
Real-time App on Rails by Action Cable
The previous blog post, WebSocket on Rails by Action Cable, focused on WebSocket as a protocol. As in the previous post, by default, Rails app responds to WebSocket connection requests without any hassle. However, other than connecting and sending ping frames, it doesn’t do anything. This blog post focuses on an application side and explains how we can create a full-duplex, bidirectional app.
Publish/Subscribe (Pub/Sub) architecture
WebSocket itself is the protocol, so it is independent from an application architecture or framework. In Rails, ActionCable::Connection::Base is an abstraction of WebSocket connection.
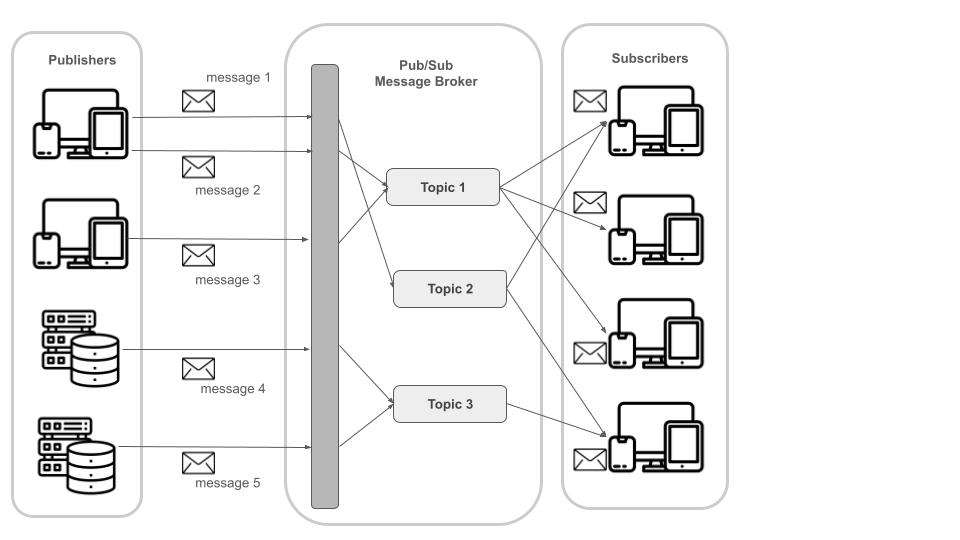
As an application framework on the full-duplex, bidirectional connection, Rails adapts Pub/Sub (Publish/Subscribe) architecture. The Pub/Sub architecture is a general event-driven, asynchronous model for a distributed system. The Pub/Sub architecture is independent from protocols, so it is not only for WebSocket. If we name the Pub/Sub frameworks, Apache Kafka, Akka, RabbitMQ, and many more are out there.
In general, the Pub/Sub framework consists of publishers, a broker with topics (or channels), and subscribers. The subscriber subscribes to a topic or topics to get updates. When the publisher send a message to a broker, the broker sends the message to the related topic. Then, the message will be distributed to subscribers who subscribed to the topic previously.
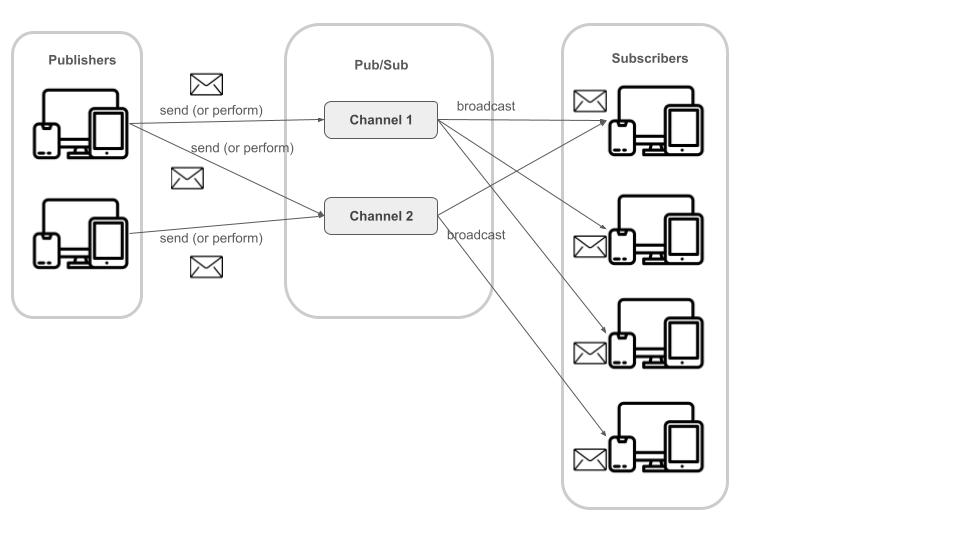
Rails provides a bit simplified version of Pub/Sub architecture. For Rails, both publishers and subscribers are a web application client. The idea of consumer is introduced as an abstraction of publishers and subscribers. Using JavaScript library, a consumer is created tied to the specific channel. The publisher sends a message through the consumer. When the publisher wants to send the message to a specific method, it performs the corresponding action with the message. Once the message arrives to the channel, the message will be broadcast to subscribers. In the end, the broadcast message is received by the subscriber through the consumer.
Chat: Simple Real-time Application
It’s time to create a Rails app. The application here is a very simple chat app. The application needs a JavaScript library which has an ability to behave reactively when the broadcast message comes in. Here, the app uses Vue.js version 3 with composition API.
Create Rails app
As always, the first step is to create a Rails app. The application doesn’t need some libraries, so it uses the rc file below to skip those.
--skip-action-mailer
--skip-action-mailbox
--skip-action-text
--skip-active-job
--skip-active-storage
-J
-T
Save above to .railsrc file, or whatever the file name you like.
$ rails new action-cable-chat --rc=./.railsrc
Create a Vue app mount point
So that the root path shows Vue.js page, create a mount point.
$ cd action-cable-chat
$ bin/rails g controller home index
Edit app/views/home/index.html.erb to create a mount point, #app.
<%= content_tag(:div, "", id:"app") %>
Additionally, update config/routes.rb.
Rails.application.routes.draw do
  root 'home#index'
  # ...
  # ...
end
Install and setup vite_rails
Since the app uses Vue.js on the frontend side, vite_rails gem should be installed and setup.
Try below:
$ bundle add vite_rails
$ bundle exec vite install
Install Vue.js
At this point, package.json and package-lock.json are created.
Since we use yarn instead of npm, remove package-lock.json and run yarn install.
$ rm package-lock.json
$ yarn install
For now, we are ready to install Vue.js. Run blow to add two packages:
$ yarn add vue @vitejs/plugin-vue
Then, edit vite.config.ts to add Vue plugin.
// vite.config.ts
import { defineConfig } from 'vite'
import RubyPlugin from 'vite-plugin-ruby'
import vue from '@vitejs/plugin-vue' // added

export default defineConfig({
    plugins: [
        RubyPlugin(),
        vue(),  // added
    ],
})
Create a starter script
When vite was installed, Profile.dev was updated as well to start two servers: one for backend, another for frontend.
To avoid typing foreman start -f Procfile.dev everytime, create a bin/dev file with the content below:
#!/usr/bin/env sh

if gem list --no-installed --exact --silent foreman; then
  echo "Installing foreman..."
  gem install foreman
fi

# Default to port 3000 if not specified
export PORT="${PORT:-3000}"

exec foreman start -f Procfile.dev "$@"
Change the file permission to executable by chmod 755 bin/dev.
Create a Pub/Sub channel
So far, all settings were completed. Now, it’s time to write code for a chat app.
We start from creating a channel for Pub/Sub. Rails provides a generator to create a channel, so type below:
$ bin/rails g channel chat speak
Above command creates app/channels/chat_channel.rb file with a minimal implementation.
Update subscribe and speak method as in below:
# app/channels/chat_channel.rb
class ChatChannel < ApplicationCable::Channel
  def subscribed
    stream_from "chat_channel"
  end

  def unsubscribed
    # Any cleanup needed when channel is unsubscribed
  end

  def speak(data)
    ActionCable.server.broadcast("chat_channel", data)
  end
end
The method, subscribed, defines the channel whose name is chat_channel.
The method, speak, broadcast message to clients who subscribed to the chat_channel.
That’s all for the server side.
Install @rails/actioncable package
Since WebSocket is a protocol, we may use any libraries for WebSocket, for example, Socket.IO.
However, it’s much better to use Rails provided package to connect to the backend seamlessly.
Run below to install @rails/actioncable package.
$ yarn add @rails/actioncable
Write frontend code
The last piece is a Vue.js app.
Create a Vue component, app/frontend/App.vue, with the content below:
<script setup>
import { ref } from 'vue';
const message = ref("");
const messages = ref([]);
import { createConsumer } from '@rails/actioncable';

const protocol = window.location.protocol === 'https:' ? 'wss' : 'ws';
const consumer = createConsumer(`${protocol}://${window.location.host}/cable`);
const channel = consumer.subscriptions.create({ channel: 'ChatChannel' }, {
  received(data) {
    messages.value.push(data['message']);
  }
});

const addNewMessage = () => {
  channel.perform('speak', { message: message.value });
}
</script>

<template>
  <div id="app">
    <h2>Action Cable Example</h2>
    <div class="info">Type something in the box below and hit enter</div>
    <form @submit.prevent="addNewMessage">
      <input
          type="text"
          placeholder="say something"
          minlength="1"
          maxlength="50"
          v-model.trim="message" />
    </form>
    <div class="messages">
      <ul class="message">
        <li v-for="message in messages"></li>
      </ul>
    </div>
  </div>
</template>
Everything of frontend is here. The above Vue component does:
- Creates a consumer using
createConsumerfunction provided by Rails’ actioncable package.
By default, WebSocket is mounted on/cable, so the URL to WebSocket is used to an argument ofcreateConsumer. - Creates a channel by subscribing to the channel,
ChatChannel.
The channel name is a channel class name on Rails side, so it is a camel case of ChatChannel. - At the same time, implements
receivedfunction to update themessagesvalue when a new message comes in. - Calls
addNewMessagefunction when something is typed in the input box and hit enter.
The function hits channel’s perform function to send the message tospeakmethod defined in ChatChannel class on the server side.
To make the Vue component work, we need a small additional work.
Edit app/frontend/entrypoints/application.js to add below:
import { createApp } from 'vue';
import App from '~/App.vue';
import '~/styles.css'

createApp(App).mount('#app');
The mount point #app was already created on the backend side.
To look better, the Vue component uses the style.css below.
* {
  box-sizing: border-box;
}

html {
  font-family: sans-serif;
}

body {
  margin: 0;
}

#app {
  margin: 3rem auto;
  border-radius: 10px;
  padding: 1rem;
  width: 90%;
  max-width: 40rem;
}

#app h2 {
  font-size: 1.5rem;
  border-bottom: 2px solid #ccc;
  color: #af463d;
  margin: 0 0 1rem 0;
}

#app .info {
  font-size: 1rem;
  color: #544f4f;
  margin: 0 0 1rem 0;
}

#app .messages {
  font-size: 1rem;
  color: #544f4f;
  margin: 1rem 0 1rem 0;
}

#app .message {
  font-size: 1rem;
  color: #4d4848;
  margin: 0 0 1rem 0;
}

#app input {
  font: inherit;
  border: 1px solid #aaa;
  background-color: #eee;
}

#app input:focus {
  outline: none;
  border-color: #754340;
  background-color: #fff;
}
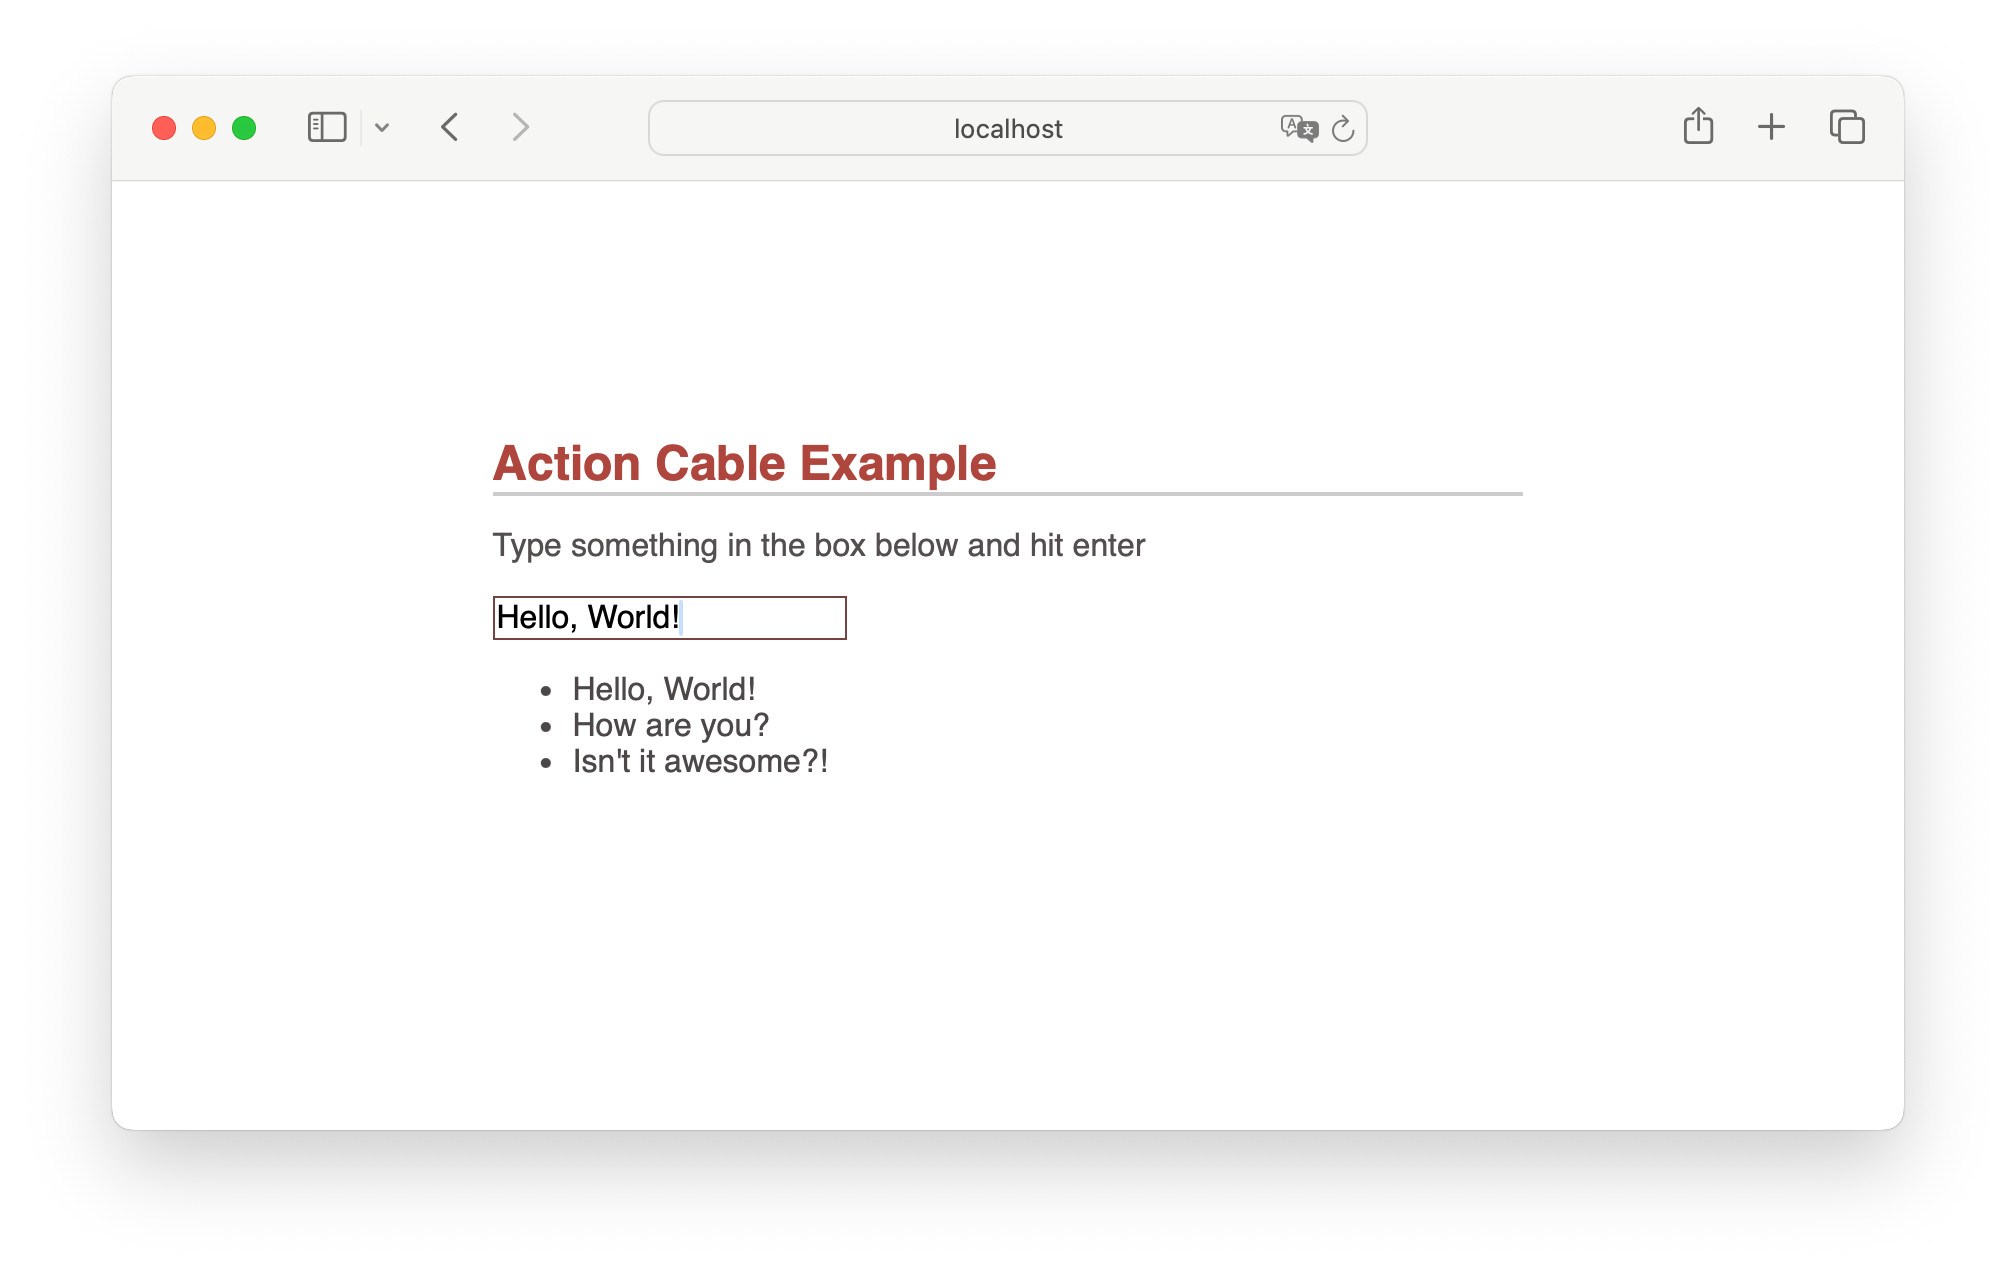
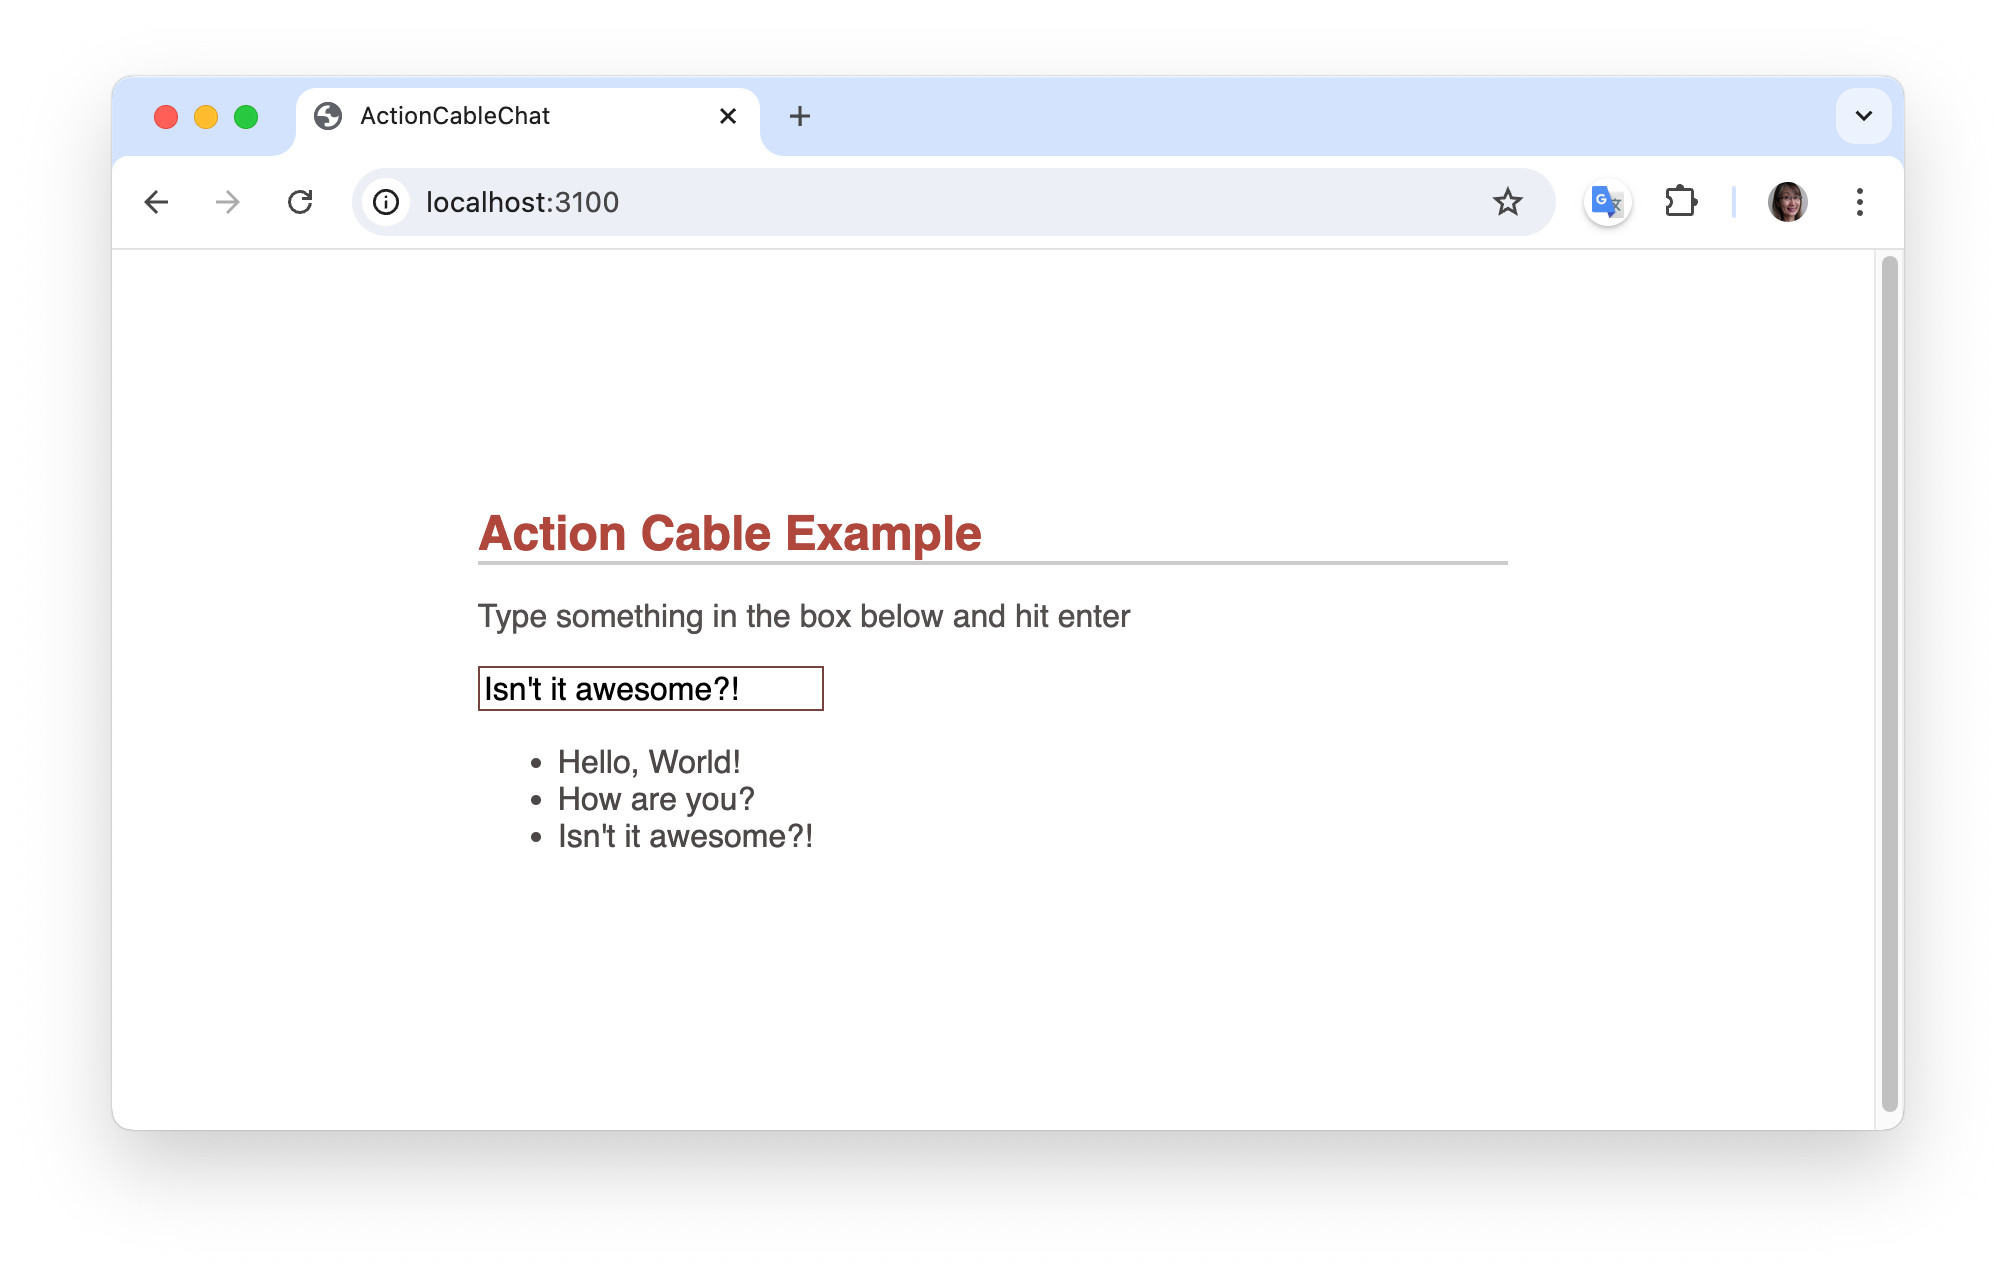
Run the app and try real-time chat
We have already created bin/dev starter command. Type it and start servers.
$ bin/dev
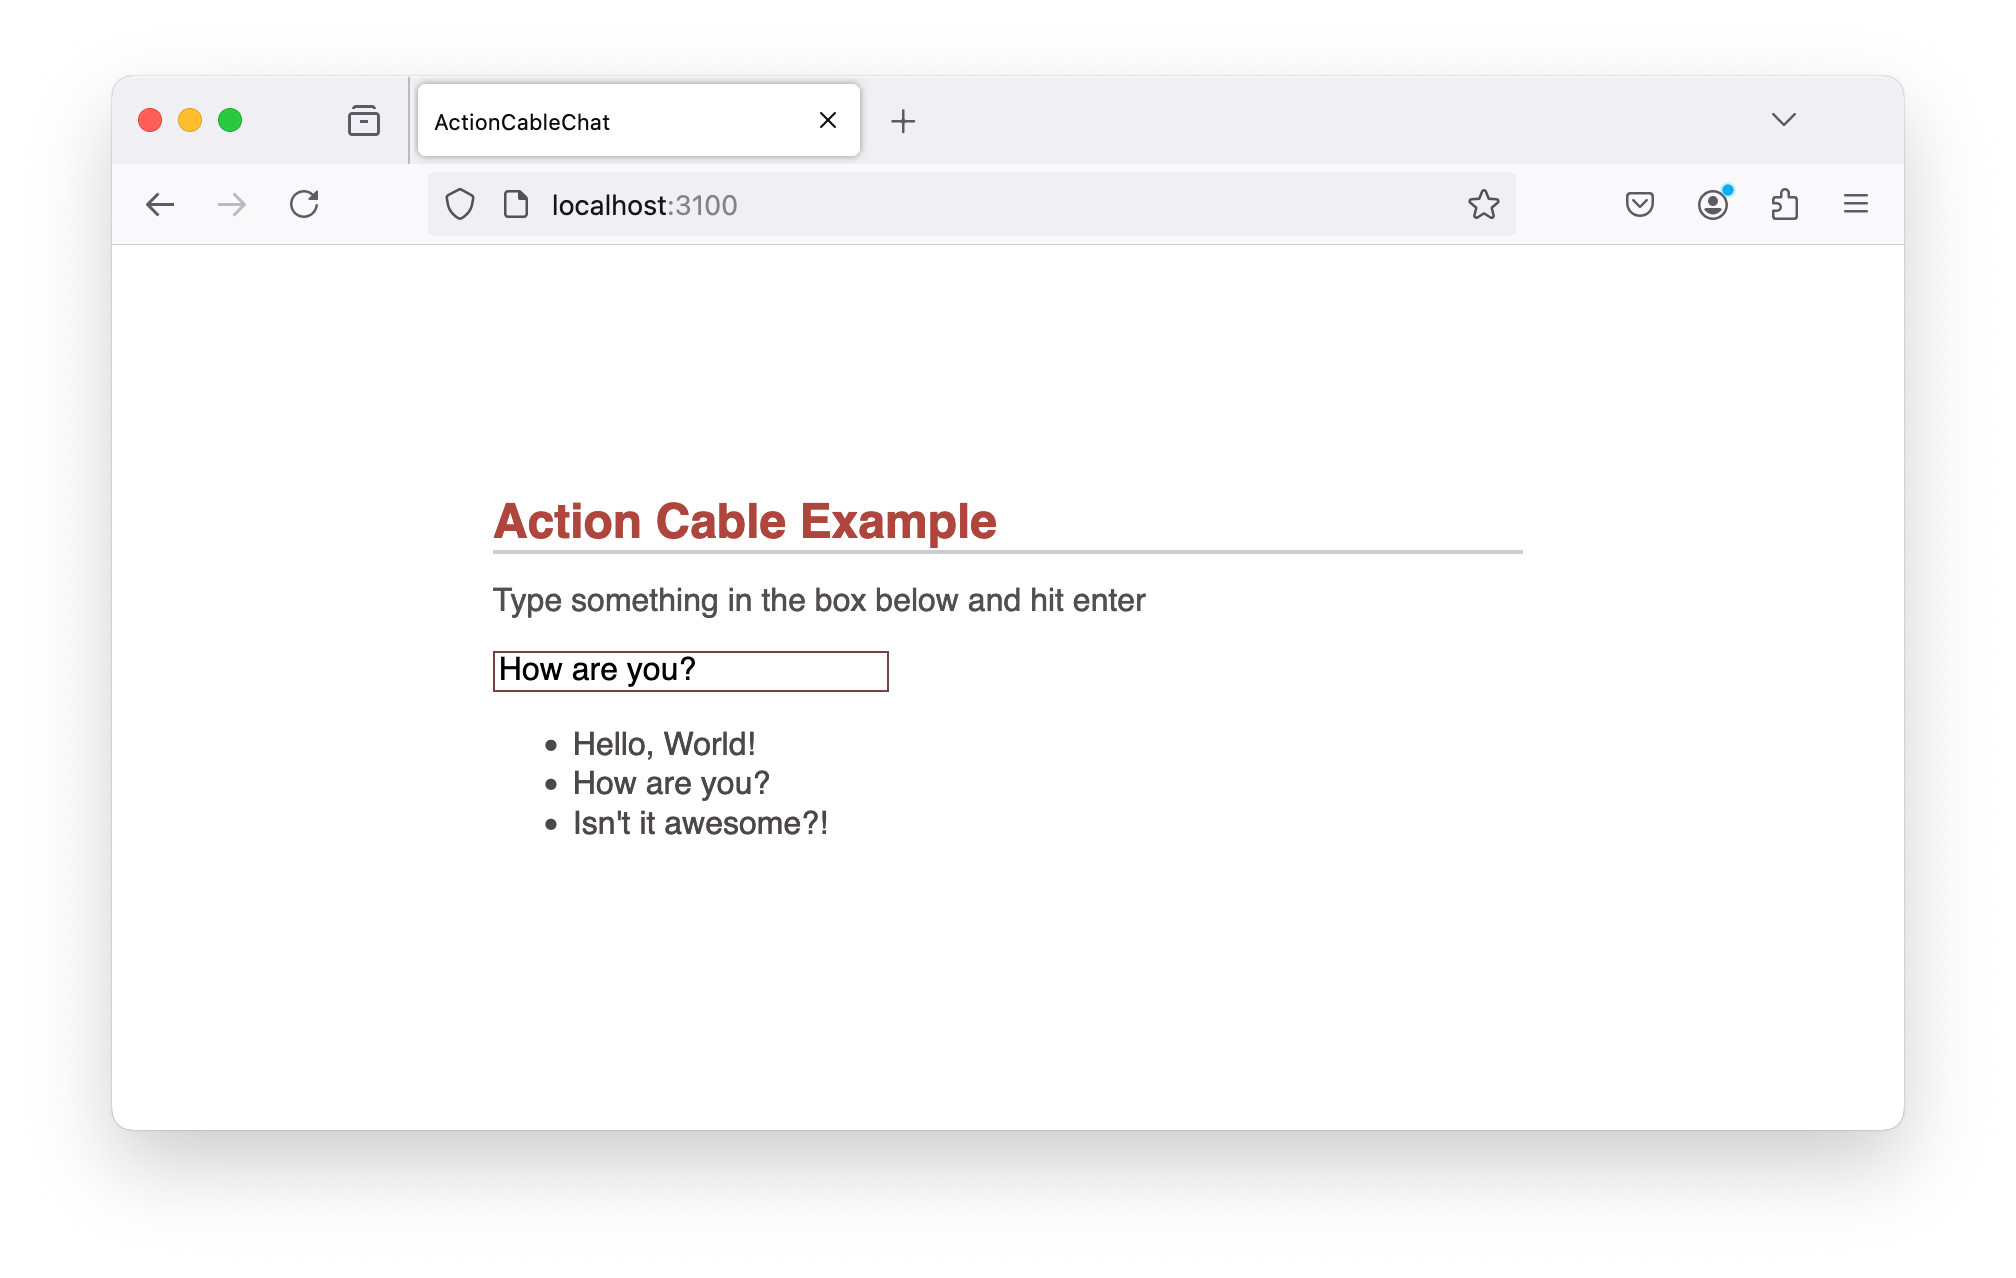
Open http://localhost:3000 on multiple different browsers or private windows.
Type something in the input box and hit enter.
The message appears on all browsers immediately.
Below are the result on Safari, FireFox and Chrome.
Conclusion
WebSocket and Action Cable are not easy ideas to understand. However, once we do, an implementation using Rails Action Cable is not difficult. We can create more interesting real-time applications by Action Cable.
Comments and Discussions
GitHub Discussions: Real-time App on Rails by Action Cable #9
References
- GitHub Repo: https://github.com/yokolet/action-cable-chat
- Publisher-Subscriber Model: https://www.baeldung.com/cs/publisher-subscriber-model
- Akka: https://akka.io/
- Apache Kafka: https://kafka.apache.org/
- Redis Pub/Sub: https://redis.io/docs/latest/develop/interact/pubsub/
- Rails Guides, Action Cable Overview: https://guides.rubyonrails.org/action_cable_overview.html
- Action Cable Hello World With Rails 7: https://blog.dennisokeeffe.com/blog/2022-02-28-action-cable-hello-world-with-rails-7
- Creating a Chat Using Rails’ Action Cable: https://www.pluralsight.com/resources/blog/guides/creating-a-chat-using-rails-action-cable
- Getting more comfortable with Action Cable: https://medium.com/craft-academy/getting-more-comfortable-with-action-cable-2b4bc758c57f
- Deconstructing Action Cable: https://stanko.io/deconstructing-action-cable-DC7F33OsjGmK