<?xml version="1.0" encoding="utf-8"?><feed xmlns="http://www.w3.org/2005/Atom" ><generator uri="https://jekyllrb.com/" version="3.10.0">Jekyll</generator><link href="/feed.xml" rel="self" type="application/atom+xml" /><link href="/" rel="alternate" type="text/html" /><updated>2025-10-01T04:24:19+00:00</updated><id>/feed.xml</id><title type="html">yokolet’s notelets</title><subtitle>This is a blog site mostly about programming.</subtitle><entry><title type="html">JRuby Extension Revisited</title><link href="/2025/08/jruby-extension-revisited.html" rel="alternate" type="text/html" title="JRuby Extension Revisited" /><published>2025-08-11T06:46:00+00:00</published><updated>2025-08-11T06:46:00+00:00</updated><id>/2025/08/jruby-extension-revisited</id><content type="html" xml:base="/2025/08/jruby-extension-revisited.html"><![CDATA[<p>Ruby provides a way to write a native extension.
Many gems use some kind of C library to create an API or application, like <a href="https://github.com/ged/ruby-pg">pg gem</a>.
When it comes to Java backed JRuby, the native extension uses a Java library.
<!--more--></p>

<p>As C backed Ruby can integrate C libraries, JRuby can integrate Java libraries seamlessly.
This is an interesting feature since Java libraries can be used as if those are written in Ruby.
The downside is that creating a JRuby extension is a bit tricky.
Java API should be wrapped by JRuby to provide as Ruby methods.
Java code should be glued to Ruby’s entrypoint code.
This blog post is my recent experience to develop a JRuby extension.</p>

<h3 id="background">Background</h3>

<p>I used to write JRuby native extensions back in early 2010s.
Now, it is late 2020s. JRuby 10 dropped older versions of Java support.
It only supports Java 21 and above.
Also, JRuby has updated its API.
I decided to revisit JRuby native extension.</p>

<h3 id="jsoup-from-ruby">Jsoup from Ruby</h3>

<p>To write JRuby extension, absolutely we need at least one Java library.
What I picked up for the JRuby extension here is <a href="https://jsoup.org/">Jsoup</a>.
It is an HTML parser for Java, and supports HTML 5.</p>

<p>The sample application is very simple and limited.
It parses an HTML string, then creates a list of node names. That’s it.
The application might be too simple; however, it would be good enough as a starting point.
All code for the JRuby extension application is in the GitHub repo: <a href="https://github.com/yokolet/red-jsoup">https://github.com/yokolet/red-jsoup</a>.</p>

<h3 id="development">Development</h3>

<p>The native extension development consists of roughly three parts:
Java code to use Java library, compile definition, Ruby code to glue the extension and Ruby.
Typically, the Java code resides under <code class="language-plaintext highlighter-rouge">ext</code> directory.
A jar archive created by compilation, and Ruby code reside under <code class="language-plaintext highlighter-rouge">lib</code> directory.
The compile definition resides in the top directory.</p>

<h4 id="rake-compiler">Rake-compiler</h4>

<p>As we know, Java code should be compiled before using that.
Instead of a common javac compiler in Java world, <a href="https://github.com/rake-compiler/rake-compiler">rake-compiler</a>
would be the most used Java extension compiler.
Since the rake-compiler runs on JRuby, we don’t need to set jruby.jar to a classpath at compilation.
The compilation definition is done by a rake task definition, which is familiar to a Ruby developer.
The example here uses rake-compiler to compile Java extension code.</p>

<p>Rakefile is below;</p>

<div class="language-ruby highlighter-rouge"><div class="highlight"><pre class="highlight"><code><span class="c1"># Rakefile</span>

<span class="nb">require</span> <span class="s1">'rake/javaextensiontask'</span>

<span class="n">jars</span> <span class="o">=</span> <span class="no">Dir</span><span class="p">.</span><span class="nf">glob</span><span class="p">(</span><span class="s2">"lib/**/*.jar"</span><span class="p">)</span>
<span class="no">Rake</span><span class="o">::</span><span class="no">JavaExtensionTask</span><span class="p">.</span><span class="nf">new</span><span class="p">(</span><span class="s1">'red-jsoup'</span><span class="p">)</span> <span class="k">do</span> <span class="o">|</span><span class="n">ext</span><span class="o">|</span>
  <span class="n">ext</span><span class="p">.</span><span class="nf">classpath</span> <span class="o">=</span> <span class="n">jars</span><span class="p">.</span><span class="nf">map</span> <span class="p">{</span><span class="o">|</span><span class="n">x</span><span class="o">|</span> <span class="no">File</span><span class="p">.</span><span class="nf">expand_path</span> <span class="n">x</span><span class="p">}.</span><span class="nf">join</span> <span class="s2">":"</span>
  <span class="n">ext</span><span class="p">.</span><span class="nf">source_version</span> <span class="o">=</span> <span class="s1">'21'</span>
  <span class="n">ext</span><span class="p">.</span><span class="nf">target_version</span> <span class="o">=</span> <span class="s1">'21'</span>
<span class="k">end</span>

<span class="n">task</span> <span class="ss">:default</span> <span class="o">=&gt;</span> <span class="p">[</span><span class="ss">:compile</span><span class="p">]</span>
</code></pre></div></div>

<p>The rake-compiler’s default native extension code directory is ext/[extension name].
Above Rakefile expects Java files to be located under <code class="language-plaintext highlighter-rouge">ext/red-jsoup</code> directory.
If you have an experience of Java development, *.java files should be located under its package structure.
However, the rake-compiler doesn’t care the package structure.
When Java files are compiled and put together in a jar file, the package directory structure is created in the jar.</p>

<p>When the Rakefile gets run by:</p>
<div class="language-bash highlighter-rouge"><div class="highlight"><pre class="highlight"><code><span class="nv">$ </span>rake
</code></pre></div></div>

<p>The jar archive, <code class="language-plaintext highlighter-rouge">red-jsoup.jar</code>, is created under lib directory.</p>

<p>As an additional info, the rak-compiler is not the only one compiler.
The <a href="https://github.com/jruby/jruby/wiki/Java-extensions-for-JRuby-using-polyglot-maven">polyglot maven</a> is another one.
When a Java library has multiple dependencies, the polyglot maven might be better since it manages such dependencies.</p>

<h4 id="java-code">Java Code</h4>

<p>The Java extension code has two types of classes.
The first is often named <code class="language-plaintext highlighter-rouge">***Service.java</code>, which works as a glue to Ruby from Java side.
Ruby’s modules, classes and methods are defined in this class.
Another type defines a core logic of API or application.
In many cases, multiple Java classes would be created to provide desired features.
Ruby methods are annotated as <code class="language-plaintext highlighter-rouge">@JRubyMethod</code>, which can take additional info.</p>

<p>The very simple application here has only two Java classes.</p>

<div class="language-java highlighter-rouge"><div class="highlight"><pre class="highlight"><code><span class="c1">// ext/red-jsoup/RedJsoupService.java</span>
<span class="kn">package</span> <span class="nn">rjsoup</span><span class="o">;</span>

<span class="kn">import</span> <span class="nn">java.io.IOException</span><span class="o">;</span>

<span class="kn">import</span> <span class="nn">org.jruby.Ruby</span><span class="o">;</span>
<span class="kn">import</span> <span class="nn">org.jruby.RubyClass</span><span class="o">;</span>
<span class="kn">import</span> <span class="nn">org.jruby.RubyModule</span><span class="o">;</span>
<span class="kn">import</span> <span class="nn">org.jruby.runtime.ObjectAllocator</span><span class="o">;</span>
<span class="kn">import</span> <span class="nn">org.jruby.runtime.builtin.IRubyObject</span><span class="o">;</span>
<span class="kn">import</span> <span class="nn">org.jruby.runtime.load.BasicLibraryService</span><span class="o">;</span>
<span class="kn">import</span> <span class="nn">org.jruby.api.Define</span><span class="o">;</span>

<span class="kd">public</span> <span class="kd">class</span> <span class="nc">RedJsoupService</span> <span class="kd">implements</span> <span class="nc">BasicLibraryService</span> <span class="o">{</span>

    <span class="nd">@Override</span>
    <span class="kd">public</span> <span class="kt">boolean</span> <span class="nf">basicLoad</span><span class="o">(</span><span class="kd">final</span> <span class="nc">Ruby</span> <span class="n">runtime</span><span class="o">)</span> <span class="kd">throws</span> <span class="nc">IOException</span> <span class="o">{</span>
        <span class="nc">RubyModule</span> <span class="n">rjs</span> <span class="o">=</span> <span class="nc">Define</span><span class="o">.</span><span class="na">defineModule</span><span class="o">(</span><span class="n">runtime</span><span class="o">.</span><span class="na">getCurrentContext</span><span class="o">(),</span> <span class="s">"RedJsoup"</span><span class="o">);</span>
        <span class="nc">RubyClass</span> <span class="n">parser</span> <span class="o">=</span> <span class="n">rjs</span><span class="o">.</span><span class="na">defineClassUnder</span><span class="o">(</span><span class="n">runtime</span><span class="o">.</span><span class="na">getCurrentContext</span><span class="o">(),</span> <span class="s">"Parser"</span><span class="o">,</span> <span class="n">runtime</span><span class="o">.</span><span class="na">getObject</span><span class="o">(),</span> <span class="no">FRACTION_ALLOCATOR</span><span class="o">);</span>
        <span class="n">parser</span><span class="o">.</span><span class="na">defineMethods</span><span class="o">(</span><span class="n">runtime</span><span class="o">.</span><span class="na">getCurrentContext</span><span class="o">(),</span> <span class="nc">Parser</span><span class="o">.</span><span class="na">class</span><span class="o">);</span>
        <span class="k">return</span> <span class="kc">true</span><span class="o">;</span>
    <span class="o">}</span>
    
    <span class="kd">private</span> <span class="kd">static</span> <span class="nc">ObjectAllocator</span> <span class="no">FRACTION_ALLOCATOR</span> <span class="o">=</span> <span class="k">new</span> <span class="nc">ObjectAllocator</span><span class="o">()</span> <span class="o">{</span>
        <span class="kd">public</span> <span class="nc">IRubyObject</span> <span class="nf">allocate</span><span class="o">(</span><span class="nc">Ruby</span> <span class="n">runtime</span><span class="o">,</span> <span class="nc">RubyClass</span> <span class="n">klazz</span><span class="o">)</span> <span class="o">{</span>
            <span class="k">return</span> <span class="k">new</span> <span class="nf">Parser</span><span class="o">(</span><span class="n">runtime</span><span class="o">,</span> <span class="n">klazz</span><span class="o">);</span>
        <span class="o">}</span>
    <span class="o">};</span>
<span class="o">}</span>
</code></pre></div></div>

<div class="language-java highlighter-rouge"><div class="highlight"><pre class="highlight"><code><span class="c1">// ext/red-jsoup/Praser.java</span>
<span class="kn">package</span> <span class="nn">rjsoup</span><span class="o">;</span>

<span class="kn">import</span> <span class="nn">java.util.List</span><span class="o">;</span>
<span class="kn">import</span> <span class="nn">org.jruby.Ruby</span><span class="o">;</span>
<span class="kn">import</span> <span class="nn">org.jruby.RubyArray</span><span class="o">;</span>
<span class="kn">import</span> <span class="nn">org.jruby.RubyClass</span><span class="o">;</span>
<span class="kn">import</span> <span class="nn">org.jruby.RubyObject</span><span class="o">;</span>
<span class="kn">import</span> <span class="nn">org.jruby.RubyString</span><span class="o">;</span>
<span class="kn">import</span> <span class="nn">org.jruby.anno.JRubyClass</span><span class="o">;</span>
<span class="kn">import</span> <span class="nn">org.jruby.anno.JRubyMethod</span><span class="o">;</span>
<span class="kn">import</span> <span class="nn">org.jruby.runtime.Arity</span><span class="o">;</span>
<span class="kn">import</span> <span class="nn">org.jruby.runtime.ThreadContext</span><span class="o">;</span>
<span class="kn">import</span> <span class="nn">org.jruby.runtime.builtin.IRubyObject</span><span class="o">;</span>
<span class="kn">import</span> <span class="nn">org.jsoup.Jsoup</span><span class="o">;</span>
<span class="kn">import</span> <span class="nn">org.jsoup.nodes.Node</span><span class="o">;</span>

<span class="nd">@JRubyClass</span><span class="o">(</span><span class="n">name</span><span class="o">=</span><span class="s">"RedJsoup::Parser"</span><span class="o">)</span>
<span class="kd">public</span> <span class="kd">class</span> <span class="nc">Parser</span> <span class="kd">extends</span> <span class="nc">RubyObject</span> <span class="o">{</span>
    <span class="kd">private</span> <span class="kd">static</span> <span class="kd">final</span> <span class="kt">long</span> <span class="n">serialVersionUID</span> <span class="o">=</span> <span class="mi">1L</span><span class="o">;</span>

    <span class="kd">public</span> <span class="nf">Parser</span><span class="o">(</span><span class="nc">Ruby</span> <span class="n">runtime</span><span class="o">,</span> <span class="nc">RubyClass</span> <span class="n">klazz</span><span class="o">)</span> <span class="o">{</span>
        <span class="kd">super</span><span class="o">(</span><span class="n">runtime</span><span class="o">,</span> <span class="n">klazz</span><span class="o">);</span>
    <span class="o">}</span>
    
    <span class="nd">@JRubyMethod</span><span class="o">(</span><span class="n">name</span> <span class="o">=</span> <span class="s">"parse"</span><span class="o">)</span>
    <span class="kd">public</span> <span class="nc">IRubyObject</span> <span class="nf">parseHtml</span><span class="o">(</span><span class="nc">ThreadContext</span> <span class="n">context</span><span class="o">,</span> <span class="nc">IRubyObject</span> <span class="n">input</span><span class="o">)</span> <span class="o">{</span>
        <span class="k">if</span> <span class="o">(</span><span class="n">input</span> <span class="k">instanceof</span> <span class="nc">RubyString</span><span class="o">)</span> <span class="o">{</span>
            <span class="nc">String</span> <span class="n">html</span> <span class="o">=</span> <span class="n">input</span><span class="o">.</span><span class="na">asJavaString</span><span class="o">();</span>
            <span class="nc">Node</span> <span class="n">node</span> <span class="o">=</span> <span class="nc">Jsoup</span><span class="o">.</span><span class="na">parse</span><span class="o">(</span><span class="n">html</span><span class="o">);</span>
            <span class="nc">RubyArray</span><span class="o">&lt;?&gt;</span> <span class="n">nodeList</span> <span class="o">=</span> <span class="nc">RubyArray</span><span class="o">.</span><span class="na">newArray</span><span class="o">(</span><span class="n">context</span><span class="o">);</span>
            <span class="n">nodeList</span> <span class="o">=</span> <span class="n">findNodeList</span><span class="o">(</span><span class="n">context</span><span class="o">,</span> <span class="n">node</span><span class="o">,</span> <span class="n">nodeList</span><span class="o">);</span>
            <span class="k">return</span> <span class="n">nodeList</span><span class="o">;</span>
        <span class="o">}</span> <span class="k">else</span> <span class="o">{</span>
            <span class="k">return</span> <span class="n">context</span><span class="o">.</span><span class="na">getRuntime</span><span class="o">().</span><span class="na">getNil</span><span class="o">();</span>
        <span class="o">}</span>
    <span class="o">}</span>

    <span class="kd">private</span> <span class="nc">RubyArray</span><span class="o">&lt;?&gt;</span> <span class="n">findNodeList</span><span class="o">(</span><span class="nc">ThreadContext</span> <span class="n">context</span><span class="o">,</span> <span class="nc">Node</span> <span class="n">node</span><span class="o">,</span> <span class="nc">RubyArray</span><span class="o">&lt;?&gt;</span> <span class="n">nodeList</span><span class="o">)</span> <span class="o">{</span>
        <span class="nc">List</span><span class="o">&lt;</span><span class="nc">Node</span><span class="o">&gt;</span> <span class="n">nodes</span> <span class="o">=</span> <span class="n">node</span><span class="o">.</span><span class="na">childNodes</span><span class="o">();</span>
        <span class="k">for</span> <span class="o">(</span><span class="nc">Node</span> <span class="n">n</span> <span class="o">:</span> <span class="n">nodes</span><span class="o">)</span> <span class="o">{</span>
            <span class="n">nodeList</span> <span class="o">=</span> <span class="n">findNodeList</span><span class="o">(</span><span class="n">context</span><span class="o">,</span> <span class="n">n</span><span class="o">,</span> <span class="n">nodeList</span><span class="o">);</span>
        <span class="o">}</span>
        <span class="n">nodeList</span><span class="o">.</span><span class="na">add</span><span class="o">(</span><span class="n">context</span><span class="o">.</span><span class="na">getRuntime</span><span class="o">().</span><span class="na">newString</span><span class="o">(</span><span class="n">node</span><span class="o">.</span><span class="na">nodeName</span><span class="o">()));</span>
        <span class="k">return</span> <span class="n">nodeList</span><span class="o">;</span>
    <span class="o">}</span>
<span class="o">}</span>
</code></pre></div></div>

<h4 id="ruby-code">Ruby Code</h4>

<p>The final piece is a Ruby code to glue Java classes from Ruby side.
This is simple. It’s main purpose is to call a <code class="language-plaintext highlighter-rouge">basicLoad</code> method defined in <code class="language-plaintext highlighter-rouge">RedJsoupService</code> class.
Typically, Java libraries are loaded in this Ruby code as well.
The example below requires <code class="language-plaintext highlighter-rouge">jsoup-1.21.1</code>, which loads <code class="language-plaintext highlighter-rouge">jsoup-1.21.1.jar</code> located under <code class="language-plaintext highlighter-rouge">lib</code> directory.</p>

<div class="language-ruby highlighter-rouge"><div class="highlight"><pre class="highlight"><code><span class="nb">require</span> <span class="s1">'jruby'</span>
<span class="nb">require_relative</span> <span class="s1">'red-jsoup.jar'</span>

<span class="nb">require</span> <span class="s1">'jsoup-1.21.1'</span>

<span class="no">Java</span><span class="o">::</span><span class="no">Rjsoup</span><span class="o">::</span><span class="no">RedJsoupService</span><span class="p">.</span><span class="nf">new</span><span class="p">.</span><span class="nf">basicLoad</span><span class="p">(</span><span class="no">JRuby</span><span class="p">.</span><span class="nf">runtime</span><span class="p">)</span>
</code></pre></div></div>

<p>That’s all about the JRuby native extension development.</p>

<h4 id="sample-code">Sample Code</h4>

<p>Let’s try this very simple JRuby extension application.
The extension here doesn’t take Ruby gem style, so the sample application should load all from <code class="language-plaintext highlighter-rouge">lib</code> directory.
Then, require Ruby’s entrypoint file, <code class="language-plaintext highlighter-rouge">red_jsoup</code>.
Please be aware the difference between <code class="language-plaintext highlighter-rouge">red-jsoup</code> and <code class="language-plaintext highlighter-rouge">red_jsoup</code> (hyphen vs underscore).</p>

<div class="language-ruby highlighter-rouge"><div class="highlight"><pre class="highlight"><code><span class="nb">require</span> <span class="s1">'java'</span>
<span class="nb">require</span> <span class="s1">'pathname'</span>

<span class="vg">$:</span> <span class="o">&lt;&lt;</span> <span class="no">Pathname</span><span class="p">.</span><span class="nf">new</span><span class="p">(</span><span class="n">__dir__</span><span class="p">).</span><span class="nf">join</span><span class="p">(</span><span class="s2">".."</span><span class="p">,</span> <span class="s2">"lib"</span><span class="p">)</span>
<span class="nb">require</span> <span class="s1">'red_jsoup'</span>

<span class="nb">p</span> <span class="o">=</span> <span class="no">RedJsoup</span><span class="o">::</span><span class="no">Parser</span><span class="p">.</span><span class="nf">new</span>
<span class="n">html</span> <span class="o">=</span> <span class="s2">"&lt;html&gt;&lt;head&gt;&lt;title&gt;First parse&lt;/title&gt;&lt;/head&gt;&lt;body&gt;&lt;p&gt;Parsed HTML into a doc.&lt;/p&gt;&lt;/body&gt;&lt;/html&gt;"</span><span class="p">;</span>

<span class="n">ret</span> <span class="o">=</span> <span class="nb">p</span><span class="p">.</span><span class="nf">parse</span><span class="p">(</span><span class="n">html</span><span class="p">)</span>
<span class="nb">puts</span><span class="p">(</span><span class="n">ret</span><span class="p">)</span>
</code></pre></div></div>

<p>Above prints:</p>
<div class="language-plaintext highlighter-rouge"><div class="highlight"><pre class="highlight"><code>#text
title
head
#text
p
body
html
#document
</code></pre></div></div>

<h3 id="conclusion">Conclusion</h3>

<p>The example code here is very simple. Despite, I struggled to glue Java and Ruby, especially to call <code class="language-plaintext highlighter-rouge">basicLoad</code> method.
There are a couple of ways to do so. However, most of existing examples or blog posts look outdated.
Eventually, I found the way to call the method like a Ruby class.
Additionally, JRuby API has been updated, so at first I got many compile warnings.
I went to JRuby API document and fixed all those.
It was a good occasion to catch up recent JRuby.</p>

<h3 id="references">References</h3>
<ul>
  <li><a href="https://blog.jcoglan.com/2012/08/02/your-first-ruby-native-extension-java/">Your first Ruby native extension: Java</a></li>
  <li><a href="https://ola-bini.blogspot.com/2006/10/jruby-tutorial-4-writing-java.html">The JRuby Tutorial #4: Writing Java extensions for JRuby</a></li>
  <li><a href="https://github.com/jruby/jruby-examples/tree/master">JRuby Examples: GitHub repo</a></li>
  <li><a href="https://github.com/jruby/jruby/wiki/C-Extension-Alternatives">C Extension Alternatives: JRuby Wiki</a></li>
  <li>Jonathan Hedley &amp; jsoup contributors. jsoup: Java HTML Parser (2009–present). Available at: <a href="https://jsoup.org">https://jsoup.org</a></li>
  <li>GitHub repository of the sample code: <a href="https://github.com/yokolet/red-jsoup">https://github.com/yokolet/red-jsoup</a></li>
</ul>]]></content><author><name></name></author><summary type="html"><![CDATA[Ruby provides a way to write a native extension. Many gems use some kind of C library to create an API or application, like pg gem. When it comes to Java backed JRuby, the native extension uses a Java library.]]></summary></entry><entry><title type="html">Website Renewal</title><link href="/2025/05/website-renewal.html" rel="alternate" type="text/html" title="Website Renewal" /><published>2025-05-18T06:48:00+00:00</published><updated>2025-05-18T06:48:00+00:00</updated><id>/2025/05/website-renewal</id><content type="html" xml:base="/2025/05/website-renewal.html"><![CDATA[<p>Recently, I re-created this blog site, yokolet’s notelets, from scratch.
Still, it is made by <a href="https://jekyllrb.com/">Jekyll</a> like it was, but now, CSS styles are defined by Tailwind CSS.
This blog post is about what I did to build the website.
<!--more--></p>

<h3 id="motivation">Motivation</h3>

<p>Previously, this blog site used the existing theme called
<a href="https://github.com/chrisrhymes/bulma-clean-theme">bulma clean theme</a> since 2022.
It was a simple, easy-to-customize, nice theme. I liked that.
However, there were some responsiveness and minor issues.
After the website was created by the bulma clean theme, I studied Tailwind CSS a lot.
I’ve already built portfolio apps using Tailwind. For now, Tailwind became my best CSS framework.
That’s why I decided to re-create my blog site.</p>

<h3 id="how-to-integrate-tailwind-css">How to Integrate Tailwind CSS</h3>

<p>The first challenge I encountered was how to integrate Tailwind CSS to Jekyll.
Since the site will be pushed to GitHub Pages, how to deploy should be considered as well.
For the deployment, I wanted to avoid building a static site locally to push that.
Ideally, pushing to the repository should trigger CI/CD pipeline.
To find a suitable solution, I googled a lot and tested some for a while.
My effort led me to <a href="https://github.com/flavorjones/tailwindcss-ruby">tailwindcss-ruby</a> and
<a href="https://github.com/vormwald/jekyll-tailwindcss">jekyll-tailwindcss</a> gems.</p>

<p>The <code class="language-plaintext highlighter-rouge">jekyll-tailwindcss</code> gem is a Jekyll plugin which uses <code class="language-plaintext highlighter-rouge">tailwnidcss-ruby</code> gem underneath.
With these two gems, I could build the site completely in Ruby ecosystem – no <code class="language-plaintext highlighter-rouge">package.json</code> at all.
That made the CI/CD setting much easier.
Actually, only a couple of clicks on the GitHub repo created an enough GitHub Actions configuration.</p>

<p>Following the explanation of gem site, <a href="https://github.com/vormwald/jekyll-tailwindcss">https://github.com/vormwald/jekyll-tailwindcss</a>,
I installed and set up the gem.
That was just three steps: add the gem to <code class="language-plaintext highlighter-rouge">Gemfile</code>, create <code class="language-plaintext highlighter-rouge">_tailwind.css</code> and <code class="language-plaintext highlighter-rouge">assets/css/styles.tailwindcss</code> files.
That’s all. Tailwind CSS started working.
An example Jekyll site by <code class="language-plaintext highlighter-rouge">jekyll-tailwindcss</code> is out there, which guided me well to develop the site.</p>

<h3 id="tailwind-css-gotcha">Tailwind CSS Gotcha</h3>

<p>The <code class="language-plaintext highlighter-rouge">tailwnidcss-ruby</code> gem sets Tailwind CSS version to v4. I have used v3, so there were confusions when I started.
For example, I wondered in what directory, <code class="language-plaintext highlighter-rouge">tailwind.config.js</code> should reside.
After going over the Tailwind CSS <a href="https://tailwindcss.com/docs/upgrade-guide">Upgrade guide</a>,
I figured out that I didn’t need the JavaScript config file anymore.
Others were minor confusions, so all were solved by reading the Upgrade guide.</p>

<p>Another topic related to Tailwind CSS is
<a href="https://github.com/tailwindlabs/tailwindcss-typography">Tailwind CSS Typography plugin</a>.
The plugin provides styles to uncontrollable block of source such as Markdown text.
For example, Tailwind CSS doesn’t give any style to h1 headings, paragraphs or lists.
The typography plugin covers such area. So, we don’t need to write all HTML styles by ourselves.
It is a very handy tool for a blog site where posts are normally written in Markdown.
To use the plugin, just add <code class="language-plaintext highlighter-rouge">prose</code> to the class list.</p>

<p>The typography plugin’s styling is great, but even though, there’s an occasion we want to customize the style.
If it is a simple one, such as a link color, we can add <code class="language-plaintext highlighter-rouge">prose-a:text-blue-600</code> to the class list.
When it grows more styles, those can be added to <code class="language-plaintext highlighter-rouge">_tailwind.css</code> as in below:</p>

<div class="language-css highlighter-rouge"><div class="highlight"><pre class="highlight"><code><span class="k">@utility</span> <span class="n">prose</span> <span class="p">{</span>
  <span class="o">&amp;</span> <span class="nt">h1</span> <span class="p">{</span>
    <span class="err">@apply</span> <span class="err">text-xl</span> <span class="py">lg</span><span class="p">:</span><span class="n">text-2xl</span> <span class="n">my-</span><span class="p">[</span><span class="m">1.5rem</span><span class="p">]</span> <span class="n">font-semibold</span>
  <span class="p">}</span>
<span class="p">}</span>
</code></pre></div></div>

<h3 id="github-actions">GitHub Actions</h3>

<p>If it is a simple Jekyll site with vanilla CSS and/or only whitelisted plugins,
just pushing site code to the repository will build and deploy it.
In this Jekyll site, Tailwind CSS is added, which means the site needs GitHub Actions to build/deploy.
As mentioned above, the process was fairly easy since all are in Ruby ecosystem.</p>

<p>Howto is explained at the Jekyll website,
<a href="https://jekyllrb.com/docs/continuous-integration/github-actions/#setting-up-the-action">https://jekyllrb.com/docs/continuous-integration/github-actions/#setting-up-the-action</a>.
Following a few steps there, the config file will be created in <code class="language-plaintext highlighter-rouge">.github/workflows/jekyll.yml</code>.
What I changed was Ruby version only, nothing else. All done.
When the updates were pushed to the main repository, CI/CD pipeline started running.
Once the build and deploy signals turned green, the website was ready.</p>

<h3 id="conclusion">Conclusion</h3>

<p>One of the purpose to renew this site was to improve responsiveness.
Tailwind CSS gives us pretty handy ways to achieve that.
With such technology, the renewed site works even in a Mobile size window.
An entire design was created from scratch, so changing styles of specific area became controllable.
In that sense, the renewal was meaningful.
On the other hand, defining styles in every single part was a time-consuming task.
If an existing theme satisfies the requirements, it would be good to use it.</p>

<p>Lastly, it was an awesome experience to learn more about Tailwind CSS. 
The renewal by Tailwind was relatively easier than I expected.
I enjoyed working on it.</p>]]></content><author><name></name></author><summary type="html"><![CDATA[Recently, I re-created this blog site, yokolet’s notelets, from scratch. Still, it is made by Jekyll like it was, but now, CSS styles are defined by Tailwind CSS. This blog post is about what I did to build the website.]]></summary></entry><entry><title type="html">Ruby on Rails Low Level Cache Programming</title><link href="/2025/03/rails-cache-programming.html" rel="alternate" type="text/html" title="Ruby on Rails Low Level Cache Programming" /><published>2025-03-05T13:57:00+00:00</published><updated>2025-03-05T13:57:00+00:00</updated><id>/2025/03/rails-cache-programming</id><content type="html" xml:base="/2025/03/rails-cache-programming.html"><![CDATA[<p>Ruby on Rails is famous for offering really various features which are helpful to create a web application.
Among those, little known API might be the low level caching API.
<!--more-->
Basically, people don’t code to manipulate cached values. When the caching is on, Rails caches
view fragments, database query result or some values automatically. As you know the caching is used to
improve performance in general.</p>

<p>However, we can use Rails cache like a key-value store.
The API allows us to read/write values tied to keys, which is called a low level caching.</p>

<p>This blog post focuses on such Rails low level cache programming.</p>

<h3 id="configuration">Configuration</h3>

<p>Rails supports multiple types of cache stores. The type should be specified by <code class="language-plaintext highlighter-rouge">config_cache_store</code> in
<code class="language-plaintext highlighter-rouge">config/environments/[development|test|production].rb</code> files.</p>

<h4 id="types-of-stores">types of stores</h4>
<ul>
  <li>Memory Store
    <ul>
      <li>example: <code class="language-plaintext highlighter-rouge">config.cache_store = :memory_store, { size: 64.megabytes }</code></li>
      <li>In-memory data store which can be used within a single process.</li>
      <li>Popular type for a development environment.</li>
    </ul>
  </li>
  <li>File Store
    <ul>
      <li>example: <code class="language-plaintext highlighter-rouge">config.cache_store = :file_store, "/path/to/cache/directory"</code></li>
      <li>File system data store which can be shared among multiple processes.</li>
    </ul>
  </li>
  <li>MemCache Store
    <ul>
      <li>example: <code class="language-plaintext highlighter-rouge">config.cache_store = :mem_cache_store, "cache-1.example.com", "cache-2.example.com"</code></li>
      <li>Data store by memcached server (<a href="https://memcached.org/">https://memcached.org/</a>).</li>
      <li>Popular type for a production environment.</li>
    </ul>
  </li>
  <li>Redis Store
    <ul>
      <li>example: <code class="language-plaintext highlighter-rouge">config.cache_store = :redis_cache_store, { url: ENV["REDIS_URL"] }</code></li>
      <li>Data store by Redis (<a href="https://redis.io/">https://redis.io/</a>).</li>
    </ul>
  </li>
  <li>Solid Cache Store
    <ul>
      <li>example: see production section of <code class="language-plaintext highlighter-rouge">config/database.yml</code></li>
      <li>Data store by RDBMS which is the same as Rails database.</li>
      <li>Introduced in Rails 8.</li>
    </ul>
  </li>
  <li>Null Store
    <ul>
      <li>example: <code class="language-plaintext highlighter-rouge">config.cache_store = :null_store</code></li>
      <li>Data store whose scope is each web request.</li>
    </ul>
  </li>
</ul>

<h4 id="difference-between-rails-7-and-rails-8">Difference between Rails 7 and Rails 8</h4>

<p>The production/test environment configurations stay the same on both Rails 7 and 8.
However, the development configuration has changed.
Let’s look at the differences. The first one is Rails 7, and the second is Rail 8.</p>

<div class="language-ruby highlighter-rouge"><div class="highlight"><pre class="highlight"><code><span class="c1"># Rails 7 config/environments/development.rb</span>

<span class="c1"># Enable/disable caching. By default caching is disabled.</span>
<span class="c1"># Run rails dev:cache to toggle caching.</span>
<span class="k">if</span> <span class="no">Rails</span><span class="p">.</span><span class="nf">root</span><span class="p">.</span><span class="nf">join</span><span class="p">(</span><span class="s2">"tmp/caching-dev.txt"</span><span class="p">).</span><span class="nf">exist?</span>
  <span class="n">config</span><span class="p">.</span><span class="nf">cache_store</span> <span class="o">=</span> <span class="ss">:memory_store</span>
  <span class="n">config</span><span class="p">.</span><span class="nf">public_file_server</span><span class="p">.</span><span class="nf">headers</span> <span class="o">=</span> <span class="p">{</span>
    <span class="s2">"Cache-Control"</span> <span class="o">=&gt;</span> <span class="s2">"public, max-age=</span><span class="si">#{</span><span class="mi">2</span><span class="p">.</span><span class="nf">days</span><span class="p">.</span><span class="nf">to_i</span><span class="si">}</span><span class="s2">"</span>
  <span class="p">}</span>
<span class="k">else</span>
  <span class="n">config</span><span class="p">.</span><span class="nf">action_controller</span><span class="p">.</span><span class="nf">perform_caching</span> <span class="o">=</span> <span class="kp">false</span>

  <span class="n">config</span><span class="p">.</span><span class="nf">cache_store</span> <span class="o">=</span> <span class="ss">:null_store</span>
<span class="k">end</span>
</code></pre></div></div>

<div class="language-ruby highlighter-rouge"><div class="highlight"><pre class="highlight"><code><span class="c1"># Rails 8 config/environments/development.rb</span>

<span class="c1"># Enable/disable Action Controller caching. By default Action Controller caching is disabled.</span>
<span class="c1"># Run rails dev:cache to toggle Action Controller caching.</span>
<span class="k">if</span> <span class="no">Rails</span><span class="p">.</span><span class="nf">root</span><span class="p">.</span><span class="nf">join</span><span class="p">(</span><span class="s2">"tmp/caching-dev.txt"</span><span class="p">).</span><span class="nf">exist?</span>
  <span class="n">config</span><span class="p">.</span><span class="nf">action_controller</span><span class="p">.</span><span class="nf">perform_caching</span> <span class="o">=</span> <span class="kp">true</span>
  <span class="n">config</span><span class="p">.</span><span class="nf">action_controller</span><span class="p">.</span><span class="nf">enable_fragment_cache_logging</span> <span class="o">=</span> <span class="kp">true</span>
  <span class="n">config</span><span class="p">.</span><span class="nf">public_file_server</span><span class="p">.</span><span class="nf">headers</span> <span class="o">=</span> <span class="p">{</span> <span class="s2">"cache-control"</span> <span class="o">=&gt;</span> <span class="s2">"public, max-age=</span><span class="si">#{</span><span class="mi">2</span><span class="p">.</span><span class="nf">days</span><span class="p">.</span><span class="nf">to_i</span><span class="si">}</span><span class="s2">"</span> <span class="p">}</span>
<span class="k">else</span>
  <span class="n">config</span><span class="p">.</span><span class="nf">action_controller</span><span class="p">.</span><span class="nf">perform_caching</span> <span class="o">=</span> <span class="kp">false</span>
<span class="k">end</span>

<span class="c1"># Change to :null_store to avoid any caching.</span>
<span class="n">config</span><span class="p">.</span><span class="nf">cache_store</span> <span class="o">=</span> <span class="ss">:memory_store</span>
</code></pre></div></div>

<p>On Rails 7, we should hit the command, <code class="language-plaintext highlighter-rouge">bin/rails dev:cache</code>, to use the cache.
The command creates an empty file, <code class="language-plaintext highlighter-rouge">tmp/caching-dev.txt</code>, so that <code class="language-plaintext highlighter-rouge">config.cache_store = :memory_store</code> works.
However, on Rails 8, <code class="language-plaintext highlighter-rouge">config.cache_store = :memory_store</code> is located on the outside of if-block.
We don’t need to use the command, <code class="language-plaintext highlighter-rouge">bin/rails dev:cache</code> anymore, if we don’t need anything in the block.</p>

<p>While using the low-level caching API, setting the cache store is enough.
That being said, the caching API is available out of the box on Rail 8.</p>

<h3 id="cache-api">Cache API</h3>

<h4 id="keys-and-values">Keys and Values</h4>

<p>Rails cache is a key-value store. A key is, internally, a string always.
However, if a Ruby object can be converted to a string, such object can be a key, for example, a symbol or Array.
API document says, if the object reacts to <code class="language-plaintext highlighter-rouge">to_param</code> method and returns a value,
the object can be a key. Also, if the object implements <code class="language-plaintext highlighter-rouge">cache_key</code> method, the object can be a key.</p>

<p>The key-value store’s values are any Ruby object if the object is serializable and deserializable.
For example, a string, Array, or Hash can be a value, but Proc object is not.
If it really needs, we can define own serializer and set to the Rails cache.</p>

<h4 id="basic-methods">Basic Methods</h4>

<p>Supported methods on all types of stores are <code class="language-plaintext highlighter-rouge">fetch</code>, <code class="language-plaintext highlighter-rouge">write</code>, <code class="language-plaintext highlighter-rouge">read</code>, <code class="language-plaintext highlighter-rouge">exist?</code> and <code class="language-plaintext highlighter-rouge">delete</code>.
The cache API has more methods such as <code class="language-plaintext highlighter-rouge">increment</code> or <code class="language-plaintext highlighter-rouge">cleanup</code>, but depending on the store types,
some methods may not be supported.</p>

<h5 id="fetch">fetch</h5>
<p>The <code class="language-plaintext highlighter-rouge">fetch</code> would be the most frequently used method. It covers both read and write.
The fetch method considers a cache miss, so it takes a block to return a value for the cache miss.
When the value from the block is returned, the value is saved as well.
However, the method doesn’t simply update the value. To make the fetch method to update the value
even though it hits the cached value, the method takes <code class="language-plaintext highlighter-rouge">force</code> option.</p>

<div class="language-bash highlighter-rouge"><div class="highlight"><pre class="highlight"><code><span class="nv">$ </span>bin/rails c
example<span class="o">(</span>dev<span class="o">)&gt;</span> Rails.cache
<span class="o">=&gt;</span> <span class="c">#&lt;ActiveSupport::Cache::MemoryStore entries=0, size=0, options={compress: false, compress_threshold: 1024}&gt;</span>
example<span class="o">(</span>dev<span class="o">)&gt;</span> Rails.cache.fetch<span class="o">(</span>:my_value<span class="o">)</span>
<span class="o">=&gt;</span> nil
example<span class="o">(</span>dev<span class="o">)&gt;</span> Rails.cache.fetch<span class="o">(</span>:my_value<span class="o">)</span> <span class="o">{</span> <span class="s2">"Ruby"</span> <span class="o">}</span>
<span class="o">=&gt;</span> <span class="s2">"Ruby"</span>
example<span class="o">(</span>dev<span class="o">)&gt;</span> Rails.cache.fetch<span class="o">(</span>:my_value<span class="o">)</span>
<span class="o">=&gt;</span> <span class="s2">"Ruby"</span>
example<span class="o">(</span>dev<span class="o">)&gt;</span> Rails.cache.fetch<span class="o">(</span>:my_value<span class="o">)</span> <span class="o">{</span> <span class="s2">"JavaScript"</span> <span class="o">}</span>
<span class="o">=&gt;</span> <span class="s2">"Ruby"</span>
example<span class="o">(</span>dev<span class="o">)&gt;</span> Rails.cache.fetch<span class="o">(</span>:my_value, force: <span class="nb">true</span><span class="o">)</span> <span class="o">{</span> <span class="s2">"JavaScript"</span> <span class="o">}</span>
<span class="o">=&gt;</span> <span class="s2">"JavaScript"</span>
example<span class="o">(</span>dev<span class="o">)&gt;</span> Rails.cache.fetch<span class="o">(</span>:my_value<span class="o">)</span>
<span class="o">=&gt;</span> <span class="s2">"JavaScript"</span>
</code></pre></div></div>

<p>The fetch method takes an expiry option to remove a value from cache automatically.</p>

<div class="language-bash highlighter-rouge"><div class="highlight"><pre class="highlight"><code>example<span class="o">(</span>dev<span class="o">)&gt;</span> Rails.cache.fetch<span class="o">(</span>:my_value, force: <span class="nb">true</span>, expires_in: 5.seconds<span class="o">)</span> <span class="o">{</span> <span class="s2">"Bash"</span> <span class="o">}</span>
<span class="o">=&gt;</span> <span class="s2">"Bash"</span>
example<span class="o">(</span>dev<span class="o">)&gt;</span> Rails.cache.fetch<span class="o">(</span>:my_value<span class="o">)</span>
<span class="o">=&gt;</span> <span class="s2">"Bash"</span>
<span class="c"># after 5 seconds</span>
example<span class="o">(</span>dev<span class="o">)&gt;</span> Rails.cache.fetch<span class="o">(</span>:my_value<span class="o">)</span>
<span class="o">=&gt;</span> nil
</code></pre></div></div>

<p>Aside of <code class="language-plaintext highlighter-rouge">expires_in</code>, <code class="language-plaintext highlighter-rouge">expires_at</code> is also available.
This is a handy feature when we want to save the value just temporarily.</p>

<h5 id="write">write</h5>

<p>The <code class="language-plaintext highlighter-rouge">write</code> method works the same as <code class="language-plaintext highlighter-rouge">Rails.cache.fetch(:my_value, force: true) { "JavaScript" }</code>.</p>

<div class="language-bash highlighter-rouge"><div class="highlight"><pre class="highlight"><code>example<span class="o">(</span>dev<span class="o">)&gt;</span> Rails.cache.write<span class="o">(</span>:your_value, <span class="s2">"YAML"</span><span class="o">)</span>
<span class="o">=&gt;</span> <span class="nb">true
</span>example<span class="o">(</span>dev<span class="o">)&gt;</span> Rails.cache.fetch<span class="o">(</span>:your_value<span class="o">)</span>
<span class="o">=&gt;</span> <span class="s2">"YAML"</span>
</code></pre></div></div>

<p>The method takes <code class="language-plaintext highlighter-rouge">expires_in</code>, <code class="language-plaintext highlighter-rouge">expires_at</code> options.</p>

<h5 id="read">read</h5>

<p>The <code class="language-plaintext highlighter-rouge">read</code> method works the same as <code class="language-plaintext highlighter-rouge">fetch</code> without block. The method just looks up a value by key.</p>

<div class="language-bash highlighter-rouge"><div class="highlight"><pre class="highlight"><code>example<span class="o">(</span>dev<span class="o">)&gt;</span> Rails.cache.write<span class="o">(</span>:her_value, <span class="s2">"SQL"</span><span class="o">)</span>
<span class="o">=&gt;</span> <span class="nb">true
</span>example<span class="o">(</span>dev<span class="o">)&gt;</span> Rails.cache.read<span class="o">(</span>:her_value<span class="o">)</span>
<span class="o">=&gt;</span> <span class="s2">"SQL"</span>
</code></pre></div></div>

<h5 id="exist">exist?</h5>

<p>The <code class="language-plaintext highlighter-rouge">exist?</code> method is useful to find that the value is nil or key doesn’t exist.
Rails cache allows to save nil as a value.
When the fetch or read method returns nil, we don’t know it is a value or not.</p>

<div class="language-bash highlighter-rouge"><div class="highlight"><pre class="highlight"><code>example<span class="o">(</span>dev<span class="o">)&gt;</span> Rails.cache.fetch<span class="o">(</span>:his_value, force: <span class="nb">true</span>, expires_in: 10.seconds<span class="o">)</span> <span class="o">{</span> nil <span class="o">}</span>
<span class="o">=&gt;</span> nil
example<span class="o">(</span>dev<span class="o">)&gt;</span> Rails.cache.read<span class="o">(</span>:his_value<span class="o">)</span>
<span class="o">=&gt;</span> nil
example<span class="o">(</span>dev<span class="o">)&gt;</span> Rails.cache.exist?<span class="o">(</span>:his_value<span class="o">)</span>
<span class="o">=&gt;</span> <span class="nb">true</span>
<span class="c"># after 10 seconds</span>
example<span class="o">(</span>dev<span class="o">)&gt;</span> Rails.cache.exist?<span class="o">(</span>:his_value<span class="o">)</span>
<span class="o">=&gt;</span> <span class="nb">false</span>
</code></pre></div></div>

<h5 id="delete">delete</h5>

<p>The <code class="language-plaintext highlighter-rouge">delete</code> method deletes a key-value pair from the cache.</p>

<div class="language-bash highlighter-rouge"><div class="highlight"><pre class="highlight"><code>example<span class="o">(</span>dev<span class="o">)&gt;</span> Rails.cache.write<span class="o">(</span>:their_value, <span class="s2">"JSON"</span><span class="o">)</span>
<span class="o">=&gt;</span> <span class="nb">true
</span>example<span class="o">(</span>dev<span class="o">)&gt;</span> Rails.cache.read<span class="o">(</span>:their_value<span class="o">)</span>
<span class="o">=&gt;</span> <span class="s2">"JSON"</span>
example<span class="o">(</span>dev<span class="o">)&gt;</span> Rails.cache.delete<span class="o">(</span>:their_value<span class="o">)</span>
<span class="o">=&gt;</span> <span class="nb">true
</span>example<span class="o">(</span>dev<span class="o">)&gt;</span> Rails.cache.read<span class="o">(</span>:their_value<span class="o">)</span>
<span class="o">=&gt;</span> nil
example<span class="o">(</span>dev<span class="o">)&gt;</span> Rails.cache.exist?<span class="o">(</span>:their_value<span class="o">)</span>
<span class="o">=&gt;</span> <span class="nb">false</span>
</code></pre></div></div>

<h3 id="low-level-cache-programming-for-what">Low Level Cache Programming for What</h3>

<p>So far, we have looked at the low level cache API. Well, the question would be, “what is it for?”
To save and read values, we can use database or ActiveRecord. The value saved in the database can be used
in almost everywhere. So, why or when we should use the low level cache programming?</p>

<p>I have used the low level cache API in a couple of applications.
It is good to save a short-lived small data.
The Rails cache is a simple key-value store. To save the value, we don’t create a migration.
Without explicit deleting, the values expire and disappear.</p>

<p>The sessions might be another option for a key-value store.
However, the sessions are not a mighty store.
For example, WebSocket or ActionCable is unable to use the sessions.
Another example would be a controller method used as a callback function of OAuth, payment gateway or such.
The sessions are established between Rails server and a web browser.
When the controller method gets hit by somewhere else, the sessions don’t work nicely.</p>

<p>Typical Rails applications can do without the low level cache programming.
However, it is very useful in some cases.</p>

<h3 id="references">References</h3>
<ul>
  <li><a href="https://www.honeybadger.io/blog/rails-low-level-caching/">Mastering Low Level Caching in Rails</a></li>
  <li><a href="https://guides.rubyonrails.org/caching_with_rails.html#low-level-caching-using-rails-cache">Ruby on Rails Guides: Caching: 2.4 Low-Level Caching using Rails.cache</a></li>
  <li><a href="https://api.rubyonrails.org/classes/ActiveSupport/Cache/Store.html">Ruby on Rail API: Active Support Cache Store</a></li>
</ul>]]></content><author><name></name></author><summary type="html"><![CDATA[Ruby on Rails is famous for offering really various features which are helpful to create a web application. Among those, little known API might be the low level caching API.]]></summary></entry><entry><title type="html">Application Development by Rails Action Cable</title><link href="/2024/11/application-development-by-rails-action-cable.html" rel="alternate" type="text/html" title="Application Development by Rails Action Cable" /><published>2024-11-11T13:32:00+00:00</published><updated>2024-11-11T13:32:00+00:00</updated><id>/2024/11/application-development-by-rails-action-cable</id><content type="html" xml:base="/2024/11/application-development-by-rails-action-cable.html"><![CDATA[<p>The previous two blog posts introduced WebSocket and how to implement a WebSocket application on Ruby on Rails.
This blog post digs deeper. It is a memo on creating a more realistic application by Action Cable.
<!--more--></p>

<h3 id="real-time-application">Real-time application</h3>

<p>As a real-time application, this post picks up a classic Tic-Tac-Toe game.
The game here adopts a multi-player and multi-board design.
Multiple players can join the game.
A single player can create or join multiple game boards.
The player can play multiple games in parallel.</p>

<p>When a player registers a player name, the name appears on all players’ panels in real-time.
When a new board is created, its name appears on all players’ panels in real-time as well.
Of course, the game progress is updated in real-time.</p>

<p>When a player clicks an unregister button or closes a window/tab,
the player’s name disappears from all players’ panels.</p>

<h4 id="code-and-game-details">Code and Game Details</h4>

<ul>
  <li>GitLab: <a href="https://gitlab.com/yokolet/action-cable-tictactoe">https://gitlab.com/yokolet/action-cable-tictactoe</a></li>
  <li>GitHub: <a href="https://github.com/yokolet/action-cable-tictactoe">https://github.com/yokolet/action-cable-tictactoe</a></li>
</ul>

<h3 id="rails-side">Rails Side</h3>

<p>On the Rails side, a connection and channels are main components for the application.
It depends on the application whether the connection should be implemented or used as is.
On the other hand, a channel need to be implemented to provide a specific service.</p>

<h4 id="connection">Connection</h4>

<p>As the <a href="https://guides.rubyonrails.org/v8.0/action_cable_overview.html#server-side-components-connections">Rails Guide</a>
explains, the main purpose of the connection (ApplicationCable::Connection) is an authentication and authorization.
However, ApplicationCable::Connection itself doesn’t authenticate a user.
Its usage is to verify the already authenticated/authorized user so that channels can identify an individual user.</p>

<p>In the Tic-Tac-Toe application, an encrypted cookie is created when the application is requested for the first time.</p>
<ul>
  <li><a href="https://gitlab.com/yokolet/action-cable-tictactoe/-/blob/main/app/controllers/home_controller.rb?ref_type=heads">app/controllers/home_controller.rb</a></li>
</ul>

<p>The encrypted cookie is verified in the WebSocket connection as a player id.
After successful verification, the user is identified by <code class="language-plaintext highlighter-rouge">current_player_id</code>.</p>
<ul>
  <li><a href="https://gitlab.com/yokolet/action-cable-tictactoe/-/blob/main/app/channels/application_cable/connection.rb?ref_type=heads">app/channels/application_cable/connection.rb</a></li>
</ul>

<p>The key word, <code class="language-plaintext highlighter-rouge">identified_by</code> is provided by Rails, so we can use it without doing anything extra.</p>

<h4 id="channel">Channel</h4>

<p>Application’s main logic is implemented in a channel. The API document shows what methods are defined in
<a href="https://api.rubyonrails.org/classes/ActionCable/Connection/Base.html">ActionCable::Channel::Base</a> class.
Among those, the application mostly implement a subscribe, unsubscribe, send or other methods to perform actions.</p>

<ul>
  <li><code class="language-plaintext highlighter-rouge">subscribe</code>: when a JavaScript client creates a channel, the subscribe method is called.</li>
  <li><code class="language-plaintext highlighter-rouge">unsubscribe</code>: when a WebSocket connection is closed, the unsubscribe method is called.</li>
  <li><code class="language-plaintext highlighter-rouge">perform action</code>: when a JavaScript client sends a payload, {action: “some_method”, …}, “some_method” is called to
perform the logic.</li>
</ul>

<p>After performing the logic in the channel,
broadcast and transmit methods are used to send the result back from the Rails side to JavaScript client.</p>

<ul>
  <li>broadcast: pushes the result to all subscribed JavaScript clients</li>
  <li>transmit: sends the result back to the only one JavaScript client who sends payload to the channel.</li>
</ul>

<p>The Tic-Tac-Toe application uses 3 types of channels. The PlayerChannel would be a good example since it is simple.</p>
<ul>
  <li><a href="https://gitlab.com/yokolet/action-cable-tictactoe/-/blob/main/app/channels/player_channel.rb?ref_type=heads">app/channels/player_channel.rb</a></li>
</ul>

<p>The PlayerChannel has a subscribe, unsubscribe, register, unregister, and heads_up methods.</p>
<ul>
  <li><code class="language-plaintext highlighter-rouge">subscribe</code>: using <code class="language-plaintext highlighter-rouge">stream_from</code> method, adds the client to the player_channel, then sends back the payload to the
client who tries to subscribe</li>
  <li><code class="language-plaintext highlighter-rouge">unsubscribe</code>: after removing the player name of this connection, broadcasts the updated player list to all subscribed clients</li>
  <li>[perform action] <code class="language-plaintext highlighter-rouge">register</code>: adds a new player name to the player list and sends back the payload to the client
who tries to register. In this application, “subscribe” doesn’t mean “register”. Without registering the player name,
clients can receive the broadcast player list.</li>
  <li>[perform action] <code class="language-plaintext highlighter-rouge">unregister</code>: JavaScript client explicitly removes its player name from the list.
The result is sent back to the client who tries to unregister</li>
  <li>[perform action] <code class="language-plaintext highlighter-rouge">heads_up</code>: broadcasts the updated player list. The method is called by the JavaScript client
when the client wants to broadcast the updated player list.</li>
</ul>

<h4 id="transmit-or-broadcast">transmit or broadcast</h4>

<p>The PlayerChannel of this application uses <code class="language-plaintext highlighter-rouge">transmit</code> for subscribe, register and unregister methods, which means
the results are not broadcast.
To broadcast, the client calls <code class="language-plaintext highlighter-rouge">heads_up</code> action after receiving the payload from <code class="language-plaintext highlighter-rouge">transmit</code>. It takes double paths.
At a glance, such architecture looks an excess. What if successful register broadcast the updated player list?
Unfortunately, that confuses the client application.
For example, upon a successful registration process, the client app wants to close registration form.
If the successful registration is broadcast, the client needs to figure out
the message is about its own or someone else’s successful registration.
So that the client application can act reactively, transmitting the result payload to the only client
who tries it works well.</p>

<h3 id="rspec">RSpec</h3>

<p>When it comes to a realistic application, testing is important. Testing Action Cable using RSpec is explained at
<a href="https://github.com/palkan/action-cable-testing">https://github.com/palkan/action-cable-testing</a>.
It is a gem called action-cable-testing. But, as far as using recent versions of Rails and RSpec,
we don’t need to install the gem. It is merged in Rails 6 and RSpec 4.</p>

<h4 id="connection-specs">Connection specs</h4>

<p>The testing framework provides <code class="language-plaintext highlighter-rouge">connect</code> method, which simulates the connection.
Once the <code class="language-plaintext highlighter-rouge">connect</code> method is called, we can use <code class="language-plaintext highlighter-rouge">connection</code> instance to test <code class="language-plaintext highlighter-rouge">identified_by</code> value.
The <code class="language-plaintext highlighter-rouge">cookies</code> is available to use in the spec, so we can add a cookie to test the connection.</p>

<p>The connection spec of this application:</p>
<ul>
  <li><a href="https://gitlab.com/yokolet/action-cable-tictactoe/-/blob/main/spec/channels/connection_spec.rb?ref_type=heads">spec/channels/connection_spec.rb</a></li>
</ul>

<p>The spec here tests whether <code class="language-plaintext highlighter-rouge">current_player_id</code> is set correctly.</p>

<h4 id="channel-specs">Channel specs</h4>

<p>The testing framework provides <code class="language-plaintext highlighter-rouge">stub_connection</code> and <code class="language-plaintext highlighter-rouge">subsscribe</code> utility methods.</p>

<ul>
  <li><code class="language-plaintext highlighter-rouge">stub_connection</code>: gives a connection stub. The identifier can be given as a parameter.</li>
  <li><code class="language-plaintext highlighter-rouge">subscribe</code>: subscribes to the channel.</li>
</ul>

<p>The specs for PlayerChannel:</p>
<ul>
  <li><a href="https://gitlab.com/yokolet/action-cable-tictactoe/-/blob/main/spec/channels/player_channel_spec.rb?ref_type=heads">spec/channels/player_channel_spec.rb</a></li>
</ul>

<p>The spec calls <code class="language-plaintext highlighter-rouge">stub_connection(current_player_id: uid)</code> in the before block.
By this, the <code class="language-plaintext highlighter-rouge">current_player_id</code> value is available to use in the channel methods.
In each spec, <code class="language-plaintext highlighter-rouge">subscribe</code> is called with a parameter. This simulate the the subscription has done.</p>

<p>To test subscription, we can do:</p>
<div class="language-ruby highlighter-rouge"><div class="highlight"><pre class="highlight"><code><span class="n">expect</span><span class="p">(</span><span class="n">subscription</span><span class="p">).</span><span class="nf">to</span> <span class="n">be_confirmed</span>
<span class="n">expect</span><span class="p">(</span><span class="n">subscription</span><span class="p">).</span><span class="nf">to</span> <span class="n">have_stream_from</span><span class="p">(</span><span class="s1">'player_channel'</span><span class="p">)</span>
</code></pre></div></div>

<p>To test transmitted payload, <code class="language-plaintext highlighter-rouge">expect(transmissions.last).to eq({...})</code> does the job.</p>
<div class="language-ruby highlighter-rouge"><div class="highlight"><pre class="highlight"><code><span class="n">expect</span><span class="p">(</span><span class="n">transmissions</span><span class="p">.</span><span class="nf">last</span><span class="p">).</span><span class="nf">to</span> <span class="n">eq</span><span class="p">({</span><span class="ss">key: </span><span class="n">value</span><span class="p">})</span>
</code></pre></div></div>

<p>As for testing a broadcast, <code class="language-plaintext highlighter-rouge">have_broadcasted_to</code> matcher does the job.</p>
<div class="language-ruby highlighter-rouge"><div class="highlight"><pre class="highlight"><code><span class="n">expect</span> <span class="p">{</span>
  <span class="n">perform</span> <span class="ss">:heads_up</span><span class="p">,</span> <span class="p">{</span><span class="ss">key1: </span><span class="n">value1</span><span class="p">}</span>
<span class="p">}.</span><span class="nf">to</span> <span class="n">have_broadcasted_to</span><span class="p">(</span><span class="s2">"player_channel"</span><span class="p">).</span><span class="nf">with</span><span class="p">({</span><span class="ss">key2: </span><span class="n">value2</span><span class="p">})</span>
</code></pre></div></div>

<h3 id="javascript-side">JavaScript Side</h3>

<p>To connect to Rails’ WebSocket, <a href="https://www.npmjs.com/package/@rails/actioncable">@rails/actioncable</a>
JavaScript package would be the best library.
The package provides seamless interaction with WebSocket by Rails Action Cable.</p>

<p>Of course, @rails/actioncable is not the only one choice.
Since WebSocket is a protocol, it’s possible to write a connection library from scratch.
In the JavaScript world, well-known WebSocket libraries are out there also.
However, an ease of use, examples to learn about, and more reasons say @rails/actioncable is the best.</p>

<h4 id="basics-of-client-side">Basics of Client Side</h4>

<p>With @rails/actioncable library, a basic usage is below:</p>
<div class="language-javascript highlighter-rouge"><div class="highlight"><pre class="highlight"><code><span class="kd">const</span> <span class="nx">channel</span> <span class="o">=</span> <span class="nx">createConsumer</span><span class="p">()</span>
    <span class="p">.</span><span class="nx">subscriptions</span>
    <span class="p">.</span><span class="nx">create</span><span class="p">({</span> <span class="na">channel</span><span class="p">:</span> <span class="dl">'</span><span class="s1">CHANNEL_CLASS</span><span class="dl">'</span><span class="p">,</span> <span class="na">key</span><span class="p">:</span> <span class="nx">value</span> <span class="p">},</span> <span class="p">{</span>
        <span class="nx">received</span><span class="p">(</span><span class="nx">data</span><span class="p">)</span> <span class="p">{</span>
            <span class="c1">// do something</span>
        <span class="p">}</span>
    <span class="p">}</span>
</code></pre></div></div>

<p>Above establishes WebSocket connection and calls channel’s subscribe method.
The channel to subscribe is a parameter to <code class="language-plaintext highlighter-rouge">create</code> method.
The callback function, <code class="language-plaintext highlighter-rouge">receieved</code> receives everything the channel sends back
such as the payload from channel’s transmit and broadcast methods.
The client side application should handle all of those.</p>

<p>To call perform action methods, use <code class="language-plaintext highlighter-rouge">channel.perform</code> function.</p>
<div class="language-javascript highlighter-rouge"><div class="highlight"><pre class="highlight"><code><span class="nx">channel</span><span class="p">.</span><span class="nx">perform</span><span class="p">(</span><span class="dl">"</span><span class="s2">CHANNEL_METHOD</span><span class="dl">"</span><span class="p">,</span> <span class="p">{</span><span class="na">key</span><span class="p">:</span> <span class="nx">value</span><span class="p">})</span>
</code></pre></div></div>

<p>This Tic-Tac-Toe application uses Vue.js and Pinia (something like React + Redux).
The client implementation to use <code class="language-plaintext highlighter-rouge">PlayerChannel</code> is a Pinia store, <code class="language-plaintext highlighter-rouge">player.ts</code>.</p>
<ul>
  <li><a href="https://gitlab.com/yokolet/action-cable-tictactoe/-/blob/main/app/frontend/stores/player.ts?ref_type=heads">app/frontend/stores/player.ts</a></li>
</ul>

<p>In this application, the payload data is a Hash and has an action key always.
The action is a key to handle received data through WebSocket.
Depending on the action type, received data is processed and set to reactive variables.
The changes of reactive variables are taken care of by a JavaScript framework, in this application, Vue.js.</p>

<p>The client side implementation really varies.
Vue.js, React, Stimulus and many other JavaScript frameworks handles reactive data in their ways.
The basics here is to reflect the updated data to UI by own way.</p>

<h3 id="live-application">Live Application</h3>

<p>The multi-player, multi-board Tic-Tac-Toe application is live at:</p>
<ul>
  <li><a href="https://action-cable-tictactoe-2fbbd874419e.herokuapp.com/">https://action-cable-tictactoe-2fbbd874419e.herokuapp.com/</a></li>
</ul>

<h3 id="consideration">Consideration</h3>

<p>Creating a real-time application by Rails Action Cable is relatively easy.
The framework provides an easy to use API for both back-end and front-end.
The downside would be lack of up-to-date rich information.
Rails Guide gives enough info and examples, but those are fragments.
Google search often hit old Rails 6 examples and blog posts. 
It took a while to figure out how to code and test on Rails 7.
However, once those became clear, the development accelerated.</p>

<p>Try and have fun by creating a real-time application.</p>]]></content><author><name></name></author><summary type="html"><![CDATA[The previous two blog posts introduced WebSocket and how to implement a WebSocket application on Ruby on Rails. This blog post digs deeper. It is a memo on creating a more realistic application by Action Cable.]]></summary></entry><entry><title type="html">Real-time App on Rails by Action Cable</title><link href="/2024/08/real-time-app-on-rails-by-action-cable.html" rel="alternate" type="text/html" title="Real-time App on Rails by Action Cable" /><published>2024-08-08T14:27:00+00:00</published><updated>2024-08-08T14:27:00+00:00</updated><id>/2024/08/real-time-app-on-rails-by-action-cable</id><content type="html" xml:base="/2024/08/real-time-app-on-rails-by-action-cable.html"><![CDATA[<p>The previous blog post, <a href="/2024/08/02/websocket-on-rails-by-action-cable.html">WebSocket on Rails by Action Cable</a>,
focused on WebSocket as a protocol. As in the previous post, by default, Rails app responds to WebSocket connection
requests without any hassle.
<!--more-->
However, other than connecting and sending ping frames, it doesn’t do anything.
This blog post focuses on an application side and explains how we can create a full-duplex, bidirectional app.</p>

<h3 id="publishsubscribe-pubsub-architecture">Publish/Subscribe (Pub/Sub) architecture</h3>

<p>WebSocket itself is the protocol, so it is independent from an application architecture or framework.
In Rails, ActionCable::Connection::Base is an abstraction of WebSocket connection.</p>

<p>As an application framework on the full-duplex, bidirectional connection, Rails adapts Pub/Sub
(Publish/Subscribe) architecture. The Pub/Sub architecture is a general event-driven, asynchronous model for a
distributed system. The Pub/Sub architecture is independent from protocols, so it is not only for WebSocket.
If we name the Pub/Sub frameworks, <a href="https://kafka.apache.org/">Apache Kafka</a>, <a href="https://akka.io/">Akka</a>,
<a href="https://www.rabbitmq.com/">RabbitMQ</a>, and many more are out there.</p>

<p>In general, the Pub/Sub framework consists of publishers, a broker with topics (or channels), and subscribers.
The subscriber subscribes to a topic or topics to get updates.
When the publisher send a message to a broker, the broker sends the message to the related topic.
Then, the message will be distributed to subscribers who subscribed to the topic previously.</p>

<p><img width="1200px" src="/assets/img/blog/GeneralPubSub.jpg" alt="img: Pub/Sub architecture in general" /></p>

<p>Rails provides a bit simplified version of Pub/Sub architecture.
For Rails, both publishers and subscribers are a web application client.
The idea of consumer is introduced as an abstraction of publishers and subscribers.
Using JavaScript library, a consumer is created tied to the specific channel.
The publisher sends a message through the consumer.
When the publisher wants to send the message to a specific method, it performs the corresponding action with the message.
Once the message arrives to the channel, the message will be broadcast to subscribers.
In the end, the broadcast message is received by the subscriber through the consumer.</p>

<p><img width="1200px" src="/assets/img/blog/RailsPubSub.jpg" alt="img: Rails Pub/Sub architecture" /></p>

<h3 id="chat-simple-real-time-application">Chat: Simple Real-time Application</h3>

<p>It’s time to create a Rails app. The application here is a very simple chat app.
The application needs a JavaScript library which has an ability to behave reactively when the broadcast message comes in.
Here, the app uses Vue.js version 3 with composition API.</p>

<h4 id="create-rails-app">Create Rails app</h4>

<p>As always, the first step is to create a Rails app. The application doesn’t need some libraries, so it uses the rc file
below to skip those.</p>

<div class="language-bash highlighter-rouge"><div class="highlight"><pre class="highlight"><code><span class="nt">--skip-action-mailer</span>
<span class="nt">--skip-action-mailbox</span>
<span class="nt">--skip-action-text</span>
<span class="nt">--skip-active-job</span>
<span class="nt">--skip-active-storage</span>
<span class="nt">-J</span>
<span class="nt">-T</span>
</code></pre></div></div>

<p>Save above to <code class="language-plaintext highlighter-rouge">.railsrc</code> file, or whatever the file name you like.</p>

<div class="language-bash highlighter-rouge"><div class="highlight"><pre class="highlight"><code><span class="nv">$ </span>rails new action-cable-chat <span class="nt">--rc</span><span class="o">=</span>./.railsrc
</code></pre></div></div>

<h4 id="create-a-vue-app-mount-point">Create a Vue app mount point</h4>

<p>So that the root path shows Vue.js page, create a mount point.</p>

<div class="language-bash highlighter-rouge"><div class="highlight"><pre class="highlight"><code><span class="nv">$ </span><span class="nb">cd </span>action-cable-chat
<span class="nv">$ </span>bin/rails g controller home index
</code></pre></div></div>

<p>Edit <code class="language-plaintext highlighter-rouge">app/views/home/index.html.erb</code> to create a mount point, <code class="language-plaintext highlighter-rouge">#app</code>.</p>

<pre><code class="language-erbruby">&lt;%= content_tag(:div, "", id:"app") %&gt;
</code></pre>

<p>Additionally, update <code class="language-plaintext highlighter-rouge">config/routes.rb</code>.</p>

<div class="language-ruby highlighter-rouge"><div class="highlight"><pre class="highlight"><code><span class="no">Rails</span><span class="p">.</span><span class="nf">application</span><span class="p">.</span><span class="nf">routes</span><span class="p">.</span><span class="nf">draw</span> <span class="k">do</span>
  <span class="n">root</span> <span class="s1">'home#index'</span>
  <span class="c1"># ...</span>
  <span class="c1"># ...</span>
<span class="k">end</span>
</code></pre></div></div>

<h4 id="install-and-setup-vite_rails">Install and setup vite_rails</h4>

<p>Since the app uses Vue.js on the frontend side, <code class="language-plaintext highlighter-rouge">vite_rails</code> gem should be installed and setup.
Try below:</p>

<div class="language-bash highlighter-rouge"><div class="highlight"><pre class="highlight"><code><span class="nv">$ </span>bundle add vite_rails
<span class="nv">$ </span>bundle <span class="nb">exec </span>vite <span class="nb">install</span>
</code></pre></div></div>

<h4 id="install-vuejs">Install Vue.js</h4>

<p>At this point, <code class="language-plaintext highlighter-rouge">package.json</code> and <code class="language-plaintext highlighter-rouge">package-lock.json</code> are created.
Since we use <code class="language-plaintext highlighter-rouge">yarn</code> instead of <code class="language-plaintext highlighter-rouge">npm</code>, remove <code class="language-plaintext highlighter-rouge">package-lock.json</code> and run <code class="language-plaintext highlighter-rouge">yarn install</code>.</p>

<div class="language-bash highlighter-rouge"><div class="highlight"><pre class="highlight"><code><span class="nv">$ </span><span class="nb">rm </span>package-lock.json
<span class="nv">$ </span>yarn <span class="nb">install</span>
</code></pre></div></div>

<p>For now, we are ready to install Vue.js. Run blow to add two packages:</p>

<div class="language-bash highlighter-rouge"><div class="highlight"><pre class="highlight"><code><span class="nv">$ </span>yarn add vue @vitejs/plugin-vue
</code></pre></div></div>

<p>Then, edit <code class="language-plaintext highlighter-rouge">vite.config.ts</code> to add Vue plugin.</p>

<div class="language-javascript highlighter-rouge"><div class="highlight"><pre class="highlight"><code><span class="c1">// vite.config.ts</span>
<span class="k">import</span> <span class="p">{</span> <span class="nx">defineConfig</span> <span class="p">}</span> <span class="k">from</span> <span class="dl">'</span><span class="s1">vite</span><span class="dl">'</span>
<span class="k">import</span> <span class="nx">RubyPlugin</span> <span class="k">from</span> <span class="dl">'</span><span class="s1">vite-plugin-ruby</span><span class="dl">'</span>
<span class="k">import</span> <span class="nx">vue</span> <span class="k">from</span> <span class="dl">'</span><span class="s1">@vitejs/plugin-vue</span><span class="dl">'</span> <span class="c1">// added</span>

<span class="k">export</span> <span class="k">default</span> <span class="nx">defineConfig</span><span class="p">({</span>
    <span class="na">plugins</span><span class="p">:</span> <span class="p">[</span>
        <span class="nx">RubyPlugin</span><span class="p">(),</span>
        <span class="nx">vue</span><span class="p">(),</span>  <span class="c1">// added</span>
    <span class="p">],</span>
<span class="p">})</span>
</code></pre></div></div>

<h4 id="create-a-starter-script">Create a starter script</h4>

<p>When vite was installed, Profile.dev was updated as well to start two servers: one for backend, another for frontend.
To avoid typing <code class="language-plaintext highlighter-rouge">foreman start -f Procfile.dev</code> everytime, create a <code class="language-plaintext highlighter-rouge">bin/dev</code> file with the content below:</p>

<div class="language-bash highlighter-rouge"><div class="highlight"><pre class="highlight"><code><span class="c">#!/usr/bin/env sh</span>

<span class="k">if </span>gem list <span class="nt">--no-installed</span> <span class="nt">--exact</span> <span class="nt">--silent</span> foreman<span class="p">;</span> <span class="k">then
  </span><span class="nb">echo</span> <span class="s2">"Installing foreman..."</span>
  gem <span class="nb">install </span>foreman
<span class="k">fi</span>

<span class="c"># Default to port 3000 if not specified</span>
<span class="nb">export </span><span class="nv">PORT</span><span class="o">=</span><span class="s2">"</span><span class="k">${</span><span class="nv">PORT</span><span class="k">:-</span><span class="nv">3000</span><span class="k">}</span><span class="s2">"</span>

<span class="nb">exec </span>foreman start <span class="nt">-f</span> Procfile.dev <span class="s2">"</span><span class="nv">$@</span><span class="s2">"</span>
</code></pre></div></div>

<p>Change the file permission to executable by <code class="language-plaintext highlighter-rouge">chmod 755 bin/dev</code>.</p>

<h4 id="create-a-pubsub-channel">Create a Pub/Sub channel</h4>

<p>So far, all settings were completed.
Now, it’s time to write code for a chat app.</p>

<p>We start from creating a channel for Pub/Sub.
Rails provides a generator to create a channel, so type below:</p>

<div class="language-bash highlighter-rouge"><div class="highlight"><pre class="highlight"><code><span class="nv">$ </span>bin/rails g channel chat speak
</code></pre></div></div>

<p>Above command creates <code class="language-plaintext highlighter-rouge">app/channels/chat_channel.rb</code> file with a minimal implementation.
Update <code class="language-plaintext highlighter-rouge">subscribe</code> and <code class="language-plaintext highlighter-rouge">speak</code> method as in below:</p>

<div class="language-ruby highlighter-rouge"><div class="highlight"><pre class="highlight"><code><span class="c1"># app/channels/chat_channel.rb</span>
<span class="k">class</span> <span class="nc">ChatChannel</span> <span class="o">&lt;</span> <span class="no">ApplicationCable</span><span class="o">::</span><span class="no">Channel</span>
  <span class="k">def</span> <span class="nf">subscribed</span>
    <span class="n">stream_from</span> <span class="s2">"chat_channel"</span>
  <span class="k">end</span>

  <span class="k">def</span> <span class="nf">unsubscribed</span>
    <span class="c1"># Any cleanup needed when channel is unsubscribed</span>
  <span class="k">end</span>

  <span class="k">def</span> <span class="nf">speak</span><span class="p">(</span><span class="n">data</span><span class="p">)</span>
    <span class="no">ActionCable</span><span class="p">.</span><span class="nf">server</span><span class="p">.</span><span class="nf">broadcast</span><span class="p">(</span><span class="s2">"chat_channel"</span><span class="p">,</span> <span class="n">data</span><span class="p">)</span>
  <span class="k">end</span>
<span class="k">end</span>
</code></pre></div></div>

<p>The method, <code class="language-plaintext highlighter-rouge">subscribed</code>, defines the channel whose name is chat_channel.
The method, <code class="language-plaintext highlighter-rouge">speak</code>, broadcast message to clients who subscribed to the chat_channel.
That’s all for the server side.</p>

<h4 id="install-railsactioncable-package">Install @rails/actioncable package</h4>

<p>Since WebSocket is a protocol, we may use any libraries for WebSocket, for example, <a href="https://socket.io/">Socket.IO</a>.
However, it’s much better to use Rails provided package to connect to the backend seamlessly.
Run below to install <code class="language-plaintext highlighter-rouge">@rails/actioncable</code> package.</p>

<div class="language-bash highlighter-rouge"><div class="highlight"><pre class="highlight"><code><span class="nv">$ </span>yarn add @rails/actioncable 
</code></pre></div></div>

<h4 id="write-frontend-code">Write frontend code</h4>

<p>The last piece is a Vue.js app.
Create a Vue component, <code class="language-plaintext highlighter-rouge">app/frontend/App.vue</code>, with the content below:</p>

<div class="language-javascript highlighter-rouge"><div class="highlight"><pre class="highlight"><code><span class="o">&lt;</span><span class="nx">script</span> <span class="nx">setup</span><span class="o">&gt;</span>
<span class="k">import</span> <span class="p">{</span> <span class="nx">ref</span> <span class="p">}</span> <span class="k">from</span> <span class="dl">'</span><span class="s1">vue</span><span class="dl">'</span><span class="p">;</span>
<span class="kd">const</span> <span class="nx">message</span> <span class="o">=</span> <span class="nx">ref</span><span class="p">(</span><span class="dl">""</span><span class="p">);</span>
<span class="kd">const</span> <span class="nx">messages</span> <span class="o">=</span> <span class="nx">ref</span><span class="p">([]);</span>
<span class="k">import</span> <span class="p">{</span> <span class="nx">createConsumer</span> <span class="p">}</span> <span class="k">from</span> <span class="dl">'</span><span class="s1">@rails/actioncable</span><span class="dl">'</span><span class="p">;</span>

<span class="kd">const</span> <span class="nx">protocol</span> <span class="o">=</span> <span class="nb">window</span><span class="p">.</span><span class="nx">location</span><span class="p">.</span><span class="nx">protocol</span> <span class="o">===</span> <span class="dl">'</span><span class="s1">https:</span><span class="dl">'</span> <span class="p">?</span> <span class="dl">'</span><span class="s1">wss</span><span class="dl">'</span> <span class="p">:</span> <span class="dl">'</span><span class="s1">ws</span><span class="dl">'</span><span class="p">;</span>
<span class="kd">const</span> <span class="nx">consumer</span> <span class="o">=</span> <span class="nx">createConsumer</span><span class="p">(</span><span class="s2">`</span><span class="p">${</span><span class="nx">protocol</span><span class="p">}</span><span class="s2">://</span><span class="p">${</span><span class="nb">window</span><span class="p">.</span><span class="nx">location</span><span class="p">.</span><span class="nx">host</span><span class="p">}</span><span class="s2">/cable`</span><span class="p">);</span>
<span class="kd">const</span> <span class="nx">channel</span> <span class="o">=</span> <span class="nx">consumer</span><span class="p">.</span><span class="nx">subscriptions</span><span class="p">.</span><span class="nx">create</span><span class="p">({</span> <span class="na">channel</span><span class="p">:</span> <span class="dl">'</span><span class="s1">ChatChannel</span><span class="dl">'</span> <span class="p">},</span> <span class="p">{</span>
  <span class="nx">received</span><span class="p">(</span><span class="nx">data</span><span class="p">)</span> <span class="p">{</span>
    <span class="nx">messages</span><span class="p">.</span><span class="nx">value</span><span class="p">.</span><span class="nx">push</span><span class="p">(</span><span class="nx">data</span><span class="p">[</span><span class="dl">'</span><span class="s1">message</span><span class="dl">'</span><span class="p">]);</span>
  <span class="p">}</span>
<span class="p">});</span>

<span class="kd">const</span> <span class="nx">addNewMessage</span> <span class="o">=</span> <span class="p">()</span> <span class="o">=&gt;</span> <span class="p">{</span>
  <span class="nx">channel</span><span class="p">.</span><span class="nx">perform</span><span class="p">(</span><span class="dl">'</span><span class="s1">speak</span><span class="dl">'</span><span class="p">,</span> <span class="p">{</span> <span class="na">message</span><span class="p">:</span> <span class="nx">message</span><span class="p">.</span><span class="nx">value</span> <span class="p">});</span>
<span class="p">}</span>
<span class="o">&lt;</span><span class="sr">/script</span><span class="err">&gt;
</span>
<span class="o">&lt;</span><span class="nx">template</span><span class="o">&gt;</span>
  <span class="o">&lt;</span><span class="nx">div</span> <span class="nx">id</span><span class="o">=</span><span class="dl">"</span><span class="s2">app</span><span class="dl">"</span><span class="o">&gt;</span>
    <span class="o">&lt;</span><span class="nx">h2</span><span class="o">&gt;</span><span class="nx">Action</span> <span class="nx">Cable</span> <span class="nx">Example</span><span class="o">&lt;</span><span class="sr">/h2</span><span class="err">&gt;
</span>    <span class="o">&lt;</span><span class="nx">div</span> <span class="kd">class</span><span class="o">=</span><span class="dl">"</span><span class="s2">info</span><span class="dl">"</span><span class="o">&gt;</span><span class="nx">Type</span> <span class="nx">something</span> <span class="k">in</span> <span class="nx">the</span> <span class="nx">box</span> <span class="nx">below</span> <span class="nx">and</span> <span class="nx">hit</span> <span class="nx">enter</span><span class="o">&lt;</span><span class="sr">/div</span><span class="err">&gt;
</span>    <span class="o">&lt;</span><span class="nx">form</span> <span class="p">@</span><span class="nd">submit</span><span class="p">.</span><span class="nx">prevent</span><span class="o">=</span><span class="dl">"</span><span class="s2">addNewMessage</span><span class="dl">"</span><span class="o">&gt;</span>
      <span class="o">&lt;</span><span class="nx">input</span>
          <span class="nx">type</span><span class="o">=</span><span class="dl">"</span><span class="s2">text</span><span class="dl">"</span>
          <span class="nx">placeholder</span><span class="o">=</span><span class="dl">"</span><span class="s2">say something</span><span class="dl">"</span>
          <span class="nx">minlength</span><span class="o">=</span><span class="dl">"</span><span class="s2">1</span><span class="dl">"</span>
          <span class="nx">maxlength</span><span class="o">=</span><span class="dl">"</span><span class="s2">50</span><span class="dl">"</span>
          <span class="nx">v</span><span class="o">-</span><span class="nx">model</span><span class="p">.</span><span class="nx">trim</span><span class="o">=</span><span class="dl">"</span><span class="s2">message</span><span class="dl">"</span> <span class="o">/&gt;</span>
    <span class="o">&lt;</span><span class="sr">/form</span><span class="err">&gt;
</span>    <span class="o">&lt;</span><span class="nx">div</span> <span class="kd">class</span><span class="o">=</span><span class="dl">"</span><span class="s2">messages</span><span class="dl">"</span><span class="o">&gt;</span>
      <span class="o">&lt;</span><span class="nx">ul</span> <span class="kd">class</span><span class="o">=</span><span class="dl">"</span><span class="s2">message</span><span class="dl">"</span><span class="o">&gt;</span>
        <span class="o">&lt;</span><span class="nx">li</span> <span class="nx">v</span><span class="o">-</span><span class="k">for</span><span class="o">=</span><span class="dl">"</span><span class="s2">message in messages</span><span class="dl">"</span><span class="o">&gt;&lt;</span><span class="sr">/li</span><span class="err">&gt;
</span>      <span class="o">&lt;</span><span class="sr">/ul</span><span class="err">&gt;
</span>    <span class="o">&lt;</span><span class="sr">/div</span><span class="err">&gt;
</span>  <span class="o">&lt;</span><span class="sr">/div</span><span class="err">&gt;
</span><span class="o">&lt;</span><span class="sr">/template</span><span class="err">&gt;
</span></code></pre></div></div>

<p>Everything of frontend is here. The above Vue component does:</p>
<ul>
  <li>Creates a consumer using <code class="language-plaintext highlighter-rouge">createConsumer</code> function provided by Rails’ actioncable package. <br />
By default, WebSocket is mounted on <code class="language-plaintext highlighter-rouge">/cable</code>, so the URL to WebSocket is used to an argument of <code class="language-plaintext highlighter-rouge">createConsumer</code>.</li>
  <li>Creates a channel by subscribing to the channel, <code class="language-plaintext highlighter-rouge">ChatChannel</code>. <br />
The channel name is a channel class name on Rails side, so it is a camel case of ChatChannel.</li>
  <li>At the same time, implements <code class="language-plaintext highlighter-rouge">received</code> function to update the <code class="language-plaintext highlighter-rouge">messages</code> value when a new message comes in.</li>
  <li>Calls <code class="language-plaintext highlighter-rouge">addNewMessage</code> function when something is typed in the input box and hit enter. <br />
The function hits channel’s perform function to send the message to <code class="language-plaintext highlighter-rouge">speak</code> method defined in ChatChannel class on the server side.</li>
</ul>

<p>To make the Vue component work, we need a small additional work.
Edit <code class="language-plaintext highlighter-rouge">app/frontend/entrypoints/application.js</code> to add below:</p>

<div class="language-javascript highlighter-rouge"><div class="highlight"><pre class="highlight"><code><span class="k">import</span> <span class="p">{</span> <span class="nx">createApp</span> <span class="p">}</span> <span class="k">from</span> <span class="dl">'</span><span class="s1">vue</span><span class="dl">'</span><span class="p">;</span>
<span class="k">import</span> <span class="nx">App</span> <span class="k">from</span> <span class="dl">'</span><span class="s1">~/App.vue</span><span class="dl">'</span><span class="p">;</span>
<span class="k">import</span> <span class="dl">'</span><span class="s1">~/styles.css</span><span class="dl">'</span>

<span class="nx">createApp</span><span class="p">(</span><span class="nx">App</span><span class="p">).</span><span class="nx">mount</span><span class="p">(</span><span class="dl">'</span><span class="s1">#app</span><span class="dl">'</span><span class="p">);</span>
</code></pre></div></div>

<p>The mount point <code class="language-plaintext highlighter-rouge">#app</code> was already created on the backend side.
To look better, the Vue component uses the <code class="language-plaintext highlighter-rouge">style.css</code> below.</p>

<div class="language-css highlighter-rouge"><div class="highlight"><pre class="highlight"><code><span class="o">*</span> <span class="p">{</span>
  <span class="nl">box-sizing</span><span class="p">:</span> <span class="n">border-box</span><span class="p">;</span>
<span class="p">}</span>

<span class="nt">html</span> <span class="p">{</span>
  <span class="nl">font-family</span><span class="p">:</span> <span class="nb">sans-serif</span><span class="p">;</span>
<span class="p">}</span>

<span class="nt">body</span> <span class="p">{</span>
  <span class="nl">margin</span><span class="p">:</span> <span class="m">0</span><span class="p">;</span>
<span class="p">}</span>

<span class="nf">#app</span> <span class="p">{</span>
  <span class="nl">margin</span><span class="p">:</span> <span class="m">3rem</span> <span class="nb">auto</span><span class="p">;</span>
  <span class="nl">border-radius</span><span class="p">:</span> <span class="m">10px</span><span class="p">;</span>
  <span class="nl">padding</span><span class="p">:</span> <span class="m">1rem</span><span class="p">;</span>
  <span class="nl">width</span><span class="p">:</span> <span class="m">90%</span><span class="p">;</span>
  <span class="nl">max-width</span><span class="p">:</span> <span class="m">40rem</span><span class="p">;</span>
<span class="p">}</span>

<span class="nf">#app</span> <span class="nt">h2</span> <span class="p">{</span>
  <span class="nl">font-size</span><span class="p">:</span> <span class="m">1.5rem</span><span class="p">;</span>
  <span class="nl">border-bottom</span><span class="p">:</span> <span class="m">2px</span> <span class="nb">solid</span> <span class="m">#ccc</span><span class="p">;</span>
  <span class="nl">color</span><span class="p">:</span> <span class="m">#af463d</span><span class="p">;</span>
  <span class="nl">margin</span><span class="p">:</span> <span class="m">0</span> <span class="m">0</span> <span class="m">1rem</span> <span class="m">0</span><span class="p">;</span>
<span class="p">}</span>

<span class="nf">#app</span> <span class="nc">.info</span> <span class="p">{</span>
  <span class="nl">font-size</span><span class="p">:</span> <span class="m">1rem</span><span class="p">;</span>
  <span class="nl">color</span><span class="p">:</span> <span class="m">#544f4f</span><span class="p">;</span>
  <span class="nl">margin</span><span class="p">:</span> <span class="m">0</span> <span class="m">0</span> <span class="m">1rem</span> <span class="m">0</span><span class="p">;</span>
<span class="p">}</span>

<span class="nf">#app</span> <span class="nc">.messages</span> <span class="p">{</span>
  <span class="nl">font-size</span><span class="p">:</span> <span class="m">1rem</span><span class="p">;</span>
  <span class="nl">color</span><span class="p">:</span> <span class="m">#544f4f</span><span class="p">;</span>
  <span class="nl">margin</span><span class="p">:</span> <span class="m">1rem</span> <span class="m">0</span> <span class="m">1rem</span> <span class="m">0</span><span class="p">;</span>
<span class="p">}</span>

<span class="nf">#app</span> <span class="nc">.message</span> <span class="p">{</span>
  <span class="nl">font-size</span><span class="p">:</span> <span class="m">1rem</span><span class="p">;</span>
  <span class="nl">color</span><span class="p">:</span> <span class="m">#4d4848</span><span class="p">;</span>
  <span class="nl">margin</span><span class="p">:</span> <span class="m">0</span> <span class="m">0</span> <span class="m">1rem</span> <span class="m">0</span><span class="p">;</span>
<span class="p">}</span>

<span class="nf">#app</span> <span class="nt">input</span> <span class="p">{</span>
  <span class="nl">font</span><span class="p">:</span> <span class="nb">inherit</span><span class="p">;</span>
  <span class="nl">border</span><span class="p">:</span> <span class="m">1px</span> <span class="nb">solid</span> <span class="m">#aaa</span><span class="p">;</span>
  <span class="nl">background-color</span><span class="p">:</span> <span class="m">#eee</span><span class="p">;</span>
<span class="p">}</span>

<span class="nf">#app</span> <span class="nt">input</span><span class="nd">:focus</span> <span class="p">{</span>
  <span class="nl">outline</span><span class="p">:</span> <span class="nb">none</span><span class="p">;</span>
  <span class="nl">border-color</span><span class="p">:</span> <span class="m">#754340</span><span class="p">;</span>
  <span class="nl">background-color</span><span class="p">:</span> <span class="m">#fff</span><span class="p">;</span>
<span class="p">}</span>
</code></pre></div></div>

<h4 id="run-the-app-and-try-real-time-chat">Run the app and try real-time chat</h4>

<p>We have already created <code class="language-plaintext highlighter-rouge">bin/dev</code> starter command. Type it and start servers.</p>

<div class="language-bash highlighter-rouge"><div class="highlight"><pre class="highlight"><code><span class="nv">$ </span>bin/dev
</code></pre></div></div>

<p>Open <code class="language-plaintext highlighter-rouge">http://localhost:3000</code> on multiple different browsers or private windows.
Type something in the input box and hit enter.
The message appears on all browsers immediately.
Below are the result on Safari, FireFox and Chrome.</p>

<p><img width="600px" src="/assets/img/blog/action-cable-chat-safari.jpeg" alt="img: Chat on Safari" /> <br />
<img width="600px" src="/assets/img/blog/action-cable-chat-firefox.jpeg" alt="img: Chat on FireFox" /> <br />
<img width="600px" src="/assets/img/blog/action-cable-chat-chrome.jpeg" alt="img: Chat on Chrome" /></p>

<h3 id="conclusion">Conclusion</h3>

<p>WebSocket and Action Cable are not easy ideas to understand.
However, once we do, an implementation using Rails Action Cable is not difficult.
We can create more interesting real-time applications by Action Cable.</p>

<h3 id="comments-and-discussions">Comments and Discussions</h3>

<p>GitHub Discussions: <a href="https://github.com/yokolet/new-note/discussions/9">Real-time App on Rails by Action Cable #9</a></p>

<h3 id="references">References</h3>
<ul>
  <li>GitHub Repo: <a href="https://github.com/yokolet/action-cable-chat">https://github.com/yokolet/action-cable-chat</a></li>
  <li>Publisher-Subscriber Model: <a href="https://www.baeldung.com/cs/publisher-subscriber-model">https://www.baeldung.com/cs/publisher-subscriber-model</a></li>
  <li>Akka: <a href="https://akka.io/">https://akka.io/</a></li>
  <li>Apache Kafka: <a href="https://kafka.apache.org/">https://kafka.apache.org/</a></li>
  <li>Redis Pub/Sub: <a href="https://redis.io/docs/latest/develop/interact/pubsub/">https://redis.io/docs/latest/develop/interact/pubsub/</a></li>
  <li>Rails Guides, Action Cable Overview: <a href="https://guides.rubyonrails.org/action_cable_overview.html">https://guides.rubyonrails.org/action_cable_overview.html</a></li>
  <li>Action Cable Hello World With Rails 7: <a href="https://blog.dennisokeeffe.com/blog/2022-02-28-action-cable-hello-world-with-rails-7">https://blog.dennisokeeffe.com/blog/2022-02-28-action-cable-hello-world-with-rails-7</a></li>
  <li>Creating a Chat Using Rails’ Action Cable: <a href="https://www.pluralsight.com/resources/blog/guides/creating-a-chat-using-rails-action-cable">https://www.pluralsight.com/resources/blog/guides/creating-a-chat-using-rails-action-cable</a></li>
  <li>Getting more comfortable with Action Cable: <a href="https://medium.com/craft-academy/getting-more-comfortable-with-action-cable-2b4bc758c57f">https://medium.com/craft-academy/getting-more-comfortable-with-action-cable-2b4bc758c57f</a></li>
  <li>Deconstructing Action Cable: <a href="https://stanko.io/deconstructing-action-cable-DC7F33OsjGmK">https://stanko.io/deconstructing-action-cable-DC7F33OsjGmK</a></li>
</ul>]]></content><author><name></name></author><summary type="html"><![CDATA[The previous blog post, WebSocket on Rails by Action Cable, focused on WebSocket as a protocol. As in the previous post, by default, Rails app responds to WebSocket connection requests without any hassle.]]></summary></entry><entry><title type="html">WebSocket on Rails by Action Cable</title><link href="/2024/08/websocket-on-rails-by-action-cable.html" rel="alternate" type="text/html" title="WebSocket on Rails by Action Cable" /><published>2024-08-02T15:10:00+00:00</published><updated>2024-08-02T15:10:00+00:00</updated><id>/2024/08/websocket-on-rails-by-action-cable</id><content type="html" xml:base="/2024/08/websocket-on-rails-by-action-cable.html"><![CDATA[<p>In the web application domain, we hear some protocol names.
Absolutely, HTTP or HTTPS is the most famous protocol that all web developers know.
Although there’s a mechanism of <a href="/2024/07/17/conserving-network-resources-keep-alive.html">Keep-Alive</a>,
a single request/response sequence with a single client/server is all done by HTTP.
<!--more-->
The client initiates the HTTP request to the server. Once the client receives the HTTP response from the server,
communication finishes. As far as HTTP is used, the server just waits and waits. Only when the request comes in, the
server can send back some data to the client. This communication style is surprisingly capable of doing many things,
so most web applications are satisfied with HTTP.</p>

<p>But! Let’s think of a chat application. Two or more people write messages to each other.
How do we see newer messages from other folks? Reload every time?
Definitely, no. We don’t want to click a reload button every time to see newer ones.
For this type of communication, a protocol called WebSocket has been created.
Since then, WebSocket is used for a chat, multi-player game, online presence status, and more.
This blog post is about WebSocket protocol and how Ruby on Rails handles it.</p>

<h3 id="what-is-websocket-protocol">What is WebSocket protocol</h3>

<p>WebSocket is a protocol defined by <a href="https://datatracker.ietf.org/doc/html/rfc6455">RFC6455</a>.
As many documents or blog posts explain, WebSocket provides a two-way interactive communication session
over a single TCP connection. The two-way interactive communication is often called a full-duplex bidirectional
communication. Not like HTTP, both client and server can send data each other.</p>

<h4 id="websocket-handshake">WebSocket Handshake</h4>

<p>The communication by WebSocket initially starts from normal HTTP request/response. Then the communication is upgraded to
WebSocket. Once the bidirectional communication establishes, a single TCP connection is used to send/receive data
until a client or server closes the connection.</p>

<p>The initial HTTP request/response sequence is called a WebSocket handshake.
<a href="https://developer.mozilla.org/en-US/docs/Web/API/WebSockets_API/Writing_WebSocket_servers">MDN (Mozilla Developer Network) document</a>
explains how the handshake goes.
Suppose the server listens to the WebSocket request at http://example.com/chat, the client sends the HTTP request
something like below:</p>

<div class="language-plaintext highlighter-rouge"><div class="highlight"><pre class="highlight"><code>GET /chat HTTP/1.1
Host: example.com:8000
Upgrade: websocket
Connection: Upgrade
Sec-WebSocket-Key: dGhlIHNhbXBsZSBub25jZQ==
Sec-WebSocket-Version: 13
</code></pre></div></div>

<p>The HTTP request header above has Connection: Upgrade and Upgrade: websocket. These are keys to get started.
Also, Sec-WebSocket-Key header field is there. The value is basically 16 bytes base 64 encoded string.
Precisely, the forgiving-base64-encoded or isomorphic encoded is used to create a string.
The key is used to avoid <a href="https://portswigger.net/web-security/websockets/cross-site-websocket-hijacking">Cross-site WebSocket hijacking</a>.</p>

<p>When the server receives the upgrade request, it returns something like below as a response.</p>

<div class="language-plaintext highlighter-rouge"><div class="highlight"><pre class="highlight"><code>HTTP/1.1 101 Switching Protocols
Upgrade: websocket
Connection: Upgrade
Sec-WebSocket-Accept: s3pPLMBiTxaQ9kYGzzhZRbK+xOo=
</code></pre></div></div>

<p>The status code is 101.
Upon receiving the response above, the protocol is upgraded to WebSocket.
Among the response header field, we see a Sec-WebSocket-Accept field.
It is the answer to Sec-WebSocket-Key from the client.
The client can verify the server when it receives the Sec-WebSocket-Accept.</p>

<p>The Sec-WebSocket-Accept value is created by the steps below:</p>
<ol>
  <li>Concatenate Sec-WebSocket-Key field value in the request and GUID value, <code class="language-plaintext highlighter-rouge">258EAFA5-E914-47DA-95CA-C5AB0DC85B11</code>.<br />
 The GUID value is always the same, a magic number.</li>
  <li>Take SHA1 hash and base64 encode.</li>
</ol>

<p>In Ruby, the encoding can be done by Digest::SHA1.base64digest.
Let’s try above Sec-WebSocket-Key and see if the same value of Sec-WebSocket-Accept will be created.</p>

<div class="language-bash highlighter-rouge"><div class="highlight"><pre class="highlight"><code><span class="nv">$ </span>irb
irb<span class="o">(</span>main<span class="o">)</span>:001&gt; require <span class="s1">'digest'</span>
<span class="o">=&gt;</span> <span class="nb">false
</span>irb<span class="o">(</span>main<span class="o">)</span>:002&gt; key <span class="o">=</span> <span class="s1">'dGhlIHNhbXBsZSBub25jZQ=='</span>
<span class="o">=&gt;</span> <span class="s2">"dGhlIHNhbXBsZSBub25jZQ=="</span>
irb<span class="o">(</span>main<span class="o">)</span>:003&gt; magic <span class="o">=</span> <span class="s1">'258EAFA5-E914-47DA-95CA-C5AB0DC85B11'</span>
<span class="o">=&gt;</span> <span class="s2">"258EAFA5-E914-47DA-95CA-C5AB0DC85B11"</span>
irb<span class="o">(</span>main<span class="o">)</span>:004&gt; accpt <span class="o">=</span> Digest::SHA1.base64digest<span class="o">(</span>key + magic<span class="o">)</span>
<span class="o">=&gt;</span> <span class="s2">"s3pPLMBiTxaQ9kYGzzhZRbK+xOo="</span>
</code></pre></div></div>

<p><img width="1000px" src="/assets/img/blog/WebSocket.jpg" alt="img: WebSocket" /></p>

<h4 id="websocket-heartbeat">WebSocket Heartbeat</h4>

<p>After the WebSocket connection is established, a client or server can send a ping to a counterpart.
The client or server who receives the ping must return a pong to the other side immediately or within a certain time frame.
This is the heartbeat of the WebSocket.</p>

<p>The heartbeat by pinging is useful for handling the connection for the reasons below:</p>
<ul>
  <li>verify the client and server are connected</li>
  <li>prevent firewalls and proxies from terminating inactive connections</li>
</ul>

<p>That is all about WebSocket as a protocol.</p>

<h3 id="action-cable">Action Cable</h3>

<p>Ruby on Rails supports WebSocket by Action Cable. The Action Cable was introduced on Rails 5.
Just including (or not skipping) Action Cable makes WebSocket available to use.
Let’s try Action Cable.</p>

<h4 id="create-a-rails-app">Create a Rails app</h4>

<p>Rails is an all-inclusive type web framework. All features are supported by default.
We don’t need to do anything special to enable Action Cable while creating a Rails app.
Only when <code class="language-plaintext highlighter-rouge">--minimal</code> or <code class="language-plaintext highlighter-rouge">--skip-action-cable</code> option is specified, Action Cable is not included.
Even when <code class="language-plaintext highlighter-rouge">--api</code> option is specified, Action Cable a.k.a WebSocket is supported.</p>

<p>For a simplicity, create a Rails app with default options.</p>

<div class="language-bash highlighter-rouge"><div class="highlight"><pre class="highlight"><code><span class="nv">$ </span>rails new just-a-sample
</code></pre></div></div>

<h4 id="test-websocket">Test WebSocket</h4>

<p>Nothing special. Go to just-a-sample directory and start the Rails server.</p>

<div class="language-bash highlighter-rouge"><div class="highlight"><pre class="highlight"><code><span class="nv">$ </span><span class="nb">cd </span>just-a-sample
<span class="nv">$ </span>bin/rails s
</code></pre></div></div>

<p>That’s it. WebSocket is ready to accept the request.
ActionCable.server is mounted on /cable by default, so using a curl command, try below HTTP request.</p>

<div class="language-bash highlighter-rouge"><div class="highlight"><pre class="highlight"><code><span class="nv">$ </span>curl <span class="nt">--http1</span>.1 <span class="nt">-i</span> <span class="nt">-N</span> <span class="se">\</span>
<span class="o">&gt;</span> <span class="nt">-H</span> <span class="s1">'Sec-Websocket-Version: 13'</span> <span class="se">\</span>
<span class="o">&gt;</span> <span class="nt">-H</span> <span class="s1">'Sec-Websocket-Key: QUo86XL2bHszCCpigvKqHg=='</span> <span class="se">\</span>
<span class="o">&gt;</span> <span class="nt">-H</span> <span class="s2">"Connection: Upgrade"</span> <span class="se">\</span>
<span class="o">&gt;</span> <span class="nt">-H</span> <span class="s2">"Upgrade: websocket"</span> <span class="se">\</span>
<span class="o">&gt;</span> <span class="nt">-H</span> <span class="s2">"Origin: http://localhost:3000/cable"</span> <span class="se">\</span>
<span class="o">&gt;</span> http://localhost:3000/cable
HTTP/1.1 101 Switching Protocols
Upgrade: websocket
Connection: Upgrade
Sec-WebSocket-Accept: 8dlVwoWynsF/RauFo6HjkWl7dLk<span class="o">=</span>

�<span class="o">{</span><span class="s2">"type"</span>:<span class="s2">"welcome"</span><span class="o">}</span>�<span class="k">${</span><span class="s2">"type"</span>:<span class="s2">"ping"</span><span class="p">,</span><span class="s2">"message"</span>:1722608438<span class="k">}</span>�<span class="k">${</span><span class="s2">"type"</span>:<span class="s2">"ping"</span><span class="p">,</span><span class="s2">"message"</span>:1722608441<span class="k">}</span>�<span class="k">${</span><span class="s2">"type"</span>:<span class="s2">"ping"</span><span class="p">,
</span><span class="s2">"message"</span>:1722608444<span class="k">}</span>�<span class="k">${</span><span class="s2">"type"</span>:<span class="s2">"ping"</span><span class="p">,</span><span class="s2">"message"</span>:1722608447<span class="k">}</span>
</code></pre></div></div>

<p>As we see, the status code 101 is returned. The connection is upgraded to WebSocket, and Sec-WebSocket-Accept is returned.
Right after the connection is established, a welcome message is sent back. Then, ping messages come in a fixed interval.</p>

<p>On the console that the Rails server is running, we see the message below:</p>

<div class="language-bash highlighter-rouge"><div class="highlight"><pre class="highlight"><code>Started GET <span class="s2">"/cable"</span> <span class="k">for</span> ::1 at 2024-08-02 23:20:35 +0900
Started GET <span class="s2">"/cable"</span> <span class="o">[</span>WebSocket] <span class="k">for</span> ::1 at 2024-08-02 23:20:35 +0900
Successfully upgraded to WebSocket <span class="o">(</span>REQUEST_METHOD: GET, HTTP_CONNECTION: Upgrade, HTTP_UPGRADE: websocket<span class="o">)</span>
</code></pre></div></div>

<p>When, the curl command quits by hitting control-c, the message below shows up:</p>
<div class="language-bash highlighter-rouge"><div class="highlight"><pre class="highlight"><code>Finished <span class="s2">"/cable"</span> <span class="o">[</span>WebSocket] <span class="k">for</span> ::1 at 2024-08-02 23:20:48 +0900
</code></pre></div></div>

<h3 id="note">Note</h3>

<p>As we see, starting WebSocket on Rails is very easy, zero configuration.
That’s a good news, but also a bad news.
If the Rails app is created without –skip-action-cable option, the app accepts WebSocket requests.
The app keeps sending ping frames to the clients who requested a WebSocket connection.
What if many curl requests try to establish WebSocket connections?
The ping frame is light weight, and the WebSocket connection can’t do anything except sending pings.
The risk of data breach or session hijacking would be almost zero, however, DoS (DDoS) type attack might be possible.</p>

<p>It’s a good practice to specify –skip-action-cable option if the app doesn’t need WebSocket.</p>

<h3 id="comments-and-discussions">Comments and Discussions</h3>

<p>GitHub Discussions: <a href="https://github.com/yokolet/new-note/discussions/10">WebSocket on Rails by Action Cable #10</a></p>

<h3 id="references">References</h3>

<ul>
  <li>RFC6455 The Websocket Protocol: <a href="https://datatracker.ietf.org/doc/html/rfc6455">https://datatracker.ietf.org/doc/html/rfc6455</a></li>
  <li>Rails Guides: Action Cable Overview: <a href="https://guides.rubyonrails.org/action_cable_overview.html">https://guides.rubyonrails.org/action_cable_overview.html</a></li>
  <li>MDN: Writing WebSocket servers: <a href="https://developer.mozilla.org/en-US/docs/Web/API/WebSockets_API/Writing_WebSocket_servers">https://developer.mozilla.org/en-US/docs/Web/API/WebSockets_API/Writing_WebSocket_servers</a></li>
  <li>A simple guide to Action Cable: <a href="https://dev.to/lucaskuhn/a-simple-guide-to-action-cable-2dk2">https://dev.to/lucaskuhn/a-simple-guide-to-action-cable-2dk2</a></li>
  <li>Understanding Action Cable in Rails 7: <a href="https://patrickkarsh.medium.com/understanding-action-cable-in-rails-7-24e942f6a8d7">https://patrickkarsh.medium.com/understanding-action-cable-in-rails-7-24e942f6a8d7</a></li>
</ul>]]></content><author><name></name></author><summary type="html"><![CDATA[In the web application domain, we hear some protocol names. Absolutely, HTTP or HTTPS is the most famous protocol that all web developers know. Although there’s a mechanism of Keep-Alive, a single request/response sequence with a single client/server is all done by HTTP.]]></summary></entry><entry><title type="html">Conserving Network Resources – Keep-Alive</title><link href="/2024/07/conserving-network-resources-keep-alive.html" rel="alternate" type="text/html" title="Conserving Network Resources – Keep-Alive" /><published>2024-07-17T12:05:00+00:00</published><updated>2024-07-17T12:05:00+00:00</updated><id>/2024/07/conserving-network-resources-keep-alive</id><content type="html" xml:base="/2024/07/conserving-network-resources-keep-alive.html"><![CDATA[<p>“When you type a URL in your browser, what will happen?”
If you are a web developer, you might have answered this sort of interview question once or twice.
It would be a popular question to test the knowledge how the Internet works.
<!--more-->
As it is famous, you will find many answers here and there online.</p>

<p>A common answer includes steps below:</p>
<ol>
  <li>DNS Resolution</li>
  <li>TCP Three-Way Handshake</li>
  <li>HTTPS Upgrade (SSL/TLS Handshake)</li>
  <li>HTTP Request/Response</li>
  <li>Browser Rendering</li>
</ol>

<p>This blog post focuses on the first three steps: DNS, TCP, and TLS, to think how the technology conserves the network
resources.</p>

<h3 id="dns-resolution">DNS Resolution</h3>

<p>To get website contents, devices send a TCP packet. The essential components of TCP packet are a
destination IP address and destination port. However it is not convenient to type 142.250.207.14, 17.253.144.10, or
54.239.28.85 in the URL box to go to Google, Apple or Amazon websites.
Sure, people type google.com, apple.com or amazon.com instead of IP addresses.</p>

<p>The first step is to find an IP address based on a given URL string. This is done by Domain Name Service (or DNS).
DNS provides a domain name to IP address mapping service and is basically a huge distributed database.
As you may know, DNS servers form a hierarchical structure.
On the top layer, 13 root servers are there:</p>
<ul>
  <li>a: Verisign, Los Angels CA</li>
  <li>b: USC-ISI, Marina del Rey, CA</li>
  <li>c: Cogent, Herndon, VA</li>
  <li>d: U Maryland, College Park, MD</li>
  <li>e: NASA, Mt. View, CA</li>
  <li>f: Internet Software C., Palo Alto, CA</li>
  <li>g: US DoD, Columbus, OH</li>
  <li>h: ARL, Aberdeen, MD</li>
  <li>i: Netnod, Stockholm</li>
  <li>j: Verisign, Dulles, VA</li>
  <li>k: RIPE, London</li>
  <li>l: ICANN, Los Angels, CA</li>
  <li>m: WIDE, Tokyo</li>
</ul>

<p>The next is a layer of Top-level domain (TLD) servers. These servers handle top-level domains such as .com, .org, .net, .edu
and .gov and all of the country top-level domains such as .uk, .fr, .ca, and .jp. The third layer is Authoritative DNS
servers. Many organizations run authoritative DNS servers. Among them, Cloudflare, Google and some more
provides publicly accessible DNS servers.</p>

<p>
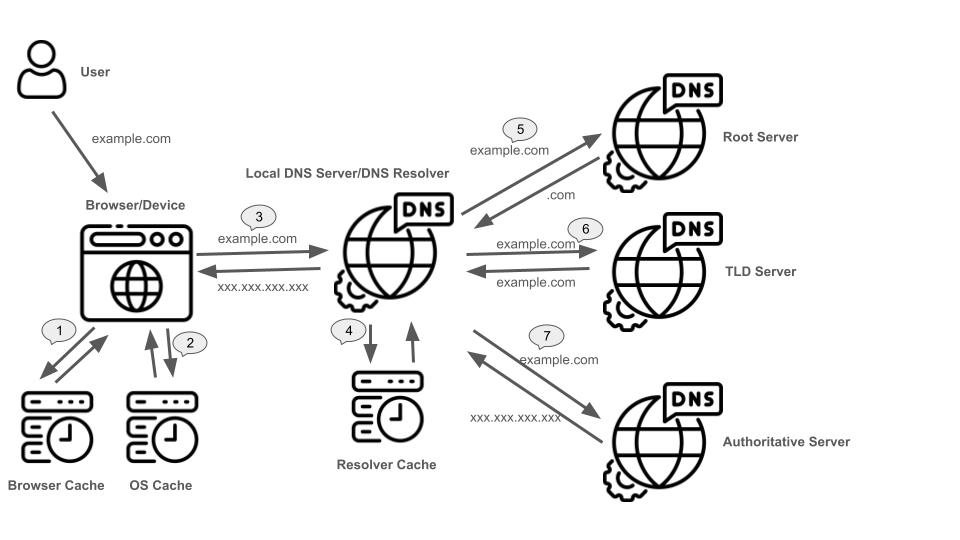
To get the IP address from URL string, browsers/devices make queries to a local DNS server.
It might be an Internet Service Provider (or ISP) DNS server and often called DNS resolver.
The local DNS server asks to the root DNS server and get a referral – what TLD DNS server likely knows the domain.
Then, the local DNS server asks to the specified TLD DNS server.
Again, the local DNS server get the referral from the TLD DNS server.
Lastly, the local DNS server goes to the specified authoritative DNS server to get the IP address.</p>

<p>It is a long way to finally get the IP address, however, domain name and IP address mappings are cached in certain points.
A browser and OS have a cache. The local DNS server has a cache as well.
If the mapping is in the cache, it is a much shorter way.</p>

<p><img width="1000px" src="/assets/img/blog/DNS_query.jpg" alt="img: DNS query" /></p>

<h3 id="tcp-three-way-handshake">TCP Three-Way Handshake</h3>

<p>The second step is the TCP three-way handshake.
TCP (Transmission Control Protocol) is frequently compared to UDP (User Datagram Protocol).
While TCP is described as connection-oriented, UDP is connectionless.
TCP establishes the connection before data transfer begins. This phase is called the three-way handshake.</p>

<p>
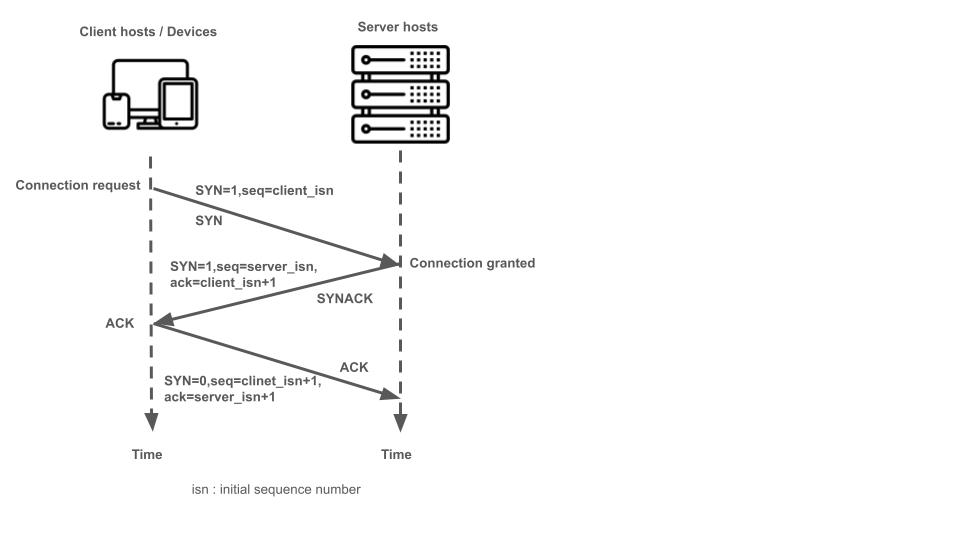
As the name expresses, the three-way handshake consists of 3 phases.</p>
<ul>
  <li>Phase 1: A client sends a SYN segment, which contains SYN bit 1 and randomly chosen client initial sequence number.</li>
  <li>Phase 2: A server receives the SYN segment and grants it. The server sends back a SYNACK segment, which contains
  SYN bit 1, client initial sequence number + 1, and randomly chosen server initial sequence number.</li>
  <li>Phase 3: The client receives SYNACK segment and acknowledges it. The client sends back the acknowledgement, which
  contains SYN bit 0, client initial sequence number + 1 and server initial sequence number + 1.</li>
</ul>

<p>After above three phases are completed, data can be sent over TCP.</p>

<p><img width="1000px" src="/assets/img/blog/TCP-3Way-Handshake.jpg" alt="img: TCP 3 Way Handshake" /></p>

<h3 id="https-upgrade-ssltls-handshake">HTTPS Upgrade (SSL/TLS Handshake)</h3>

<p>The third step is TLS handshake. This handshake is much more complicated compared to TCP handshake.
TLS handshake goes like this:</p>

<ol>
  <li>ClientHello: The client initiates the handshake by sending a message containing its supported protocols,
 cipher suites, and random session ID.</li>
  <li>ServerHello: The server responds with its chosen protocol, cipher suite, and session ID.</li>
  <li>Certificate: The server sends its digital certificate, which contains its public key and identity information.</li>
  <li>Key Exchange: The client and server use asymmetric encryption to exchange cryptographic keys,
 ensuring secure communication.</li>
  <li>Change Cipher Spec: Both parties send a “change cipher spec” message to indicate they are switching to
 the new symmetric encryption key.</li>
  <li>Finished: The client and server exchange “finished” messages to verify the integrity of the handshake and ensure
 both parties agree on the session parameters.</li>
</ol>

<p>Finally, web contents are ready to be downloaded to the browsers or devices.</p>

<h3 id="numbers-of-three-steps">Numbers of three steps</h3>

<p>At this point, we learn gory details of DNS lookup, TCP and TLS handshakes.
Well, let’s look at numbers related to the 3 steps above.</p>

<h4 id="number-of-dns-lookups">Number of DNS lookups</h4>

<p>It is said that DNS traffic is extremely busy.
<a href="https://news.ycombinator.com/item?id=36984419">This Hacker News post</a> says
“1.1.1.1 is now handling more than 1.3T requests per day.”
The 1.1.1.1 is a Cloudflare DNS server. Only one authoritative DNS server has to deal with 1.3T requests per day!
The post is 11 months ago from middle of July 2024, so data was taken around June 2023.
Here is another a bit old data.
A Reddit post from 2018 says, only one Pi-Hole DNS server processed around 18,000 DNS queries per day.
If we think of the number of public authoritative DNS servers, global DNS lookups may go up to 10 trillion
or more per day these days.</p>

<p>To conclude, DNS traffic is really extremely busy.</p>

<h4 id="time-needed-for-dns-lookup-tcptls-handshakes">Time needed for DNS lookup, TCP/TLS handshakes</h4>

<p>The number is from an AI assisted answer popped up by online search. So, the numbers are just an estimation.</p>

<ul>
  <li>DNS lookup: 10-100 milliseconds <br />
  varies depending on the complexity of the domain name, DNS server performance, and network latency.</li>
  <li>TCP handshake: 10-30 milliseconds</li>
  <li>TLS handshake: 200-1000 milliseconds <br />
  varies depending on the TLS version, the complexity of the certificate, and network latency.</li>
</ul>

<p>As the unit is milliseconds, overall performance looks not so bad. However, when the sequence repeats many times,
combined performance might not be negligible.</p>

<h3 id="here-comes-the-keep-alive">Here Comes the Keep-Alive</h3>

<p>If you are a web developer, you are sure to know that HTTP protocol is stateless.
The connection is closed once a request/response sequence is completed.
When someone type the URL on the browser, a DNS look up runs followed by a TCP handshake and TLS handshake.
Finally, web contents are shown up on the browser. At this point, the connection is closed.
When the same person clicks a button in the web page just shown up, again gory stuff explained above repeats.
The DNS lookup runs followed by the TCP handshake and TLS handshake.
The same person might click another button in the same web page. The previous connection is already closed.
So, DNS lookup, TCP handshake, and TLS handshake are performed, then finally, the web contents show up.</p>

<p>We are like: Oh, it’s a prime day. Let’s go to Amazon and click, click, click …….
Wow, what if every click triggers DNS lookup, TCP handshake, and TLS handshake?
How many people on earth do click, click, click ……?
The Internet world must be really extremely busy.</p>

<p>But, smart people are out there. They have invented a way to avoid repeating three steps.
Yes, it is the keep-alive.
The keep-alive is a mechanism to let the connection open. The consecutive HTTP request/response sequences can
skip DNS lookup, TCP handshake and TLS handshake. Using the keep-alive improves overall web performance
as well as conserves network resources.
Apparently, the number of DNS look ups is cut down.</p>

<p>During the era of HTTP/1.0, a client or server should explicitly specify the keep-alive in the HTTP header
like below:</p>

<div class="language-plaintext highlighter-rouge"><div class="highlight"><pre class="highlight"><code>Connection: Keep-Alive
Keep-Alive: timeout=5, max=1000
</code></pre></div></div>

<p>The timeout is the time in seconds that the host will allow an idle connection to remain open.
The max is the maximum number of requests that can be sent on this connection.</p>

<p>Now, HTTP/1.1 is out. The keep-alive becomes a default behavior. Below is an excerpt from RFC2616 section 8.1.2</p>
<blockquote>
  <p>A significant difference between HTTP/1.1 and earlier versions of
HTTP is that persistent connections are the default behavior of any
HTTP connection. That is, unless otherwise indicated, the client
SHOULD assume that the server will maintain a persistent connection,
even after error responses from the server.</p>
</blockquote>

<h3 id="test-keep-alive">Test Keep-Alive</h3>

<p>Well, we know Rails 7 supports HTTP/1.1, so does the keep-alive.
The keep-alive should be available and working.
But, is there any way to test the keep-alive is working?
It is very simple. Use curl command and request twice.</p>

<p>Let’s try some. The first test is to make sure the keep-alive is working.</p>
<div class="language-bash highlighter-rouge"><div class="highlight"><pre class="highlight"><code><span class="nv">$ </span>curl <span class="nt">-Iv</span> http://localhost:3000  <span class="nt">-o</span> /dev/null http://localhost:3000
<span class="k">*</span> Host localhost:3000 was resolved.
<span class="k">*</span> IPv6: ::1
<span class="k">*</span> IPv4: 127.0.0.1
  % Total    % Received % Xferd  Average Speed   Time    Time     Time  Current
                                 Dload  Upload   Total   Spent    Left  Speed
  0     0    0     0    0     0      0      0 <span class="nt">--</span>:--:-- <span class="nt">--</span>:--:-- <span class="nt">--</span>:--:--     0<span class="k">*</span>   Trying <span class="o">[</span>::1]:3000...
<span class="k">*</span> Connected to localhost <span class="o">(</span>::1<span class="o">)</span> port 3000
<span class="o">&gt;</span> HEAD / HTTP/1.1
<span class="o">&gt;</span> Host: localhost:3000
<span class="o">&gt;</span> User-Agent: curl/8.6.0
<span class="o">&gt;</span> Accept: <span class="k">*</span>/<span class="k">*</span>
<span class="o">&gt;</span>
&lt; HTTP/1.1 200 OK
&lt; x-frame-options: SAMEORIGIN
&lt; x-xss-protection: 0
&lt; x-content-type-options: nosniff
<span class="c">#...(snip snip snip)...</span>
&lt; Content-Length: 0
&lt;
  0     0    0     0    0     0      0      0 <span class="nt">--</span>:--:-- <span class="nt">--</span>:--:-- <span class="nt">--</span>:--:--     0
<span class="k">*</span> Connection <span class="c">#0 to host localhost left intact</span>
<span class="k">*</span> Found bundle <span class="k">for </span>host: 0x600002e64480 <span class="o">[</span>serially]
<span class="k">*</span> Can not multiplex, even <span class="k">if </span>we wanted to
<span class="k">*</span> Re-using existing connection with host localhost
<span class="o">&gt;</span> HEAD / HTTP/1.1
<span class="o">&gt;</span> Host: localhost:3000
<span class="o">&gt;</span> User-Agent: curl/8.6.0
<span class="o">&gt;</span> Accept: <span class="k">*</span>/<span class="k">*</span>
<span class="o">&gt;</span>
&lt; HTTP/1.1 200 OK
HTTP/1.1 200 OK
&lt; x-frame-options: SAMEORIGIN
x-frame-options: SAMEORIGIN
&lt; x-xss-protection: 0
x-xss-protection: 0
&lt; x-content-type-options: nosniff
x-content-type-options: nosniff
<span class="c">#...(snip snip snip)...</span>
&lt; Content-Length: 0
Content-Length: 0

&lt;
<span class="k">*</span> Connection <span class="c">#0 to host localhost left intact</span>
</code></pre></div></div>

<p>Focus on the lines <code class="language-plaintext highlighter-rouge">* Connection #0 to host localhost left intact</code> and
<code class="language-plaintext highlighter-rouge">* Re-using existing connection with host localhost</code>.  Those are the evidence that the keep-alive is working.</p>

<p>For a comparison, let’s add <code class="language-plaintext highlighter-rouge">Connection: close</code> to the request header to test the keep-alive disabled.</p>

<div class="language-bash highlighter-rouge"><div class="highlight"><pre class="highlight"><code><span class="nv">$ </span>curl <span class="nt">-Iv</span> http://localhost:3000  <span class="nt">-o</span> /dev/null http://localhost:3000  <span class="nt">-H</span> <span class="s2">"Connection: close"</span>
<span class="k">*</span> Host localhost:3000 was resolved.
<span class="k">*</span> IPv6: ::1
<span class="k">*</span> IPv4: 127.0.0.1
  % Total    % Received % Xferd  Average Speed   Time    Time     Time  Current
                                 Dload  Upload   Total   Spent    Left  Speed
  0     0    0     0    0     0      0      0 <span class="nt">--</span>:--:-- <span class="nt">--</span>:--:-- <span class="nt">--</span>:--:--     0<span class="k">*</span>   Trying <span class="o">[</span>::1]:3000...
<span class="k">*</span> Connected to localhost <span class="o">(</span>::1<span class="o">)</span> port 3000
<span class="o">&gt;</span> HEAD / HTTP/1.1
<span class="o">&gt;</span> Host: localhost:3000
<span class="o">&gt;</span> User-Agent: curl/8.6.0
<span class="o">&gt;</span> Accept: <span class="k">*</span>/<span class="k">*</span>
<span class="o">&gt;</span> Connection: close
<span class="o">&gt;</span>
&lt; HTTP/1.1 200 OK
&lt; x-frame-options: SAMEORIGIN
&lt; x-xss-protection: 0
&lt; x-content-type-options: nosniff
<span class="c">#...(snip snip snip)...</span>
&lt; Connection: close
&lt; Content-Length: 0
&lt;
  0     0    0     0    0     0      0      0 <span class="nt">--</span>:--:-- <span class="nt">--</span>:--:-- <span class="nt">--</span>:--:--     0
<span class="k">*</span> Closing connection
<span class="k">*</span> Hostname localhost was found <span class="k">in </span>DNS cache
<span class="k">*</span>   Trying <span class="o">[</span>::1]:3000...
<span class="k">*</span> Connected to localhost <span class="o">(</span>::1<span class="o">)</span> port 3000
<span class="o">&gt;</span> HEAD / HTTP/1.1
<span class="o">&gt;</span> Host: localhost:3000
<span class="o">&gt;</span> User-Agent: curl/8.6.0
<span class="o">&gt;</span> Accept: <span class="k">*</span>/<span class="k">*</span>
<span class="o">&gt;</span> Connection: close
<span class="o">&gt;</span>
&lt; HTTP/1.1 200 OK
HTTP/1.1 200 OK
&lt; x-frame-options: SAMEORIGIN
x-frame-options: SAMEORIGIN
&lt; x-xss-protection: 0
x-xss-protection: 0
&lt; x-content-type-options: nosniff
x-content-type-options: nosniff
<span class="c">#...(snip snip snip)...</span>
&lt; Connection: close
Connection: close
&lt; Content-Length: 0
Content-Length: 0

&lt;
<span class="k">*</span> Closing connection
</code></pre></div></div>

<p>We see the line <code class="language-plaintext highlighter-rouge">* Closing connection</code>, so we know the keep-alive becomes off.</p>

<p>Additionally, the second connection says <code class="language-plaintext highlighter-rouge">* Hostname localhost was found in DNS cache</code>, which means
the second DNS look up hits the cache.</p>

<p>“When you type a URL in your browser, what will happen?” is the interesting question.
We can learn how the Internet works as well as the network resource conservation and web performance.</p>

<h3 id="references">References</h3>
<ul>
  <li>Optimizing HTTP: Keep-alive and Pipelining: <a href="https://www.igvita.com/2011/10/04/optimizing-http-keep-alive-and-pipelining/">https://www.igvita.com/2011/10/04/optimizing-http-keep-alive-and-pipelining/</a></li>
  <li><a href="https://medium.com/@roopa.kushtagi/mastering-dns-a-comprehensive-overview-of-internet-address-translation-73793d0598ba">Mastering DNS: A Comprehensive Overview of Internet Address Translation</a></li>
  <li><a href="https://circleid.com/posts/20230316-analysis-of-7.5-trillion-dns-queries-reveals-public-resolvers-dominate-the-internet">Analysis of 7.5 Trillion DNS Queries Reveals Public Resolvers Dominate the Internet</a></li>
  <li>“1.1.1.1 is now handling more than 1.3T requests per day”: <a href="https://news.ycombinator.com/item?id=36984419">https://news.ycombinator.com/item?id=36984419</a></li>
  <li>Hypertext Transfer Protocol – HTTP/1.1: <a href="https://www.rfc-editor.org/rfc/rfc2616">https://www.rfc-editor.org/rfc/rfc2616</a></li>
  <li>The Transport Layer Security (TLS) Protocol Version 1.2 <a href="https://www.ietf.org/rfc/rfc5246.txt">https://www.ietf.org/rfc/rfc5246.txt</a></li>
  <li>Keep Alive: <a href="https://developer.mozilla.org/en-US/docs/Web/HTTP/Headers/Keep-Alive">https://developer.mozilla.org/en-US/docs/Web/HTTP/Headers/Keep-Alive</a></li>
</ul>]]></content><author><name></name></author><summary type="html"><![CDATA[“When you type a URL in your browser, what will happen?” If you are a web developer, you might have answered this sort of interview question once or twice. It would be a popular question to test the knowledge how the Internet works.]]></summary></entry><entry><title type="html">What is bcrypt gem?</title><link href="/2024/07/what-is-bcrypt-gem.html" rel="alternate" type="text/html" title="What is bcrypt gem?" /><published>2024-07-05T14:33:00+00:00</published><updated>2024-07-05T14:33:00+00:00</updated><id>/2024/07/what-is-bcrypt-gem</id><content type="html" xml:base="/2024/07/what-is-bcrypt-gem.html"><![CDATA[<p>When a Ruby on Rails application is created by <code class="language-plaintext highlighter-rouge">rails new</code> command, we typically see bcrypt gem in <code class="language-plaintext highlighter-rouge">Gemfile</code>.
<!--more--></p>
<div class="language-ruby highlighter-rouge"><div class="highlight"><pre class="highlight"><code><span class="c1"># Use Active Model has_secure_password [https://guides.rubyonrails.org/active_model_basics.html#securepassword]</span>
<span class="c1"># gem "bcrypt", "~&gt; [VERSION]"</span>
</code></pre></div></div>

<p>The Rails generator adds commonly used gems to Gemfile so that developers can add those by just removing <code class="language-plaintext highlighter-rouge">#</code>
at the beginning of a line. That’s pretty handy.</p>

<p>Okay, then, what is bcrypt gem actually doing?
The instruction at <a href="https://guides.rubyonrails.org/active_model_basics.html#securepassword">https://guides.rubyonrails.org/active_model_basics.html#securepassword</a>
says:</p>

<blockquote>
  <p>ActiveModel::SecurePassword depends on bcrypt, so include this gem in your Gemfile….”</p>
</blockquote>

<p>We can understand how to setup and use the gem to make passwords secure,
but still it’s not clear why the passwords become secure by bcrypt gem.</p>

<p>It’s time google it!</p>

<h3 id="hashing-not-encryption">Hashing, not Encryption</h3>

<p>If we see google search results about bcrypt, we notice many websites mention about hashing vs encryption.
The difference is a one-way or two-way algorithm or function.
The one-way function is able to generate a string of random characters based on the given string, but there’s no way to
make the original string back. In another words, it is impossible to decrypt.
The generated string is called a hash or digital fingerprint.</p>

<p>On the other hand, the two-way algorithm or function can do both: encrypt and decrypt.
If the two-way function is used to generate a string of random characters based on the the given string,
the given string can be recovered from the generated string. This process is called an encryption and decryption.</p>

<p>Bcrypt is the one-way function, so we will never ever know what is the password actually.
The question now would be how to test a given password from a user A is correct.
To test the password, exactly the same hashing process runs to generate a hashed string,
then, compare the saved and generated hashed strings. If those matches, the given password is correct.</p>

<p>Since nobody can recover passwords from hashed string, the one-way function is commonly used to secure password storage.</p>

<p>What about the two-way function? The two-way function or encryption/decryption is used to secure communication
including emails, store sensitive data such as PII (personal identifiable information), and etc.</p>

<p>In the area of two-way function, many online articles mention symmetric and asymmetric key encryption.
The symmetric encryption uses the same key to both encryption and decryption.
While asymmetric encryption uses a key pair, which is known as a public/private key pair.
The private key is used to encrypt. The public key is used to decrypt.
Well-known algorithms are:</p>
<ul>
  <li>Symmetric: Advanced Encryption Standard (AES), Data Encryption Standard (DES)</li>
  <li>Asymmetric: Rivest-Shamir-Adleman (RSA), Digital Signature Algorithm (DSA)</li>
</ul>

<p>If you are a software developer, you should have used one when you generated a ssh key pair.
Then, you should have pasted a public key to the source code repository such as GitHub or GitLab.</p>

<h3 id="bcrypt-algorithm--slow-is-good">Bcrypt algorithm – slow is good</h3>

<p>Of course, bcrypt is not the only widely used hashing algorithm. 
Famous algorithms are <a href="https://en.wikipedia.org/wiki/Argon2">Argon2id</a>,
<a href="https://en.wikipedia.org/wiki/Scrypt">scrypt</a>, and
<a href="https://en.wikipedia.org/wiki/PBKDF2">PBKDF2</a>.</p>

<p>Among those, bcrypt is said to be good since its computation is slow.
SLOW?? WHAT?
Yes, in the computing world, the faster, the better. To make it run faster, people use their brains and pay a lot of efforts.
Even though, bcrypt is good because it runs slow.</p>

<p>One of the purposes of the slow computation is to stop attackers in an early stage.
When a monitoring is in place, an administrator can spot a suspicious activity.
Thanks for the slow bcrypt, the attackers’ progresses slow down, which effectively prevents further data breach.</p>

<p>Bcrypt has a cost parameter to control its slowness.
The Ruby world has another gem called <a href="https://github.com/binarylogic/authlogic">authlogic</a>, which covers bcrypt,
scrypt and a couple more hashing algorithm. Authlogic’s API document has interesting benchmarks at:
<a href="https://www.rubydoc.info/github/binarylogic/authlogic/Authlogic/CryptoProviders/BCrypt">https://www.rubydoc.info/github/binarylogic/authlogic/Authlogic/CryptoProviders/BCrypt</a></p>
<div class="language-ruby highlighter-rouge"><div class="highlight"><pre class="highlight"><code><span class="nb">require</span> <span class="s2">"bcrypt"</span>
<span class="nb">require</span> <span class="s2">"digest"</span>
<span class="nb">require</span> <span class="s2">"benchmark"</span>

<span class="no">Benchmark</span><span class="p">.</span><span class="nf">bm</span><span class="p">(</span><span class="mi">18</span><span class="p">)</span> <span class="k">do</span> <span class="o">|</span><span class="n">x</span><span class="o">|</span>
  <span class="n">x</span><span class="p">.</span><span class="nf">report</span><span class="p">(</span><span class="s2">"BCrypt (cost = 10:"</span><span class="p">)</span> <span class="p">{</span>
    <span class="mi">100</span><span class="p">.</span><span class="nf">times</span> <span class="p">{</span> <span class="no">BCrypt</span><span class="o">::</span><span class="no">Password</span><span class="p">.</span><span class="nf">create</span><span class="p">(</span><span class="s2">"mypass"</span><span class="p">,</span> <span class="ss">:cost</span> <span class="o">=&gt;</span> <span class="mi">10</span><span class="p">)</span> <span class="p">}</span>
  <span class="p">}</span>
  <span class="n">x</span><span class="p">.</span><span class="nf">report</span><span class="p">(</span><span class="s2">"BCrypt (cost = 4:"</span><span class="p">)</span> <span class="p">{</span>
    <span class="mi">100</span><span class="p">.</span><span class="nf">times</span> <span class="p">{</span> <span class="no">BCrypt</span><span class="o">::</span><span class="no">Password</span><span class="p">.</span><span class="nf">create</span><span class="p">(</span><span class="s2">"mypass"</span><span class="p">,</span> <span class="ss">:cost</span> <span class="o">=&gt;</span> <span class="mi">4</span><span class="p">)</span> <span class="p">}</span>
  <span class="p">}</span>
  <span class="n">x</span><span class="p">.</span><span class="nf">report</span><span class="p">(</span><span class="s2">"Sha512:"</span><span class="p">)</span> <span class="p">{</span>
    <span class="mi">100</span><span class="p">.</span><span class="nf">times</span> <span class="p">{</span> <span class="no">Digest</span><span class="o">::</span><span class="no">SHA512</span><span class="p">.</span><span class="nf">hexdigest</span><span class="p">(</span><span class="s2">"mypass"</span><span class="p">)</span> <span class="p">}</span>
  <span class="p">}</span>
  <span class="n">x</span><span class="p">.</span><span class="nf">report</span><span class="p">(</span><span class="s2">"Sha1:"</span><span class="p">)</span> <span class="p">{</span>
    <span class="mi">100</span><span class="p">.</span><span class="nf">times</span> <span class="p">{</span> <span class="no">Digest</span><span class="o">::</span><span class="no">SHA1</span><span class="p">.</span><span class="nf">hexdigest</span><span class="p">(</span><span class="s2">"mypass"</span><span class="p">)</span> <span class="p">}</span>
  <span class="p">}</span>
<span class="k">end</span>

<span class="c1">#                          user     system      total        real</span>
<span class="c1"># BCrypt (cost = 10):  37.360000   0.020000  37.380000 ( 37.558943)</span>
<span class="c1"># BCrypt (cost = 4):    0.680000   0.000000   0.680000 (  0.677460)</span>
<span class="c1"># Sha512:               0.000000   0.000000   0.000000 (  0.000672)</span>
<span class="c1"># Sha1:                 0.000000   0.000000   0.000000 (  0.000454)</span>
</code></pre></div></div>

<p>As the result shows, the cost 10 bcrypt runs very slow.</p>

<p>Bcrypt gem’s default cost is 12 as explained at
<a href="https://github.com/bcrypt-ruby/bcrypt-ruby">https://github.com/bcrypt-ruby/bcrypt-ruby</a>.
So, by default, bcrypt-ruby runs much slower.</p>

<h3 id="its-salted">It’s salted</h3>

<p>Another goodness of bcrypt is, it is salted.
The salt is a some length of random characters used by hashing functions.
As for bcrypt, the salt is randomly generated 16 byte value, which will be 22 characters after base 64 encoded.
Using salt, bcrypt generate a hash (or checksum) from <code class="language-plaintext highlighter-rouge">salt + password</code>.
This makes hashed strings really unique and almost impossible to find passwords.</p>

<p>When the hashing is done, the generated string will have a format blow:</p>

<div class="language-plaintext highlighter-rouge"><div class="highlight"><pre class="highlight"><code>$2&lt;a/b/x/y&gt;$[cost]$[22 character salt][31 character hash]

$2a$12$K0ByB.6YI2/OYrB4fQOYLe6Tv0datUVf6VZ/2Jzwm879BW5K1cHey
\__/\/ \____________________/\_____________________________/
Alg Cost      Salt                  Hash (Checksum)
</code></pre></div></div>

<p>Since every password has a different salt, bcrypt makes guessing the passwords really hard.</p>

<h3 id="devise-and-bcrypt-gem">Devise and bcrypt gem</h3>

<p>Bcrypt-ruby gem or simply bcrypt gem is a widely used hashing function in the Rails ecosystem.
For example, famous devise gem uses bcrypt as a default hashing algorithm.</p>

<p>Let’s try what are going on by getting hands dirty.</p>

<h4 id="create-a-sample-rails-app">Create a sample Rails app</h4>

<p>As always, the first command is <code class="language-plaintext highlighter-rouge">rails new</code>. This can be very simple app, so –minimal option is added.
Also, <code class="language-plaintext highlighter-rouge">-d postgresql</code> option is added to see what are actually in the database.
Once the app is created, setup the database, install devise gem, and finally create a devise User model.</p>

<div class="language-bash highlighter-rouge"><div class="highlight"><pre class="highlight"><code><span class="nv">$ </span>bundle <span class="nb">exec </span>rails new devise-sample <span class="nt">--minimal</span> <span class="nt">-d</span> postgresql
<span class="nv">$ </span>rake db:setup
<span class="nv">$ </span>bundle add devise
<span class="nv">$ </span>bundle <span class="nb">exec </span>rails g devise:install
<span class="nv">$ </span>bundle <span class="nb">exec </span>rails g devise User
<span class="nv">$ </span>bundle <span class="nb">exec </span>rails db:migrate
</code></pre></div></div>

<p>At this point, sign up, sign in, sign out and some more password related paths are already created.</p>

<div class="language-bash highlighter-rouge"><div class="highlight"><pre class="highlight"><code><span class="nv">$ </span>bundle <span class="nb">exec </span>rails routes
                  Prefix Verb   URI Pattern                    Controller#Action
        new_user_session GET    /users/sign_in<span class="o">(</span>.:format<span class="o">)</span>       devise/sessions#new
            user_session POST   /users/sign_in<span class="o">(</span>.:format<span class="o">)</span>       devise/sessions#create
    destroy_user_session DELETE /users/sign_out<span class="o">(</span>.:format<span class="o">)</span>      devise/sessions#destroy
       new_user_password GET    /users/password/new<span class="o">(</span>.:format<span class="o">)</span>  devise/passwords#new
      edit_user_password GET    /users/password/edit<span class="o">(</span>.:format<span class="o">)</span> devise/passwords#edit
           user_password PATCH  /users/password<span class="o">(</span>.:format<span class="o">)</span>      devise/passwords#update
                         PUT    /users/password<span class="o">(</span>.:format<span class="o">)</span>      devise/passwords#update
                         POST   /users/password<span class="o">(</span>.:format<span class="o">)</span>      devise/passwords#create
cancel_user_registration GET    /users/cancel<span class="o">(</span>.:format<span class="o">)</span>        devise/registrations#cancel
   new_user_registration GET    /users/sign_up<span class="o">(</span>.:format<span class="o">)</span>       devise/registrations#new
  edit_user_registration GET    /users/edit<span class="o">(</span>.:format<span class="o">)</span>          devise/registrations#edit
       user_registration PATCH  /users<span class="o">(</span>.:format<span class="o">)</span>               devise/registrations#update
                         PUT    /users<span class="o">(</span>.:format<span class="o">)</span>               devise/registrations#update
                         DELETE /users<span class="o">(</span>.:format<span class="o">)</span>               devise/registrations#destroy
                         POST   /users<span class="o">(</span>.:format<span class="o">)</span>               devise/registrations#create
      rails_health_check GET    /up<span class="o">(</span>.:format<span class="o">)</span>                  rails/health#show
</code></pre></div></div>

<p>For a convenience, let’s create a simple page which has buttons of sign up/in/out.</p>

<div class="language-bash highlighter-rouge"><div class="highlight"><pre class="highlight"><code><span class="nv">$ </span>bundle <span class="nb">exec </span>rails g controller home index
</code></pre></div></div>

<p>Add below to <code class="language-plaintext highlighter-rouge">app/views/home/index.html.erb</code>.</p>

<div class="language-ruby highlighter-rouge"><div class="highlight"><pre class="highlight"><code><span class="o">&lt;</span><span class="sx">% if </span><span class="n">notice</span> <span class="sx">%&gt;
  &lt;p class="alert alert-success"&gt;</span><span class="o">&lt;</span><span class="sx">%= notice %&gt;&lt;/p&gt;
&lt;% end %&gt;
&lt;% if alert %&gt;
  &lt;p class=</span><span class="s2">"alert alert-danger"</span><span class="o">&gt;&lt;</span><span class="sx">%= alert %&gt;&lt;/p&gt;
&lt;% end %&gt;

&lt;%=</span> <span class="n">button_to</span><span class="p">(</span>
        <span class="s2">"Sign Up"</span><span class="p">,</span>
        <span class="n">new_user_registration_path</span><span class="p">,</span>
        <span class="ss">method: :get</span>
      <span class="p">)</span> <span class="o">%&gt;</span>
<span class="o">&lt;</span><span class="n">br</span><span class="o">/&gt;</span>
<span class="o">&lt;</span><span class="sx">%= button_to(
        "Sign In",
        new_user_session_path,
        method: :get
      ) %&gt;
&lt;br/&gt;
&lt;%=</span> <span class="n">button_to</span><span class="p">(</span>
        <span class="s2">"Log Out"</span><span class="p">,</span>
        <span class="n">destroy_user_session_path</span><span class="p">,</span>
        <span class="ss">method: :delete</span>
      <span class="p">)</span> <span class="o">%&gt;</span>
</code></pre></div></div>

<p>Update <code class="language-plaintext highlighter-rouge">config/routes.rb</code> as in blow:</p>

<div class="language-ruby highlighter-rouge"><div class="highlight"><pre class="highlight"><code><span class="no">Rails</span><span class="p">.</span><span class="nf">application</span><span class="p">.</span><span class="nf">routes</span><span class="p">.</span><span class="nf">draw</span> <span class="k">do</span>
  <span class="n">root</span> <span class="s1">'home#index'</span>
  <span class="c1">#...</span>
  <span class="c1"># ...</span>
<span class="k">end</span>
</code></pre></div></div>

<p>All are ready. It’s time to start a Rails server and create users.</p>

<div class="language-bash highlighter-rouge"><div class="highlight"><pre class="highlight"><code><span class="nv">$ </span>bundle <span class="nb">exec </span>rails s
</code></pre></div></div>

<p>If the server starts, go to http://localhost:3000 on a browser.</p>

<p><img width="500px" src="/assets/img/blog/devise-sample-buttons.jpeg" alt="img: devise sample buttons" /></p>

<p>Sign up the first user with:</p>
<ul>
  <li>email: foo@example.com</li>
  <li>password: Foo’sPassw0rd!</li>
</ul>

<p><img width="500px" src="/assets/img/blog/devise-sample-foo-signup.jpeg" alt="img: devise sample sign up foo" /></p>

<p>Click the “Log Out” button and sign up the second user with exactly the same password as the first user:</p>

<ul>
  <li>email: bar@example.com</li>
  <li>password: Foo’sPassw0rd!</li>
</ul>

<p><img width="500px" src="/assets/img/blog/devise-sample-bar-signup.jpeg" alt="img: devise sample sign up bar" /></p>

<h4 id="what-have-been-created">What have been created</h4>

<p>Now we had two devise users successfully signed up. Two users can be verified on a Rails console, but let’s see
what are in PostgreSQL first.</p>

<div class="language-bash highlighter-rouge"><div class="highlight"><pre class="highlight"><code><span class="c"># In this case, PostgreSQL was installed by brew on MacOS.</span>
<span class="c"># On other OS, installation, or setup, psql command may start with different arguments. </span>
<span class="nv">$ </span>psql postgres
<span class="nv">postgres</span><span class="o">=</span><span class="c"># \c devise_sample_development</span>
<span class="nv">devise_sample_development</span><span class="o">=</span><span class="c"># select * from users;</span>

 <span class="nb">id</span> |      email      |                      encrypted_password                      | reset_password_token |...
<span class="nt">----</span>+-----------------+--------------------------------------------------------------+----------------------+...
  2 | foo@example.com | <span class="nv">$2a$12$biaK7edYPkOMEKUFjt9rCucUrine6wP</span>.La20blTv7.bvpxtPv/dYi |                      |...
  3 | bar@example.com | <span class="nv">$2a$12$.</span>e3uUveScoJJmjBg9FNozeU9G.knZVODPmmk6xCVU0Amwmk4Pg316 |                      |...
<span class="o">(</span>2 rows<span class="o">)</span>
</code></pre></div></div>

<p>The encrypted_password column has hashed values generated by bcrypt.
Although two users used the exactly the same password, salt strings (22 characters after “12$”) are different.
As a result, hash values (last 31 characters) are different.</p>

<p>Open up the Rails console and test some bcrypt APIs.</p>

<div class="language-bash highlighter-rouge"><div class="highlight"><pre class="highlight"><code><span class="nv">$ </span>bundle <span class="nb">exec </span>rails c
</code></pre></div></div>

<div class="language-ruby highlighter-rouge"><div class="highlight"><pre class="highlight"><code><span class="c1"># get bcrypt generated hash values</span>
<span class="n">irb</span><span class="p">(</span><span class="n">main</span><span class="p">):</span><span class="mo">001</span><span class="o">&gt;</span> <span class="n">hashes</span> <span class="o">=</span> <span class="no">User</span><span class="p">.</span><span class="nf">all</span><span class="p">.</span><span class="nf">map</span> <span class="p">{</span><span class="o">|</span><span class="n">u</span><span class="o">|</span> <span class="n">u</span><span class="p">.</span><span class="nf">encrypted_password</span> <span class="p">}</span>
  <span class="no">User</span> <span class="no">Load</span> <span class="p">(</span><span class="mf">0.9</span><span class="n">ms</span><span class="p">)</span>  <span class="no">SELECT</span> <span class="s2">"users"</span><span class="p">.</span><span class="nf">*</span> <span class="no">FROM</span> <span class="s2">"users"</span>
<span class="o">=&gt;</span>
<span class="p">[</span><span class="s2">"$2a$12$biaK7edYPkOMEKUFjt9rCucUrine6wP.La20blTv7.bvpxtPv/dYi"</span><span class="p">,</span>
<span class="o">...</span>
<span class="n">irb</span><span class="p">(</span><span class="n">main</span><span class="p">):</span><span class="mo">002</span><span class="o">&gt;</span> <span class="n">hashes</span>
<span class="o">=&gt;</span>
<span class="p">[</span><span class="s2">"$2a$12$biaK7edYPkOMEKUFjt9rCucUrine6wP.La20blTv7.bvpxtPv/dYi"</span><span class="p">,</span>
 <span class="s2">"$2a$12$.e3uUveScoJJmjBg9FNozeU9G.knZVODPmmk6xCVU0Amwmk4Pg316"</span><span class="p">]</span>

<span class="c1"># try some bcrypt APIs</span>
<span class="n">irb</span><span class="p">(</span><span class="n">main</span><span class="p">):</span><span class="mo">004</span><span class="o">&gt;</span> <span class="nb">require</span> <span class="s1">'bcrypt'</span>
<span class="o">=&gt;</span> <span class="kp">true</span>
<span class="n">irb</span><span class="p">(</span><span class="n">main</span><span class="p">):</span><span class="mo">005</span><span class="o">&gt;</span> <span class="n">foo</span> <span class="o">=</span> <span class="no">BCrypt</span><span class="o">::</span><span class="no">Password</span><span class="p">.</span><span class="nf">new</span><span class="p">(</span><span class="n">hashes</span><span class="p">[</span><span class="mi">0</span><span class="p">])</span>
<span class="o">=&gt;</span> <span class="s2">"$2a$12$biaK7edYPkOMEKUFjt9rCucUrine6wP.La20blTv7.bvpxtPv/dYi"</span>

<span class="c1"># yes! the password test passes </span>
<span class="n">irb</span><span class="p">(</span><span class="n">main</span><span class="p">):</span><span class="mo">006</span><span class="o">&gt;</span> <span class="n">foo</span> <span class="o">==</span> <span class="s2">"Foo'sPassw0rd!"</span>
<span class="o">=&gt;</span> <span class="kp">true</span>

<span class="c1"># the second user's password test passes as well</span>
<span class="n">irb</span><span class="p">(</span><span class="n">main</span><span class="p">):</span><span class="mo">010</span><span class="o">&gt;</span> <span class="no">BCrypt</span><span class="o">::</span><span class="no">Password</span><span class="p">.</span><span class="nf">new</span><span class="p">(</span><span class="n">hashes</span><span class="p">[</span><span class="mi">1</span><span class="p">])</span> <span class="o">==</span> <span class="s2">"Foo'sPassw0rd!"</span>
<span class="o">=&gt;</span> <span class="kp">true</span>

<span class="c1"># get parameters from a generated hash value</span>
<span class="c1"># bcrypt version</span>
<span class="n">irb</span><span class="p">(</span><span class="n">main</span><span class="p">):</span><span class="mo">011</span><span class="o">&gt;</span> <span class="n">foo</span><span class="p">.</span><span class="nf">version</span>
<span class="o">=&gt;</span> <span class="s2">"2a"</span>
<span class="c1"># cost </span>
<span class="n">irb</span><span class="p">(</span><span class="n">main</span><span class="p">):</span><span class="mo">012</span><span class="o">&gt;</span> <span class="n">foo</span><span class="p">.</span><span class="nf">cost</span>
<span class="o">=&gt;</span> <span class="mi">12</span>
<span class="c1"># salt -- bcrypt gem's salt method returns "version + cost + salt"</span>
<span class="n">irb</span><span class="p">(</span><span class="n">main</span><span class="p">):</span><span class="mo">013</span><span class="o">&gt;</span> <span class="n">foo</span><span class="p">.</span><span class="nf">salt</span>
<span class="o">=&gt;</span> <span class="s2">"$2a$12$biaK7edYPkOMEKUFjt9rCu"</span>
<span class="c1"># checksum or hash of 31 characters</span>
<span class="n">irb</span><span class="p">(</span><span class="n">main</span><span class="p">):</span><span class="mo">014</span><span class="o">&gt;</span> <span class="n">foo</span><span class="p">.</span><span class="nf">checksum</span>
<span class="o">=&gt;</span> <span class="s2">"cUrine6wP.La20blTv7.bvpxtPv/dYi"</span>
<span class="n">irb</span><span class="p">(</span><span class="n">main</span><span class="p">):</span><span class="mo">015</span><span class="o">&gt;</span> <span class="n">foo</span><span class="p">.</span><span class="nf">checksum</span><span class="p">.</span><span class="nf">length</span>
<span class="o">=&gt;</span> <span class="mi">31</span>
</code></pre></div></div>

<p>As in above, we can manually test the password’s validity.</p>

<h3 id="what-can-be-prevented-by-password-hashing">What can be prevented by password hashing?</h3>

<p>At this point, we know what is bcrypt (bcrypt gem) and how to use it.
Bcrypt is there to secure a password storage.
The question is from what the password storage will be secured.</p>

<p>In this world, two major password storage attacks are there: brute force and rainbow table attack.
The brute force attack takes trial and error approach guessing every possible password string.
Nothing can prevent the brute force attack 100%.
However, because of the bcrypt’s slow computing process, the attack can be detected in the early stage.
That way, a damage can be possibly minimized.</p>

<p>Considering the slow computing process, evil hackers invented rainbow table attack.
The table has already generated hashing values using really many combinations of salt and possible password string.
The rainbow attack can bypass the slow bcrypt computation time.
Bcrypt is strong enough to be cracked, but there’s no guarantee to make it 100% secure.
A good news is, the rainbow table attack happens when the password storage is compromised.</p>

<p>As a Rails developer, what we can do would be to put an additional layer of password security.
Two factor authentication or CAPTCHA might be good options.</p>

<p>Other than that, Rails devs might just pray for administrators or DevOps people’s relentless work
to save the password storage.</p>

<h3 id="references">References</h3>

<ul>
  <li>Argon2: <a href="https://en.wikipedia.org/wiki/Argon2">https://en.wikipedia.org/wiki/Argon2</a></li>
  <li>scrypt: <a href="https://en.wikipedia.org/wiki/Scrypt">https://en.wikipedia.org/wiki/Scrypt</a></li>
  <li>bcrypt: <a href="https://en.wikipedia.org/wiki/Bcrypt">https://en.wikipedia.org/wiki/Bcrypt</a></li>
  <li>PBKDF2: <a href="https://en.wikipedia.org/wiki/PBKDF2">https://en.wikipedia.org/wiki/PBKDF2</a></li>
  <li>authlogic: <a href="https://github.com/binarylogic/authlogic">https://github.com/binarylogic/authlogic</a></li>
  <li>bcrypt-ruby: <a href="https://github.com/bcrypt-ruby/bcrypt-ruby">https://github.com/bcrypt-ruby/bcrypt-ruby</a></li>
  <li>OWASP Password Storage Cheat Sheet: <a href="https://cheatsheetseries.owasp.org/cheatsheets/Password_Storage_Cheat_Sheet.html">https://cheatsheetseries.owasp.org/cheatsheets/Password_Storage_Cheat_Sheet.html</a></li>
  <li>What is bcrypt and how does it work?: <a href="https://nordvpn.com/blog/what-is-bcrypt/">https://nordvpn.com/blog/what-is-bcrypt/</a></li>
  <li>What is brute force attack?: <a href="https://nordvpn.com/blog/brute-force-attack/">https://nordvpn.com/blog/brute-force-attack/</a></li>
</ul>]]></content><author><name></name></author><summary type="html"><![CDATA[When a Ruby on Rails application is created by rails new command, we typically see bcrypt gem in Gemfile.]]></summary></entry><entry><title type="html">Vite + Vue + Bun on Rails</title><link href="/2024/03/vite-vue-bun-on-rails.html" rel="alternate" type="text/html" title="Vite + Vue + Bun on Rails" /><published>2024-03-05T12:18:00+00:00</published><updated>2024-03-05T12:18:00+00:00</updated><id>/2024/03/vite-vue-bun-on-rails</id><content type="html" xml:base="/2024/03/vite-vue-bun-on-rails.html"><![CDATA[<p><a href="https://vuejs.org/">Vue.js</a> is one of frontend frameworks gaining popularity among rapidly emerging JavaScript technologies.
The combination of Vue.js and Rails is becoming more popular as well,
however, Vue.js development on Rails is not so straightforward.
The reason would be that Vue.js relies on <a href="https://vitejs.dev/">Vite</a> for a development environment
such as HMR (Hot Module Replacement) and bundling.
<!--more-->
Since Rails 7, some JavaScript approaches have been supported.
As of version 7.1.3.2, importmap (default), bun, webpack, esbuild and rollup are the choices.
Vite is a replacement of such JavaScript approaches, but is not listed yet.</p>

<p>Here comes the <a href="https://rubygems.org/gems/vite_rails">vite_rails gem</a>.
The gem sets up the environment for Vite on Rails.
Vite itself is independent from frontend frameworks.
By adding a plugin, Vite + Vue development environment will be created.</p>

<p>One more addition in this blog post is <a href="https://bun.sh/">Bun</a>.
Bun runs really fast.
Here, Bun is used just a replacement of npm or yarn.
However, Bun is a all-in-one toolkit and covers some features of Vite such as bundling.
For the topic of Bun vs. Vite, the blog post,
<a href="https://dev.to/this-is-learning/why-use-vite-when-bun-is-also-a-bundler-vite-vs-bun-2723">Why use Vite when Bun is also a bundler? - Vite vs. Bun</a>,
explains well.
At this moment, Vite on Bun is an effective combination.</p>

<p>This blog post explains how Vue, Vite and Bun on Rails can be created.
The source code is on the GitHub, <a href="https://github.com/yokolet/rails-vite-vue">rails-vite-vue</a>.</p>

<h3 id="prerequisite">Prerequisite</h3>

<p>This blog is not about a big application,
even though we need tools to be installed before getting started.
Below is a list of what should be installed.</p>

<ol>
  <li>Ruby: <a href="https://www.ruby-lang.org/en/documentation/installation/">Installing Ruby</a></li>
  <li>Rails: <a href="https://guides.rubyonrails.org/v5.0/getting_started.html#installing-rails">Installing Rails</a></li>
  <li>Node.js: <a href="https://nodejs.org/en/download/package-manager/">Installing Node.js via package manager</a><br />
or Download from <a href="https://nodejs.org/en">https://nodejs.org/en</a></li>
  <li>Bun: <a href="https://bun.sh/docs/installation">https://bun.sh/docs/installation</a></li>
</ol>

<h3 id="versions">Versions</h3>

<ul>
  <li>Ruby 3.2.3</li>
  <li>Rails 7.1.3.2</li>
  <li>Node.js v21.5.0</li>
  <li>Bun 1.0.29</li>
</ul>

<h3 id="create-a-rails-app-skipping-javascript">Create a Rails App Skipping JavaScript</h3>

<p>Rails supports importmap (default), bun, webpack, esbuild and rollup as JavaScript approaches.
None of those will be used to transpile, bundle, or etc. to create a frontend by Vue.
Bun will be used, but its role is a replacement of npm or yarn here.
The best option is <code class="language-plaintext highlighter-rouge">--skip-javascript</code>.
Also, <code class="language-plaintext highlighter-rouge">--minimal</code> option works if the app can be a simple one.</p>

<p>The command blow creates a Rails app without a JavaScript support.</p>

<div class="language-bash highlighter-rouge"><div class="highlight"><pre class="highlight"><code><span class="nv">$ </span>rails new <span class="o">[</span>APP NAME] <span class="nt">--skip-javascript</span> <span class="nt">-T</span>
</code></pre></div></div>

<h3 id="install-vite">Install Vite</h3>

<p>The next step is to install Vite.
Change a directory to the application, then type the command below.</p>

<div class="language-bash highlighter-rouge"><div class="highlight"><pre class="highlight"><code><span class="nv">$ </span>bundle add vite_rails
</code></pre></div></div>

<p>The command above installs vite_rails gem along with a Ruby version of vite command.
The Ruby version of vite command is used to install Vite and JavaScript version of vite command.</p>

<p>Now, it’s time to use the Ruby version of vite command. Type below.</p>

<div class="language-bash highlighter-rouge"><div class="highlight"><pre class="highlight"><code><span class="nv">$ </span>bundle <span class="nb">exec </span>vite <span class="nb">install</span>
</code></pre></div></div>

<p>Above command does a lot.
It installs the vite JavaScript package which includes JavaScript version of vite command.
Also, it installs the vite-plugin-ruby JavaScript package.
During the package installation, npm runs. It looks no option to switch to yarn or bun.</p>

<p>Additionally, it creates files listed below.</p>

<ul>
  <li>Procfile.dev</li>
  <li>app/frontend/entrypoints/application.js</li>
  <li>bin/vite</li>
  <li>config/initializers/content_security_policy.rb</li>
  <li>config/vite.json</li>
  <li>vite.config.ts</li>
</ul>

<h3 id="switching-from-npm-to-bun">Switching from npm to bun</h3>

<p>Bun runs really fast, so this blog uses bun instead of npm.
Since package-lock.json is no longer needed, delete the npm lock file.</p>

<div class="language-bash highlighter-rouge"><div class="highlight"><pre class="highlight"><code><span class="nv">$ </span><span class="nb">rm </span>package-lock.json
<span class="nv">$ </span>bun <span class="nb">install</span>
</code></pre></div></div>

<p>Once bun install is completed,  Bun’s lock file, <code class="language-plaintext highlighter-rouge">bun.lockb</code>, will be created.
After this, use bun command to install JavaScript packages.</p>

<h3 id="install-vue-and-vue-plugin">Install Vue and Vue Plugin</h3>

<p>We need Vue JavaScript package to develop Vue app.
We also need the Vue plugin for Vite.
Vite is a framework independent development tool.
To use Vite for Vue development, Vue plugin should be installed and set up.</p>

<div class="language-bash highlighter-rouge"><div class="highlight"><pre class="highlight"><code><span class="nv">$ </span>bun add vue @vitejs/plugin-vue
</code></pre></div></div>

<p>After the vue and plugin installation, edit <code class="language-plaintext highlighter-rouge">vite.config.ts</code> to set up Vue plugin.</p>

<div class="language-typescript highlighter-rouge"><div class="highlight"><pre class="highlight"><code><span class="k">import</span> <span class="p">{</span> <span class="nx">defineConfig</span> <span class="p">}</span> <span class="k">from</span> <span class="dl">'</span><span class="s1">vite</span><span class="dl">'</span>
<span class="k">import</span> <span class="nx">RubyPlugin</span> <span class="k">from</span> <span class="dl">'</span><span class="s1">vite-plugin-ruby</span><span class="dl">'</span>
<span class="k">import</span> <span class="nx">vue</span> <span class="k">from</span> <span class="dl">'</span><span class="s1">@vitejs/plugin-vue</span><span class="dl">'</span> <span class="c1">// added</span>

<span class="k">export</span> <span class="k">default</span> <span class="nx">defineConfig</span><span class="p">({</span>
  <span class="na">plugins</span><span class="p">:</span> <span class="p">[</span>
    <span class="nx">RubyPlugin</span><span class="p">(),</span>
    <span class="nx">vue</span><span class="p">(),</span>  <span class="c1">// added</span>
  <span class="p">],</span>
<span class="p">})</span>
</code></pre></div></div>

<h3 id="set-up-starter-command">Set up Starter Command</h3>

<p>When the app was created, we skipped the JavaScript approaches.
Because of that, the app doesn’t have a handy command such as <code class="language-plaintext highlighter-rouge">bin/dev</code>.
The vite_rails gem created <code class="language-plaintext highlighter-rouge">Profile,dev</code> configuration for a foreman.
This works, but, still, we need to type <code class="language-plaintext highlighter-rouge">foreman start -f Procfile.dev</code> to start the development server.
It’s better to have the command, <code class="language-plaintext highlighter-rouge">bin/dev</code>.</p>

<h5 id="packagejson">package.json</h5>

<p>Add the scripts section in package.json.</p>

<div class="language-json highlighter-rouge"><div class="highlight"><pre class="highlight"><code><span class="p">{</span><span class="w">
  </span><span class="nl">"scripts"</span><span class="p">:</span><span class="w"> </span><span class="p">{</span><span class="w">
    </span><span class="nl">"dev"</span><span class="p">:</span><span class="w"> </span><span class="s2">"bunx --bun vite"</span><span class="p">,</span><span class="w">
    </span><span class="nl">"build"</span><span class="p">:</span><span class="w"> </span><span class="s2">"bunx --bun vite build"</span><span class="w">
  </span><span class="p">},</span><span class="w">
  </span><span class="nl">"devDependencies"</span><span class="p">:</span><span class="w"> </span><span class="p">{</span><span class="w">
    </span><span class="nl">"vite"</span><span class="p">:</span><span class="w"> </span><span class="s2">"^5.1.4"</span><span class="p">,</span><span class="w">
    </span><span class="nl">"vite-plugin-ruby"</span><span class="p">:</span><span class="w"> </span><span class="s2">"^5.0.0"</span><span class="w">
  </span><span class="p">},</span><span class="w">
  </span><span class="nl">"dependencies"</span><span class="p">:</span><span class="w"> </span><span class="p">{</span><span class="w">
    </span><span class="nl">"@vitejs/plugin-vue"</span><span class="p">:</span><span class="w"> </span><span class="s2">"^5.0.4"</span><span class="p">,</span><span class="w">
    </span><span class="nl">"vue"</span><span class="p">:</span><span class="w"> </span><span class="s2">"^3.4.21"</span><span class="w">
  </span><span class="p">}</span><span class="w">
</span><span class="p">}</span><span class="w">
</span></code></pre></div></div>

<p>The <a href="https://bun.sh/docs/cli/bunx">bunx command</a> should be installed when Bun was installed.
The bunx is a counterpart of npx.</p>

<h5 id="procfiledev">Procfile.dev</h5>

<p>Update the file as in below.</p>

<div class="language-bash highlighter-rouge"><div class="highlight"><pre class="highlight"><code>web: <span class="nb">env </span><span class="nv">RUBY_DEBUG_OPEN</span><span class="o">=</span><span class="nb">true </span>bin/rails server
js: bun run dev
</code></pre></div></div>

<p>This setting is to start two servers – one for Rails and another for a frontend.</p>

<h5 id="bindev">bin/dev</h5>

<p>Create a new file <code class="language-plaintext highlighter-rouge">bin/dev</code> with the contents below.</p>

<div class="language-bash highlighter-rouge"><div class="highlight"><pre class="highlight"><code><span class="c">#!/usr/bin/env sh</span>

<span class="k">if </span>gem list <span class="nt">--no-installed</span> <span class="nt">--exact</span> <span class="nt">--silent</span> foreman<span class="p">;</span> <span class="k">then
  </span><span class="nb">echo</span> <span class="s2">"Installing foreman..."</span>
  gem <span class="nb">install </span>foreman
<span class="k">fi</span>

<span class="c"># Default to port 3000 if not specified</span>
<span class="nb">export </span><span class="nv">PORT</span><span class="o">=</span><span class="s2">"</span><span class="k">${</span><span class="nv">PORT</span><span class="k">:-</span><span class="nv">3000</span><span class="k">}</span><span class="s2">"</span>

<span class="nb">exec </span>foreman start <span class="nt">-f</span> Procfile.dev <span class="s2">"</span><span class="nv">$@</span><span class="s2">"</span>
</code></pre></div></div>

<p>Then, change the file permission to executable.
For example, <code class="language-plaintext highlighter-rouge">chmod 755 bin/dev</code>.</p>

<p>For now, we can start the two development servers by just typing <code class="language-plaintext highlighter-rouge">bin/dev</code>.</p>

<h3 id="create-a-vue-app-mount-point">Create a Vue App Mount Point</h3>

<p>Since it is a Rails app, a controller is responsible to receive HTTP requests.</p>

<div class="language-bash highlighter-rouge"><div class="highlight"><pre class="highlight"><code><span class="nv">$ </span>rails g controller pages index
</code></pre></div></div>

<p>Edit <code class="language-plaintext highlighter-rouge">app/views/pages/index.html.erb</code> to add the mount point.</p>

<pre><code class="language-erbruby">&lt;%= content_tag(:div, "", id:"app") %&gt;
</code></pre>

<p>Edit <code class="language-plaintext highlighter-rouge">config/routes.rb</code> so that the Vue app can be seen at a root path.</p>

<div class="language-ruby highlighter-rouge"><div class="highlight"><pre class="highlight"><code><span class="no">Rails</span><span class="p">.</span><span class="nf">application</span><span class="p">.</span><span class="nf">routes</span><span class="p">.</span><span class="nf">draw</span> <span class="k">do</span>
  <span class="n">root</span> <span class="s1">'pages#index'</span>  <span class="c1"># updated for a Vue app</span>
  <span class="c1"># Define your application routes per the DSL in https://guides.rubyonrails.org/routing.html</span>

  <span class="c1"># Reveal health status on /up that returns 200 if the app boots with no exceptions, otherwise 500.</span>
  <span class="c1"># Can be used by load balancers and uptime monitors to verify that the app is live.</span>
  <span class="n">get</span> <span class="s2">"up"</span> <span class="o">=&gt;</span> <span class="s2">"rails/health#show"</span><span class="p">,</span> <span class="ss">as: :rails_health_check</span>

  <span class="c1"># Defines the root path route ("/")</span>
  <span class="c1"># root "posts#index"</span>
<span class="k">end</span>
</code></pre></div></div>

<h3 id="create-a-vue-app">Create a Vue App</h3>

<p>To make an app creation simple, the Vue app used here is the one create by <code class="language-plaintext highlighter-rouge">bun create vite</code> command.
During the app creation, Vue and JavaScript was selected as a framework and language.</p>

<p>When vite_rails gem is used, an entrypoint file is <code class="language-plaintext highlighter-rouge">app/frontend/entrypoints/application.js</code>.
The file is equivalent to <code class="language-plaintext highlighter-rouge">main.js</code> of the Vue sample app.
Replace whole content of application.js (Rails) by main.js (Vite + Vue)
or add entire main.js (Vite + Vue) to application.js (Rails).</p>

<p>Six files of Vite + Vue app below:</p>

<div class="language-bash highlighter-rouge"><div class="highlight"><pre class="highlight"><code><span class="nv">$ </span>tree src public
src
├── App.vue
├── assets
│   └── vue.svg
├── components
│   └── HelloWorld.vue
├── main.js
└── style.css
public
└── vite.svg

4 directories, 6 files
</code></pre></div></div>

<p>should be mapped to below on Rails:</p>

<div class="language-bash highlighter-rouge"><div class="highlight"><pre class="highlight"><code><span class="nv">$ </span>tree app/frontend
app/frontend
├── App.vue
├── assets
│   └── vue.svg
├── components
│   └── HelloWorld.vue
├── entrypoints
│   ├── application.js
│   └── style.css
└── vite.svg

4 directories, 6 files
</code></pre></div></div>

<p>How to organize directories/files under app/frontend looks not standardized yet.
The vite_rails gem watches all files under app/frontend and reload if necessary.
Above directory structure is just an example.</p>

<h3 id="start-the-app-and-verify-hmr">Start the App and Verify HMR</h3>

<p>Start the servers by:</p>

<div class="language-bash highlighter-rouge"><div class="highlight"><pre class="highlight"><code><span class="nv">$ </span>bin/dev
</code></pre></div></div>

<p>Open http://localhost:3000/ on a browser.
The webpage below should show up.</p>

<p><img width="500px" src="/assets/img/blog/vite_vue_rails.jpeg" alt="img: vite + vue on rails" /></p>

<p>Try editing <code class="language-plaintext highlighter-rouge">app/frontend/App.vue</code> and <code class="language-plaintext highlighter-rouge">app/frontend/components/HelloWorld.vue</code> and
verify HMR (Hot Module Replacement) is working.</p>

<h3 id="references">References</h3>
<ul>
  <li>Vite Ruby: <a href="https://vite-ruby.netlify.app/">https://vite-ruby.netlify.app/</a></li>
  <li>Vue.js Guide: <a href="https://vuejs.org/guide/introduction.html">https://vuejs.org/guide/introduction.html</a></li>
  <li>Build a frontend using Vite and Bun: <a href="https://bun.sh/guides/ecosystem/vite">https://bun.sh/guides/ecosystem/vite</a></li>
  <li><a href="https://dev.to/this-is-learning/why-use-vite-when-bun-is-also-a-bundler-vite-vs-bun-2723">Why use Vite when Bun is also a bundler? - Vite vs. Bun</a></li>
  <li><a href="https://bootrails.com/blog/ruby-on-rails-and-vuejs-tutorial/">Ruby-on-Rails and VueJS tutorial</a></li>
  <li><a href="https://dev.to/chmich/setup-vite-on-rails-7-f1i">Create Rails-7 app with Vite</a></li>
  <li><a href="https://dev.to/jetthoughts/integrating-bun-with-vite-ruby-for-lightning-fast-frontend-builds-1fh2">Integrating Bun with Vite Ruby for Lightning-Fast Frontend Builds</a></li>
  <li><a href="https://clouddevs.com/ruby-on-rails/building-app-with-vuejs-frontend/">Building a Rails App with a Vue.js Frontend</a></li>
  <li><a href="https://medium.com/@oscarreciogonzalez/vue-on-rails-15686b85b1d3">Vue on Rails</a></li>
  <li><a href="https://guillaume.barillot.me/2022/05/05/rails-vite-vue-3-pina-starter-pack/">Rails 7 + Vite + Vue 3 + Pinia starter pack</a></li>
  <li>Source code: <a href="https://github.com/yokolet/rails-vite-vue">https://github.com/yokolet/rails-vite-vue</a></li>
</ul>]]></content><author><name></name></author><category term="Ruby on Rails" /><summary type="html"><![CDATA[Vue.js is one of frontend frameworks gaining popularity among rapidly emerging JavaScript technologies. The combination of Vue.js and Rails is becoming more popular as well, however, Vue.js development on Rails is not so straightforward. The reason would be that Vue.js relies on Vite for a development environment such as HMR (Hot Module Replacement) and bundling.]]></summary></entry><entry><title type="html">Bun + React on Rails</title><link href="/2024/03/bun-react-on-rails.html" rel="alternate" type="text/html" title="Bun + React on Rails" /><published>2024-03-01T06:31:00+00:00</published><updated>2024-03-01T06:31:00+00:00</updated><id>/2024/03/bun-react-on-rails</id><content type="html" xml:base="/2024/03/bun-react-on-rails.html"><![CDATA[<p>In the frontend world, new technologies keep emerging rapidly these years.
Still, React is a well-established and very popular frontend framework,
Vue.js, Svelte, Astro and more frameworks are gaining popularity.
Not just the frameworks, tools for a transpiler/bundler or sort are also under a rapid development.
In JavaScript domain, esbuild, rollup, vite and some more are out.
<!--more-->
Relatively new addition is Bun (<a href="https://bun.sh/">https://bun.sh/</a>).</p>

<p>Bun has multiple features.
It can be used as a package manager, development server, bundler and test runner.
On the website, it says an all-in-one toolkit for JavaScript.
The best advantage of using Bun would be its speed.
Indeed, Bun runs very fast.</p>

<p>Rails supports Bun since version 7.1 as one of JavaScript approaches.
This blog post is about the attempt to create a React app using Bun.</p>

<h4 id="prerequisite">Prerequisite</h4>

<p>Prior to the Rails application creation, <code class="language-plaintext highlighter-rouge">bun</code> command should be installed.
The installation instruction is on the Bun website, <a href="https://bun.sh/docs/installation">https://bun.sh/docs/installation</a>.
The website shows 5 ways to install bun if you have macOS and Linux.
Among those, by curl command, Homebrew and npm would be popular.
Choose whatever you like.</p>

<ul>
  <li>curl
    <div class="language-bash highlighter-rouge"><div class="highlight"><pre class="highlight"><code><span class="nv">$ </span>curl <span class="nt">-fsSL</span> https://bun.sh/install | bash <span class="c"># for macOS, Linux, and WSL</span>
</code></pre></div>    </div>
  </li>
  <li>Homebrew
    <div class="language-bash highlighter-rouge"><div class="highlight"><pre class="highlight"><code><span class="nv">$ </span>brew <span class="nb">install </span>oven-sh/bun/bun <span class="c"># for macOS and Linux</span>
</code></pre></div>    </div>
  </li>
  <li>npm
    <div class="language-bash highlighter-rouge"><div class="highlight"><pre class="highlight"><code><span class="nv">$ </span>npm <span class="nb">install</span> <span class="nt">-g</span> bun <span class="c"># the last `npm` command you'll ever need</span>
</code></pre></div>    </div>
  </li>
</ul>

<p>The Bun website also has an instruction for Windows.</p>

<h4 id="versions">Versions</h4>
<ul>
  <li>Ruby 3.2.3</li>
  <li>Rails 7.1.3.2</li>
</ul>

<h3 id="create-a-rails-app-with-bun-option">Create a Rails App with bun Option</h3>

<p>The command to create an app which uses bun is something like this:</p>

<div class="language-bash highlighter-rouge"><div class="highlight"><pre class="highlight"><code>% rails new <span class="o">[</span>APP NAME] <span class="nt">-j</span> bun <span class="nt">-T</span>
</code></pre></div></div>

<p>Above command installs all including <code class="language-plaintext highlighter-rouge">bun install</code>.
After the installation finishes, change the directory to application and just type <code class="language-plaintext highlighter-rouge">bin/dev</code>.
The Rails should start up.
Verify that by visiting http://localhost:3000/ on a browser.</p>

<p>In early releases of Rail 7.1, some odds were reported to start the Rails.
However, on version 7.1.3.2, all those issues look fixed.
None of extra steps are required to start Rails now.</p>

<h3 id="files-related-to-bun">Files Related to Bun</h3>

<p>Let’s look at files in the Rails application top directory.</p>
<h4 id="bunlockb">bun.lockb</h4>
<p>This file is a lock file equivalent to package-lock.json or yarn.lock.
Unlike a legacy lock file, bun.lockb is a binary file.</p>

<h4 id="bunconfigjs">bun.config.js</h4>
<p>This is a Bun configuration file which defines how Bun builds the application.
When the Rails generator created the file, a build configuration is defined like this:</p>
<div class="language-javascript highlighter-rouge"><div class="highlight"><pre class="highlight"><code><span class="kd">const</span> <span class="nx">config</span> <span class="o">=</span> <span class="p">{</span>
  <span class="na">sourcemap</span><span class="p">:</span> <span class="dl">"</span><span class="s2">external</span><span class="dl">"</span><span class="p">,</span>
  <span class="na">entrypoints</span><span class="p">:</span> <span class="p">[</span><span class="dl">"</span><span class="s2">app/javascript/application.js</span><span class="dl">"</span><span class="p">],</span>
  <span class="na">outdir</span><span class="p">:</span> <span class="nx">path</span><span class="p">.</span><span class="nx">join</span><span class="p">(</span><span class="nx">process</span><span class="p">.</span><span class="nx">cwd</span><span class="p">(),</span> <span class="dl">"</span><span class="s2">app/assets/builds</span><span class="dl">"</span><span class="p">),</span>
<span class="p">};</span>
</code></pre></div></div>

<p>The details of the configuration parameters are explained at <a href="https://bun.sh/docs/bundler#api">https://bun.sh/docs/bundler#api</a>.</p>

<p>For example, to minify output JavaScript files, the configuration will be:</p>
<div class="language-javascript highlighter-rouge"><div class="highlight"><pre class="highlight"><code><span class="kd">const</span> <span class="nx">config</span> <span class="o">=</span> <span class="p">{</span>
  <span class="na">sourcemap</span><span class="p">:</span> <span class="dl">"</span><span class="s2">external</span><span class="dl">"</span><span class="p">,</span>
  <span class="na">entrypoints</span><span class="p">:</span> <span class="p">[</span><span class="dl">"</span><span class="s2">app/javascript/application.js</span><span class="dl">"</span><span class="p">],</span>
  <span class="na">outdir</span><span class="p">:</span> <span class="nx">path</span><span class="p">.</span><span class="nx">join</span><span class="p">(</span><span class="nx">process</span><span class="p">.</span><span class="nx">cwd</span><span class="p">(),</span> <span class="dl">"</span><span class="s2">app/assets/builds</span><span class="dl">"</span><span class="p">),</span>
  <span class="na">minify</span><span class="p">:</span> <span class="kc">true</span><span class="p">,</span>
<span class="p">};</span>
</code></pre></div></div>
<p>We see more than ten configuration APIs on the web page.
However, not many options work seamlessly with Rails.
Suppose the naming setting is changed to <code class="language-plaintext highlighter-rouge">naming: '[dir]/[name]-[hash].[ext]'</code>
(default for the entry is ‘[dir]/[name].[ext]’),
the generated JavaScript file will be something like <code class="language-plaintext highlighter-rouge">application-6da4a92fc66938e4.js</code>.
It looks good at a glance.
However, javascript_include_tag in app/views/layouts/application.html.erb should be changed like
<code class="language-plaintext highlighter-rouge">&lt;%= javascript_include_tag "application-6da4a92fc66938e4", "data-turbo-track": "reload", type: "module" %&gt;</code>.
When the JavaScript file is updated, the hash value will be updated as well.
As a result, the outdir will have multiple <code class="language-plaintext highlighter-rouge">application-[hash].js</code> files.
Also, javascript_include_tag’s filename should be updated accordingly.
Moreover, Rails adds a hash value when the JavaScript file is provided.
It is something like, <code class="language-plaintext highlighter-rouge">application-921e7020b343a6ac4bfb2c1d2302254e1f5ea0fda39e8ee8c38aa17e00d8e0e2.js</code>.</p>

<p>Although Bun configuration API has many options, only few are useful on Rails.</p>

<h4 id="procfiledev">Procfile.dev</h4>

<p>The file is a server setting passed to Foreman.
When the Rails application is created with <code class="language-plaintext highlighter-rouge">-j bun</code> option, the file looks like below:</p>
<div class="language-bash highlighter-rouge"><div class="highlight"><pre class="highlight"><code>web: <span class="nb">env </span><span class="nv">RUBY_DEBUG_OPEN</span><span class="o">=</span><span class="nb">true </span>bin/rails server
js: bun run build <span class="nt">--watch</span>
</code></pre></div></div>

<p>Bun’s <code class="language-plaintext highlighter-rouge">--watch</code> options is explained at Watch mode (<a href="https://bun.sh/docs/runtime/hot">https://bun.sh/docs/runtime/hot</a>).
When the option is specified, Bun watches changes in JavaScript files listed in the entrypoints configuration.
If Bun detects a change, Bun restarts the process.</p>

<p>Another option is <code class="language-plaintext highlighter-rouge">--hot</code>. However, <code class="language-plaintext highlighter-rouge">--hot</code> option works when Bun is used on the server side.
Besides, as above web page explains, the option is not for a hot loading to the browser.
When the JavaScript code is updated, still we need to click browser’s reload button.
The hot loading to the browser will be a job by <a href="https://vitejs.dev/">Vite</a>.</p>

<h3 id="create-a-react-app">Create a React App</h3>

<p>The first step is to install packages.</p>

<div class="language-bash highlighter-rouge"><div class="highlight"><pre class="highlight"><code><span class="nv">$ </span>bun add react react-dom
</code></pre></div></div>

<p>You might be surprised. Bun runs really fast.</p>

<p>Next step is to write React code.
For a simplicity, the React app used here is the one create-react-app package creates.
The app shows a rotating React logo and a couple other messages.
JavaScript code can be used as those are except image and stylesheet imports.
Since the server side is Rails, it’s good and easy to put images and stylesheets in the directories meant to be.
For that reason, the sample app takes idiomatic Rails rather than idiomatic React.</p>

<ul>
  <li>app/javascript/application.js</li>
</ul>

<p>The entrypoint file is index.js on a generated React app, while it is application.js on Rails.
Replace the contents of <code class="language-plaintext highlighter-rouge">app/javascript/application.js</code> by index.js.</p>

<div class="language-javascript highlighter-rouge"><div class="highlight"><pre class="highlight"><code><span class="k">import</span> <span class="nx">React</span> <span class="k">from</span> <span class="dl">'</span><span class="s1">react</span><span class="dl">'</span><span class="p">;</span>
<span class="k">import</span> <span class="nx">ReactDOM</span> <span class="k">from</span> <span class="dl">'</span><span class="s1">react-dom/client</span><span class="dl">'</span><span class="p">;</span>
<span class="k">import</span> <span class="nx">App</span> <span class="k">from</span> <span class="dl">'</span><span class="s1">./App</span><span class="dl">'</span><span class="p">;</span>

<span class="kd">const</span> <span class="nx">root</span> <span class="o">=</span> <span class="nx">ReactDOM</span><span class="p">.</span><span class="nx">createRoot</span><span class="p">(</span><span class="nb">document</span><span class="p">.</span><span class="nx">getElementById</span><span class="p">(</span><span class="dl">'</span><span class="s1">root</span><span class="dl">'</span><span class="p">));</span>
<span class="nx">root</span><span class="p">.</span><span class="nx">render</span><span class="p">(</span>
  <span class="o">&lt;</span><span class="nx">React</span><span class="p">.</span><span class="nx">StrictMode</span><span class="o">&gt;</span>
    <span class="o">&lt;</span><span class="nx">App</span> <span class="o">/&gt;</span>
  <span class="o">&lt;</span><span class="sr">/React.StrictMode</span><span class="err">&gt;
</span><span class="p">);</span>
</code></pre></div></div>

<ul>
  <li>app/javascript/App.js</li>
</ul>

<p>This is an App component. Other than stylesheet and image imports, the code stays the same as React app.</p>

<div class="language-javascript highlighter-rouge"><div class="highlight"><pre class="highlight"><code><span class="kd">function</span> <span class="nx">App</span><span class="p">()</span> <span class="p">{</span>
  <span class="k">return</span> <span class="p">(</span>
    <span class="o">&lt;</span><span class="nx">div</span> <span class="nx">className</span><span class="o">=</span><span class="dl">"</span><span class="s2">App</span><span class="dl">"</span><span class="o">&gt;</span>
      <span class="o">&lt;</span><span class="nx">header</span> <span class="nx">className</span><span class="o">=</span><span class="dl">"</span><span class="s2">App-header</span><span class="dl">"</span><span class="o">&gt;</span>
        <span class="o">&lt;</span><span class="nx">img</span> <span class="nx">src</span><span class="o">=</span><span class="dl">"</span><span class="s2">/assets/logo.svg</span><span class="dl">"</span> <span class="nx">className</span><span class="o">=</span><span class="dl">"</span><span class="s2">App-logo</span><span class="dl">"</span> <span class="nx">alt</span><span class="o">=</span><span class="dl">"</span><span class="s2">logo</span><span class="dl">"</span> <span class="o">/&gt;</span>
        <span class="o">&lt;</span><span class="nx">p</span><span class="o">&gt;</span>
          <span class="nx">Edit</span> <span class="o">&lt;</span><span class="nx">code</span><span class="o">&gt;</span><span class="nx">src</span><span class="o">/</span><span class="nx">App</span><span class="p">.</span><span class="nx">js</span><span class="o">&lt;</span><span class="sr">/code&gt; and save to reload</span><span class="err">.
</span>        <span class="o">&lt;</span><span class="sr">/p</span><span class="err">&gt;
</span>        <span class="o">&lt;</span><span class="nx">a</span>
          <span class="nx">className</span><span class="o">=</span><span class="dl">"</span><span class="s2">App-link</span><span class="dl">"</span>
          <span class="nx">href</span><span class="o">=</span><span class="dl">"</span><span class="s2">https://reactjs.org</span><span class="dl">"</span>
          <span class="nx">target</span><span class="o">=</span><span class="dl">"</span><span class="s2">_blank</span><span class="dl">"</span>
          <span class="nx">rel</span><span class="o">=</span><span class="dl">"</span><span class="s2">noopener noreferrer</span><span class="dl">"</span>
        <span class="o">&gt;</span>
          <span class="nx">Learn</span> <span class="nx">React</span>
        <span class="o">&lt;</span><span class="sr">/a</span><span class="err">&gt;
</span>      <span class="o">&lt;</span><span class="sr">/header</span><span class="err">&gt;
</span>    <span class="o">&lt;</span><span class="sr">/div</span><span class="err">&gt;
</span>  <span class="p">);</span>
<span class="p">}</span>

<span class="k">export</span> <span class="k">default</span> <span class="nx">App</span><span class="p">;</span>
</code></pre></div></div>

<ul>
  <li>index.css, App.css and logo.svg</li>
</ul>

<p>Copy two css files under app/assets/stylesheets. No need to edit those.
Also, copy logo.svg under app/assets/images.</p>

<p>The directory structures become look like below.</p>

<div class="language-plaintext highlighter-rouge"><div class="highlight"><pre class="highlight"><code>app/javascript
├── App.js
├── application.js
└── controllers
    ├── application.js
    ├── hello_controller.js
    └── index.js

2 directories, 5 files
</code></pre></div></div>

<div class="language-plaintext highlighter-rouge"><div class="highlight"><pre class="highlight"><code>app/assets
├── builds
│   ├── application.js
│   └── application.js.map
├── config
│   └── manifest.js
├── images
│   └── logo.svg
└── stylesheets
    ├── App.css
    ├── application.css
    └── index.css

5 directories, 7 files
</code></pre></div></div>

<h3 id="create-a-mount-point">Create a Mount Point</h3>

<p>Since this is a Rails app, a controller is responsible to receive HTTP requests.
To show the React app on a browser, the controller for that should be created along with a view.</p>

<div class="language-bash highlighter-rouge"><div class="highlight"><pre class="highlight"><code><span class="nv">$ </span>rails g controller pages index
</code></pre></div></div>

<p>Above command creates a controller and view, also adds a new route in config/routes.rb</p>

<ul>
  <li>app/view/pages/index.html.erb</li>
</ul>

<p>In the app/javascript/application.js, “root” is specified as a mount point.
Add a div tag in the index.html.erb file.</p>

<div class="language-html highlighter-rouge"><div class="highlight"><pre class="highlight"><code><span class="nt">&lt;h1&gt;</span>Pages#index<span class="nt">&lt;/h1&gt;</span>
<span class="nt">&lt;p&gt;</span>Find me in app/views/pages/index.html.erb<span class="nt">&lt;/p&gt;</span>
<span class="nt">&lt;</span><span class="err">%=</span> <span class="na">content_tag</span><span class="err">(</span><span class="na">:div</span><span class="err">,</span> <span class="err">"",</span> <span class="na">id:</span><span class="err">"</span><span class="na">root</span><span class="err">")</span> <span class="err">%</span><span class="nt">&gt;</span>
</code></pre></div></div>

<h3 id="run-the-app">Run the app</h3>

<p>All are ready. Let’s run the app.</p>

<div class="language-bash highlighter-rouge"><div class="highlight"><pre class="highlight"><code><span class="nv">$ </span>bin/dev
</code></pre></div></div>

<p>Then go to http://localhost:3000/pages/index on the browser.
The React app shows up.</p>

<p><img width="300px" src="/assets/img/blog/rails-bun-react.jpeg" alt="img: bun + react on rails" /></p>

<h3 id="references">References</h3>
<ul>
  <li><a href="https://bun.sh/docs">https://bun.sh/docs</a></li>
  <li><a href="https://webcrunch.com/posts/bun-with-ruby-on-rails">How to use Bun with Ruby on Rails</a></li>
  <li>Sample code: <a href="https://github.com/yokolet/rails-bun-react">https://github.com/yokolet/rails-bun-react</a></li>
</ul>]]></content><author><name></name></author><category term="Ruby on Rails" /><summary type="html"><![CDATA[In the frontend world, new technologies keep emerging rapidly these years. Still, React is a well-established and very popular frontend framework, Vue.js, Svelte, Astro and more frameworks are gaining popularity. Not just the frameworks, tools for a transpiler/bundler or sort are also under a rapid development. In JavaScript domain, esbuild, rollup, vite and some more are out.]]></summary></entry></feed>